
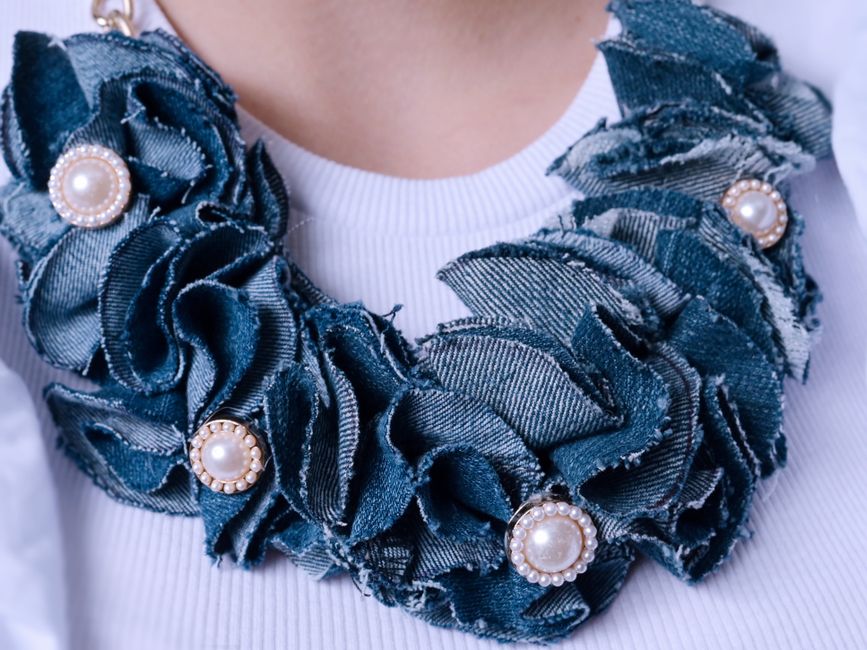
DIY Fabric Necklace Tutorial: Unleash Your Inner Designer with Jenni’s Easy Method
Creating unique and stylish accessories is a rewarding endeavor, and a DIY fabric necklace offers a fantastic opportunity to personalize your look and explore your creativity. This comprehensive tutorial, inspired by Jenni’s accessible approach, will guide you through the process of crafting a beautiful and eye-catching fabric necklace. Whether you’re a seasoned crafter or a complete beginner, this method is designed to be straightforward and enjoyable, yielding stunning results. We’ll delve into material selection, essential tools, step-by-step construction, and even offer tips for customization and troubleshooting, ensuring you have all the knowledge needed to create a fabric necklace that truly reflects your individual style. From simple braids to more intricate designs, the possibilities are endless, making this a project perfect for gifting or adding a personal touch to your own wardrobe.
The foundation of any successful fabric necklace project lies in the careful selection of your materials. For this tutorial, we’ll be focusing on using various types of fabric to achieve different textures and visual appeals. Cotton fabrics are an excellent choice for beginners due to their stability, ease of cutting, and wide availability in a plethora of colors and patterns. Quilting cottons, in particular, offer a great balance of durability and a pleasing drape. For a more luxurious feel, consider incorporating silk or satin strips. These fabrics, while more slippery to work with, will lend an elegant sheen to your necklace. Linen offers a more rustic and natural aesthetic, perfect for bohemian-inspired designs. Alternatively, consider using remnants of old clothing, such as t-shirts, jeans, or even delicate blouses. Repurposing fabric not only adds a unique, sentimental element to your creation but is also an environmentally conscious choice. When choosing fabrics, think about how their colors and patterns will interact. Contrasting colors can create bold statements, while analogous colors will produce a more harmonious and subtle effect. Don’t be afraid to mix and match different textures; a combination of a smooth silk with a rougher linen can add significant visual interest. The width of your fabric strips will also impact the final look. Wider strips will create a chunkier, more statement-making necklace, while narrower strips will result in a more delicate and intricate piece. Consider experimenting with varying widths within the same necklace for added dynamism. For a polished finish, ensure your chosen fabrics are pre-washed and ironed to remove any wrinkles and to prevent shrinkage after your necklace is complete. This simple step is crucial for a professional-looking outcome.
Beyond the fabric itself, several essential tools will facilitate the creation of your DIY fabric necklace. First and foremost is a sharp pair of fabric scissors. Dull scissors can snag and fray your fabric, leading to an uneven and unprofessional finish. Investing in a good quality pair will make a significant difference in the ease and quality of your cutting. A rotary cutter and a cutting mat are also highly recommended, especially if you plan to cut multiple strips of fabric to the same width. This combination offers precision and speed, ensuring all your fabric pieces are uniform. A ruler or measuring tape is indispensable for accurately measuring your fabric strips and determining the desired length of your necklace. For marking your fabric, tailor’s chalk or a fabric marker will be invaluable. These tools allow for precise lines that can be easily removed after cutting or sewing. If your design involves any sewing, a sewing machine will greatly expedite the process, though hand-sewing is also a viable option for those without a machine. For hand-sewing, you’ll need a set of sharp needles and a good quality thread that matches or complements your fabric. A seam ripper is also a helpful tool to have on hand for correcting any mistakes. You might also consider using fabric glue as an alternative or supplement to sewing, particularly for securing ends or attaching embellishments. Fabric glue offers a quick and strong bond without the need for needles and thread. Finally, consider accessories like beads, charms, or pendants. These can be threaded onto your fabric strips or attached to the finished necklace to further personalize your design. Embroidery floss or strong cord might also be useful for threading beads or creating decorative elements.
The construction of your DIY fabric necklace, following Jenni’s adaptable method, can be approached in several ways, depending on the desired aesthetic. The most fundamental technique involves creating fabric strips and then joining them. Begin by cutting your chosen fabrics into strips of your desired width. For a typical necklace, strips ranging from 1 to 3 inches wide are common, but feel free to experiment. The length of your strips will depend on the overall length of your necklace and how you plan to incorporate them – be it braided, twisted, or simply layered. Once you have your strips, you can begin assembling your necklace.
Method 1: The Braided Fabric Necklace
This is a classic and versatile approach. Take three fabric strips of equal width and length. Align the ends and secure them together at one end using a knot, a stitch, or a small piece of tape. Begin braiding the three strips together, similar to braiding hair. Maintain consistent tension throughout the braiding process to ensure an even and attractive result. As you braid, you can introduce new fabric strips by tapering the end of an existing strip and overlapping it with the beginning of a new one, securing with stitches or glue. Continue braiding until you reach your desired necklace length. To finish, tie off the end securely or sew it to create a loop for closure. You can also add beads or charms by threading them onto the braid as you go or by attaching them to the finished braid.
Method 2: The Twisted Fabric Necklace
This method creates a more fluid and bohemian look. Cut two or more fabric strips of varying widths and lengths. Twist each strip individually. To do this, hold one end of the strip and twist the fabric tightly, then allow it to coil naturally. You can then combine these twisted strips by braiding them together or by simply twisting them around each other in a complementary fashion. Secure the ends as you would with the braided necklace. This technique allows for a dynamic interplay of textures and colors.
Method 3: The Layered Fabric Necklace
This approach is ideal for showcasing different patterns and textures. Cut several fabric strips of varying widths and lengths. You can fray the edges of some strips for a rustic look. Layer these strips on top of each other, arranging them artistically. Secure them together by stitching them at one or multiple points along their length. You can create a central focal point by layering a wider strip and then adding narrower strips around it. Alternatively, you can sew or glue the strips together along their entire length to create a wider fabric band. This method is also excellent for incorporating embellishments like buttons or larger beads.
Method 4: The Fabric Rope Necklace
This method results in a more substantial and sturdy necklace. Cut a long fabric strip, approximately 1-2 inches wide. Fold the strip in half lengthwise. Now, you have a double-layered strip. Begin twisting this folded strip tightly. Once twisted, allow it to coil naturally into a rope-like structure. Secure the ends with stitches or fabric glue. You can create a thicker rope by using wider strips or by twisting multiple folded strips together. This method is excellent for a minimalist and modern aesthetic.
When it comes to finishing your fabric necklace, several options can elevate its professional appeal. If you’ve opted for braided or twisted techniques, you’ll need to secure the ends. This can be achieved by sewing the ends together, creating a loop for a clasp, or by tying a secure knot. If using fabric glue, ensure it’s a strong fabric adhesive and allow ample drying time. For a more polished look, you can create a fabric casing to enclose the raw ends. This involves folding a small piece of fabric and stitching it around the end of your necklace. Another option for finishing is to attach a clasp. Various types of clasps are available, including lobster clasps, toggle clasps, and magnetic clasps. Attaching a clasp will make your necklace adjustable and easier to wear. You can also create a simple tie closure using fabric ribbons or cords. For beaded embellishments, thread them onto your fabric strips before or during the construction process, or use a needle and thread to attach them securely to the finished necklace. Charms and pendants can be attached using jump rings or by directly sewing them onto the fabric. Consider adding a fringed edge by cutting the ends of your fabric strips into thin fringes. This adds a playful and bohemian touch. Experiment with different finishing techniques to find what best suits your design and personal style.
Customization is where your DIY fabric necklace truly comes to life, allowing you to express your unique taste. Beyond the fabric choices and construction methods, consider incorporating embellishments. Beads are a fantastic addition. From tiny seed beads to chunky wooden beads, their size, color, and material can dramatically alter the necklace’s aesthetic. Thread them onto your fabric strips as you braid or twist, or sew them directly onto the finished piece. Charms and pendants offer another layer of personalization. Choose them based on your interests, hobbies, or personal symbolism. They can be hung from the center of the necklace, along its length, or even clustered together for a statement piece. Buttons, both vintage and modern, can also be incorporated. Sew them onto the fabric, use them as a closure, or even create a patterned effect with a collection of buttons. Embroidery can add intricate details and textures. Stitching patterns, monograms, or simple decorative lines onto your fabric strips before assembly can create a truly bespoke piece. Consider using contrasting thread colors for a bolder effect. Fabric paint or markers can also be used to add designs, patterns, or even hand-drawn elements to your fabric before or after construction. For a softer, more tactile feel, consider adding tassels or pom-poms. These can be purchased ready-made or easily crafted from yarn or fabric scraps. Fringing, as mentioned earlier, is another simple yet effective way to add visual interest and texture. When considering embellishments, think about the overall style you’re aiming for. A bohemian necklace might benefit from wooden beads, charms, and fringing, while a more elegant piece might incorporate pearls, delicate charms, and fine chain accents. Don’t be afraid to mix and match different embellishment types to create a truly unique and layered look. The key is to maintain a sense of balance and cohesion within your design.
Troubleshooting is an inevitable part of any crafting process, and your DIY fabric necklace is no exception. One common issue is uneven fabric strips. If your strips are not consistent in width, your braid or twist may appear lopsided. To fix this, carefully trim any uneven edges with sharp scissors or a rotary cutter. If you’re using a sewing machine and experiencing skipped stitches or thread breaks, check that your needle is sharp and appropriate for the fabric type. Ensure your bobbin is wound correctly and that your tension settings are accurate. If your fabric is fraying excessively, consider using a fray-checking product, or opt for fabrics that naturally resist fraying, such as knit fabrics, or those with a tighter weave. When using fabric glue, ensure you’re using an appropriate fabric adhesive and follow the manufacturer’s instructions for application and drying time. Over-application of glue can lead to stiff and unsightly results, while under-application may result in the bond failing. If your necklace feels too stiff or too flimsy, adjust the width and thickness of your fabric strips. Wider, heavier fabrics will create a more substantial necklace, while narrower, lighter fabrics will result in a more delicate piece. If your braids or twists are becoming loose, try to maintain consistent tension as you work. If you’ve made a mistake and need to undo a section, a seam ripper is your best friend for hand-sewing, or you can carefully unpick stitches with your sewing machine. For braided or twisted sections, it’s often easier to unravel the section and start again to ensure a clean finish. If your embellishments are not staying put, use a strong fabric glue or secure them with multiple stitches. When attaching clasps, ensure they are securely fastened to the fabric ends. If the fabric is too thin, reinforce it with a small piece of interfacing or a few extra stitches before attaching the clasp. Patience is key. Don’t rush the process, and if something isn’t looking right, take a step back, assess the issue, and make the necessary adjustments.
The beauty of this DIY fabric necklace tutorial lies in its adaptability and the endless creative avenues it opens. From sourcing unique fabrics to mastering intricate braiding techniques and adding personalized embellishments, each step contributes to a finished piece that is both stylish and deeply personal. By understanding the fundamental principles of fabric manipulation and employing a thoughtful approach to material selection and construction, you can create a stunning fabric necklace that is sure to become a cherished accessory. Whether you’re looking to add a pop of color to your everyday attire, craft a unique gift for a loved one, or simply explore your creative potential, this fabric necklace tutorial provides a robust framework for success. The SEO-friendly nature of this guide ensures that crafters searching for accessible and inspiring DIY projects will find valuable information, making Jenni’s method a go-to resource for anyone looking to embark on their fabric jewelry-making journey. The potential for customization means that no two fabric necklaces will ever be exactly alike, encouraging experimentation and a truly individual artistic expression. The focus on clear instructions and practical advice empowers crafters of all skill levels to achieve professional-looking results, fostering confidence and a desire to explore further creative endeavors in the world of textile crafts.

