DIY pressed plants photo frames offer a beautiful and unique way to bring a touch of nature into your home décor. This project allows you to showcase your creativity while incorporating the beauty of pressed botanicals. The process is surprisingly simple, requiring only a few basic materials and a little patience.
Pressed plants add a delicate and timeless charm to any space. Their natural textures and colors create a sense of tranquility and serenity, making them perfect for adding a touch of the outdoors to your home. Whether you’re a seasoned crafter or a beginner, creating a pressed plant photo frame is a rewarding experience that allows you to connect with nature and personalize your décor.
Introduction to Pressed Plant Photo Frames
Pressed plant photo frames are a unique and beautiful way to add a touch of nature to your home décor. These frames feature real, pressed plants incorporated into the design, creating a stunning and natural display for your cherished photographs.
The appeal of incorporating natural elements into home décor lies in their ability to bring a sense of peace, tranquility, and connection to the outdoors. The use of pressed plants, in particular, offers a subtle yet impactful way to achieve this, adding a touch of organic beauty to your space.
Benefits of Using Pressed Plants in Crafting Projects, Diy pressed plants photo frame
Pressed plants offer numerous benefits for crafting projects, making them a versatile and appealing material for DIY enthusiasts.
- Unique and Natural Beauty:Pressed plants provide a unique and natural element that can enhance the aesthetic appeal of any craft project. Their intricate patterns and textures add a touch of organic beauty that is difficult to replicate with other materials.
- Sustainability:Using pressed plants in your crafts promotes sustainability by repurposing natural materials. This is a great way to reduce waste and embrace eco-friendly practices.
- Versatility:Pressed plants can be incorporated into a wide range of crafting projects, from photo frames and greeting cards to jewelry and home décor accents. Their adaptability makes them a valuable asset for creative individuals.
- Easy to Use:Pressed plants are relatively easy to work with, making them an accessible material for crafters of all skill levels. They can be easily glued, adhered, or incorporated into various craft techniques.
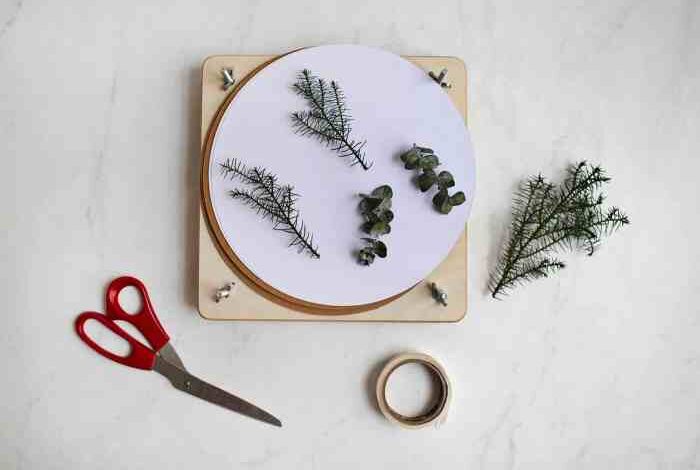
Materials and Tools
Before you dive into crafting your pressed plant photo frame, you’ll need to gather the essential materials and tools. These items are your creative companions, enabling you to transform your botanical treasures into stunning artwork.
Materials for Pressed Plant Photo Frames
The materials you choose will influence the final look and feel of your pressed plant photo frame. Explore these options to find the perfect combination for your vision.
I love the idea of a DIY pressed plants photo frame, it’s such a unique and personal way to display memories. But I’ve also been thinking about adding a touch of magic to my framed photos, and that’s where the idea of a light up photo frame comes in.
Imagine a glowing pressed flower arrangement, a subtle and beautiful way to add a touch of whimsy to any room.
| Materials | Description | Alternative Options | Purchase Links |
|---|---|---|---|
| Pressed Plants | The heart of your frame, choose plants with interesting textures, colors, and shapes. | Dried flowers, leaves, ferns, grasses, mosses | Local flower shops, online botanical suppliers |
| Photo Frame | The foundation for your artwork. Select a frame with a clear glass or acrylic front. | Wooden frames, metal frames, plastic frames | Craft stores, online retailers |
| Cardstock or Paper | Provides a backdrop for your pressed plants and protects the frame’s surface. | Construction paper, patterned paper, fabric | Craft stores, office supply stores |
| Adhesive | Secures the pressed plants to the backing paper. | Glue stick, double-sided tape, craft glue | Craft stores, office supply stores |
| Scissors | For trimming and shaping the pressed plants and backing paper. | Craft knife, rotary cutter | Craft stores, office supply stores |
| Ruler | Ensures precise measurements for cutting and arranging the pressed plants. | Measuring tape | Craft stores, office supply stores |
Pressing Plants for Framing: Diy Pressed Plants Photo Frame
Pressing plants is a crucial step in creating beautiful and long-lasting pressed plant photo frames. It involves flattening and preserving the plant’s natural beauty, allowing you to enjoy its delicate details for years to come. By following the right techniques, you can ensure your pressed plants retain their vibrant colors and intricate textures.
Selecting and Preparing Plants
Choosing the right plants is essential for successful pressing. Opt for plants with thin stems and leaves, as they flatten more easily. Avoid plants with thick, fleshy leaves or stems, as they may rot during the pressing process. Additionally, consider the seasonality of your chosen plants, as their colors and textures will vary throughout the year.Before pressing, gently clean your plants to remove any dirt or debris.
I love the idea of incorporating pressed plants into a DIY photo frame. It’s a great way to add a touch of nature and personality to your decor. And speaking of adding a personal touch, if you’re looking for a unique way to spread holiday cheer, why not try making your own holiday cards?
This website has some great ideas for creating personalized cards. Once you’ve finished your cards, you could even use your pressed plants to decorate the envelopes for a truly special touch.
A soft brush or damp cloth can be used for this purpose. It’s also important to trim any excess stems or leaves that might interfere with the pressing process.
Pressing Plants
There are several methods for pressing plants, each with its own advantages.
Using a Plant Press
A plant press is a specialized tool designed for pressing plants. It consists of two flat boards with absorbent paper placed between them. The boards are secured with straps or clamps, applying pressure to the plants.
- Place your cleaned plants between sheets of absorbent paper, ensuring they are spread out evenly. Avoid overcrowding, as this can hinder drying and lead to mold.
- Insert the paper stacks between the boards of the plant press, ensuring the pressure is evenly distributed.
- Secure the boards tightly with straps or clamps. This pressure will flatten and dry the plants.
Alternative Pressing Methods
If you don’t have a plant press, you can use alternative methods to press your plants.
- Heavy Books:Place your plants between sheets of absorbent paper and stack heavy books on top. This method requires frequent checking and paper changes to prevent mold.
- Picture Frame:Place your plants between two pieces of glass or acrylic in a picture frame. This method works well for small, delicate plants, but requires a frame with a tight seal to prevent moisture buildup.
Drying Time and Preservation
The drying time for pressed plants depends on the thickness and type of plant, as well as the pressing method used. Generally, it takes 2-4 weeks for plants to dry completely. It’s crucial to keep the pressed plants in a dry and well-ventilated area during this time.
Avoid exposing them to direct sunlight or excessive heat, as this can cause discoloration. Once the plants are completely dry, they can be stored in a cool, dark place. For long-term preservation, consider storing them in airtight containers with silica gel packets to absorb any remaining moisture.
I’ve been wanting to make a DIY pressed plants photo frame for a while now, and I finally got around to it this weekend. I love the idea of incorporating nature into my home decor, and pressed plants are a beautiful and unique way to do that.
I was inspired by the Tate’s collection of William Blake’s work, which is full of stunning botanical imagery. I think the intricate details of his drawings would be a great complement to the delicate beauty of pressed plants.
So, I’m going to try and capture that same sense of detail and wonder in my own DIY project.
Designing and Creating the Frame
Now that you have your pressed plants ready, it’s time to get creative and design your frame! This is where you can truly personalize your project and showcase your artistic flair. You can choose from a variety of frame designs, from simple and elegant to bold and eye-catching, depending on the overall aesthetic you’re going for.
Frame Design Ideas
The possibilities are endless when it comes to designing a frame for your pressed plants. Here are a few ideas to get you started:
- Classic Minimalist Frame:For a simple and elegant look, opt for a classic frame with a thin, black or white molding. This will allow the pressed plants to be the main focus of the piece.
- Rustic Wood Frame:A rustic wood frame adds warmth and charm to any decor. Choose a frame with a natural finish or stain it to match your existing furniture.
- Geometric Frame:For a modern and contemporary look, consider a frame with geometric shapes, such as a hexagon or a square.
- Custom-Made Frame:If you’re feeling adventurous, you can even create your own frame using materials like cardboard, wood, or even recycled materials.
Arranging Pressed Plants within the Frame
Once you have your frame, it’s time to arrange your pressed plants. Here are some tips for creating a visually appealing arrangement:
- Consider the Shape and Size of the Plants:Use a variety of shapes and sizes to create visual interest. For example, you could use large leaves as a backdrop for smaller flowers.
- Experiment with Different Layouts:Try different arrangements until you find one that you like. You can create a symmetrical or asymmetrical design, or even use a free-flowing style.
- Use Negative Space:Don’t be afraid to leave some empty space in the frame. This will help to balance the composition and create a sense of calm.
Securing Pressed Plants
Once you’ve arranged your plants, you need to secure them in place. There are several methods you can use:
- Adhesive:You can use a clear, archival-quality adhesive to attach the pressed plants to the frame’s backing. This method is best for delicate plants that may be easily damaged by other methods.
- Double-Sided Tape:Double-sided tape is a good option for securing plants to the frame’s backing. Be sure to use a tape that is acid-free and archival quality to prevent damage to the plants.
- Mounting Paper:If you’re using a frame with a mat, you can mount the pressed plants to a piece of acid-free mounting paper and then place the paper in the mat. This method is good for creating a more professional look.
- Framing Supplies:Most framing stores sell specialized supplies for securing pressed plants, such as plant weights and plant corners. These supplies can help to keep your plants flat and in place.
Finishing Touches and Display

Adding finishing touches to your pressed plant photo frame can elevate its aesthetic appeal and make it a truly unique piece. Whether you prefer a minimalist look or a more elaborate design, there are plenty of creative ways to personalize your frame.
Adding Finishing Touches
Adding embellishments to your pressed plant photo frame can enhance its visual appeal and create a personalized touch. Here are some ideas:
- Ribbons and Twine:A simple ribbon or twine tied around the frame can add a touch of elegance or rustic charm. Choose colors and textures that complement the pressed plants and the overall style of your frame.
- Dried Flowers and Herbs:Incorporate additional dried flowers or herbs around the pressed plants to create a more complex and layered composition. This can add texture and color to your design.
- Beads and Charms:Small beads or charms can be used to add a touch of sparkle or whimsy. Select beads and charms that complement the theme of your pressed plant frame.
- Painted Details:A touch of paint can add a unique touch to your frame. You can paint the edges of the frame, add a delicate pattern, or even create a custom background for the pressed plants.
Displaying Your Pressed Plant Photo Frame
There are many ways to display your pressed plant photo frame, both in your home and as a gift. Here are some ideas:
- On a Shelf or Mantel:A pressed plant photo frame can add a touch of nature to any shelf or mantel. Choose a frame size that complements the space and style of your home.
- On a Desk or Nightstand:A small pressed plant photo frame can be a beautiful addition to a desk or nightstand. It can serve as a decorative element or a reminder of nature.
- As a Gift:A pressed plant photo frame is a unique and thoughtful gift for any occasion. It can be personalized with a special message or a personal touch.
- In a Gallery Wall:Pressed plant photo frames can be incorporated into a gallery wall to create a cohesive and eclectic display. Mix and match different frame styles and sizes to create a visually appealing arrangement.
Maintaining the Longevity of Your Pressed Plant Frame
To ensure your pressed plant photo frame remains beautiful for years to come, it’s important to follow a few simple maintenance tips:
- Avoid Direct Sunlight:Prolonged exposure to direct sunlight can cause the pressed plants to fade. Place your frame in a location that receives indirect sunlight or artificial light.
- Keep Away from Moisture:Moisture can damage the pressed plants and the frame itself. Avoid placing your frame in humid environments or areas where it may come into contact with water.
- Dust Regularly:Dust can accumulate on the frame and pressed plants, dulling their appearance. Use a soft cloth or brush to dust your frame regularly.
Variations and Creative Ideas
The beauty of pressed plant photo frames lies in their versatility. You can experiment with different materials, techniques, and designs to create truly unique pieces that reflect your personal style. Let’s explore some creative ways to elevate your pressed plant framing game.
Alternative Materials and Techniques
Using pressed plants for framing is a great way to create unique and beautiful decor. But what if you want to go beyond the traditional frame? There are several alternative materials and techniques you can explore.
- Resin Art: Combine pressed plants with resin to create stunning, three-dimensional pieces. Resin is a clear, epoxy-like substance that hardens to a glossy finish. You can embed pressed plants within resin, creating a beautiful and durable display.
- Woodworking: Create custom frames from reclaimed wood or other sustainable materials.
This adds a rustic and natural element to your pressed plant artwork.
- Clay and Ceramics: Incorporate pressed plants into clay or ceramic pieces. You can create decorative tiles, coasters, or even small sculptures. The pressed plants will become part of the ceramic piece, adding a unique texture and visual appeal.
- Metalwork: For a more modern look, consider framing your pressed plants with metal. You can use copper, brass, or even recycled aluminum. Metal frames offer a sleek and contemporary feel, contrasting beautifully with the delicate nature of pressed plants.
Incorporating Different Types of Flora and Natural Elements
While pressed flowers are a popular choice, there are many other types of flora and natural elements that can be incorporated into your frames.
- Grasses and Ferns: Their delicate textures and unique shapes add a touch of wildness and natural beauty to your frames.
- Leaves and Twigs: Use a variety of leaves, from broad-leaved trees to delicate ferns, to create intricate patterns and textures.
- Mosses and Lichens: These can add a touch of green and a sense of texture to your frames.
- Seeds and Pods: Incorporate dried seeds, pods, and berries for a touch of color and whimsy.
- Sea Shells and Sand: For a coastal theme, incorporate seashells and sand into your pressed plant frames.
Personalized Frames for Specific Occasions or Themes
Pressed plant frames can be personalized to suit specific occasions or themes.
- Wedding Frames: Use pressed flowers from the wedding bouquet or ceremony decorations to create a sentimental keepsake.
- Birthday Frames: Incorporate flowers that represent the person’s birth month or favorite colors.
- Holiday Frames: Use pressed leaves and berries to create a festive frame for Thanksgiving or Christmas.
- Seasonal Frames: Capture the beauty of different seasons by using pressed leaves, flowers, and grasses that are representative of each season.