DIY seed bead earrings are a fantastic way to unleash your creativity and craft stunning jewelry pieces. The possibilities are endless when it comes to designing and making your own earrings. From simple and elegant to bold and colorful, you can personalize your style with unique creations that reflect your individual taste.
The beauty of seed bead earrings lies in their versatility. You can choose from a wide array of colors, shapes, and sizes of beads to create earrings that match any outfit or occasion. The process itself is incredibly rewarding, allowing you to experiment with different techniques and patterns while creating something truly special.
Introduction to DIY Seed Bead Earrings
Crafting your own seed bead earrings is a rewarding and creative endeavor that allows you to express your personal style and create unique pieces of jewelry. This DIY project is perfect for individuals of all skill levels, from beginners to seasoned crafters, offering a delightful blend of artistry and relaxation.
Making DIY seed bead earrings is a fun and affordable way to express your creativity. It’s a great way to unwind after a long day and you can create unique pieces that reflect your personal style. But, as we delve deeper into the world of technology, we have to ask ourselves: can we afford AI ?
The cost of developing and implementing AI is substantial, and it raises questions about accessibility and equity. Perhaps, like seed bead earrings, AI can be democratized, making it available to all.
Versatility and Creativity, Diy seed bead earrings
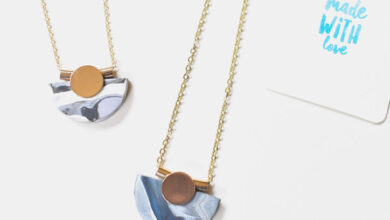
The beauty of seed bead earrings lies in their versatility. You can experiment with countless colors, shapes, and sizes of beads to create earrings that reflect your individual style and preferences. Whether you prefer minimalist designs or bold statement pieces, the possibilities are endless.
You can create earrings that complement your wardrobe, match specific outfits, or express your mood.
Benefits of DIY Seed Bead Earrings
Making your own jewelry offers numerous advantages, including:
- Cost Savings:Purchasing pre-made earrings can be expensive, but crafting your own allows you to create multiple pairs for a fraction of the cost. You can also choose high-quality materials that are durable and long-lasting.
- Personalization:The most significant benefit of DIY jewelry is the ability to personalize your creations. You can choose colors, patterns, and designs that reflect your unique taste and personality.
- Creative Outlet:Crafting your own earrings provides a fulfilling creative outlet, allowing you to express your artistic side and bring your ideas to life.
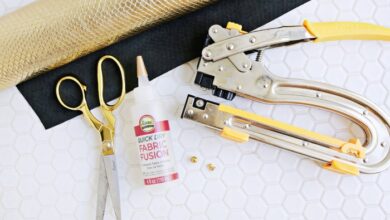
Materials and Tools
Crafting your own seed bead earrings is a fun and rewarding experience, and having the right materials and tools is crucial for success. This section will guide you through the essentials for creating beautiful and unique earrings.
Materials
A variety of materials are needed for creating seed bead earrings. These include:
- Seed Beads: These are the primary element of your earrings. They come in various sizes, colors, and finishes, offering endless creative possibilities.
- Wire: Wire is used for stringing beads and shaping earring components. Choose a wire that is strong enough to hold the weight of your beads, yet flexible enough for easy manipulation.
- Findings: These are the components that connect the beadwork to your earring hooks. Common findings include:
- Earring Hooks: These are the metal loops that attach to your earlobes.
- Jump Rings: Small, circular rings used to connect different components.
- Headpins: Short, straight wires with a rounded head, used to create decorative elements.
Making DIY seed bead earrings is a great way to express your creativity and add a personal touch to your look. The process reminds me of another crafty project I recently tried – a stitched photo art project where I used thread to create intricate designs on a photograph.
Both projects involve a lot of patience and precision, and the results are truly rewarding. Just like stitching a photo, stringing beads together allows you to create beautiful patterns and textures that are unique to you.
- Bead Tips: Small metal caps that cover the ends of wires, preventing fraying and adding a polished finish.
Tools
The right tools make your beading experience smoother and more enjoyable.
I’ve been on a DIY kick lately, making everything from crocheted blankets to these adorable seed bead earrings. I’m always looking for inspiration, and recently stumbled across a great article on gamesbeat profile samsung next that got me thinking about new color combinations for my beadwork.
The article discussed Samsung’s commitment to gaming, which made me realize how much I love playing mobile games while I’m working on my projects! Maybe I should make some gaming-themed earrings next.
- Beading Needles: These are specialized needles with a blunt point and a large eye, designed to thread seed beads easily.
- Pliers: A set of pliers is essential for working with wire and findings.
- Round Nose Pliers: Used to shape wire into loops and curves.
- Chain Nose Pliers: For holding and manipulating small components.
- Flat Nose Pliers: For flattening wire ends and securing findings.
- Wire Cutters: Used to cut wire to the desired length.
- Beading Board: A beading board provides a smooth surface for organizing beads and findings, making it easier to work with small components.
Basic Beading Techniques

Mastering a few basic beading techniques is essential for creating beautiful and durable seed bead earrings. These techniques are the foundation for more intricate designs and allow you to express your creativity with confidence.
Stringing Beads
Stringing beads is the simplest beading technique, but it’s crucial for creating earrings. It involves threading beads onto a string or wire.
Stringing beads is like creating a necklace for your earrings, laying the foundation for your design.
Here’s a step-by-step guide:
- Choose your string or wire.Nylon thread, beading wire, or fishing line are common choices. Consider the weight of the beads and the desired look. Nylon thread is flexible and easy to work with, beading wire is strong and durable, and fishing line is nearly invisible.
- Cut your string or wire to the desired length.Leave extra length for knotting and attaching findings.
- Thread your beads onto the string or wire.Start with the largest beads first, then work your way down to the smallest.
- Secure the end of your string or wire.Tie a knot or use a crimp bead to secure the end.
Common Mistakes and Tips:
- Using the wrong string or wire.Choose a string or wire that’s strong enough to hold the weight of your beads.
- Not securing the end properly.A loose knot or unsecured crimp bead can cause your beads to fall off.
- Over-tightening your string or wire.This can cause the string or wire to break.
Tips for a Polished Finish:
- Use a beading needle.This will help you thread beads more easily and prevent damage to your string or wire.
- Trim any excess string or wire.This will give your earrings a clean and polished look.
- Use a beading mat or tray.This will help you keep your beads organized and prevent them from rolling away.
Creating Loops
Creating loops is essential for attaching findings to your seed bead earrings. Loops can be made using wire or string.
Loops are like the bridges that connect your beads to the earring hooks or other findings, giving them a secure and elegant finish.
Here’s how to create a loop using wire:
- Cut a short piece of wire.The length should be slightly longer than the desired loop size.
- Fold the wire in half.This will create a center point for your loop.
- Twist the ends of the wire together.This will secure the loop.
- Use pliers to shape the loop.You can use round-nose pliers or flat-nose pliers to create a round or oval loop.
Common Mistakes and Tips:
- Making the loop too small.This can make it difficult to attach findings.
- Making the loop too large.This can make the loop look bulky and unprofessional.
- Not securing the ends of the wire properly.This can cause the loop to come undone.
Tips for a Polished Finish:
- Use wire cutters to trim any excess wire.This will give your loop a clean and finished look.
- Use pliers to smooth out any rough edges.This will prevent the wire from snagging on your hair or clothing.
Attaching Findings
Attaching findings is the final step in creating your seed bead earrings. Findings are the components that connect your earrings to your ears, such as earring hooks, ear wires, or posts.
Findings are like the finishing touch that transforms your beadwork into wearable art, ensuring your earrings stay securely in place.
Here’s how to attach findings:
- Choose the right findings.Consider the weight of your earrings and your personal style.
- Use pliers to open the jump rings or other findings.This will allow you to attach your earrings to the findings.
- Attach your earrings to the findings.Make sure the earrings are securely attached and the findings are closed properly.
Common Mistakes and Tips:
- Using the wrong findings.Using findings that are too small or too large can cause your earrings to fall off or look awkward.
- Not closing the findings properly.This can cause your earrings to come undone.
- Over-tightening the findings.This can damage the findings and make them difficult to open in the future.
Tips for a Polished Finish:
- Use pliers to smooth out any rough edges on the findings.This will prevent them from snagging on your hair or clothing.
- Use a beading mat or tray to keep your findings organized.This will help you avoid losing them.
Design Inspiration and Ideas: Diy Seed Bead Earrings

The world of seed bead earrings is a vast and exciting landscape, offering endless possibilities for creativity. Whether you prefer delicate and minimalist designs or bold and colorful statement pieces, there’s a seed bead earring style for everyone.
Exploring Different Styles
To spark your imagination, let’s explore some popular seed bead earring styles and the techniques that bring them to life.
Bohemian
Bohemian-inspired seed bead earrings often feature natural elements, earthy tones, and intricate patterns. They can be long and flowing, incorporating feathers, tassels, or charms.
Minimalist
Minimalist seed bead earrings prioritize simplicity and elegance. They often feature clean lines, geometric shapes, and a limited color palette.
Geometric
Geometric seed bead earrings showcase bold shapes and angles. They can be created using various beading techniques, such as right-angle weave or brick stitch, to achieve intricate patterns and textures.
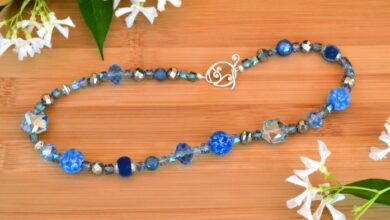
Colorful
Colorful seed bead earrings are a celebration of vibrant hues and playful combinations. They can be made with a rainbow of colors or feature a single dominant color with contrasting accents.
Popular Beading Patterns and Techniques
To bring your seed bead earring designs to life, you’ll need to master some basic beading techniques. Here are a few popular methods:
Peyote Stitch
Peyote stitch is a versatile and popular technique for creating both flat and tubular beadwork. It involves weaving beads together in a diagonal pattern, creating a textured and durable fabric.
Brick Stitch
Brick stitch is a simple and effective technique for creating flat, even beadwork. It involves laying beads side by side in rows, with each bead nestled between two beads in the previous row.
Right-Angle Weave
Right-angle weave is a technique that allows you to create intricate geometric designs. It involves weaving beads together at right angles, creating a strong and durable fabric.
Seed Bead Earring Design Ideas
Here are some seed bead earring design ideas to get you started: