Geometric acrylic earring DIY is a trend that’s taking the fashion world by storm. These earrings offer a unique blend of modern style and playful design, making them a versatile accessory for any outfit. Whether you prefer bold statement pieces or delicate minimalist designs, geometric acrylic earrings provide endless possibilities for self-expression.
The beauty of geometric acrylic earrings lies in their adaptability. From sharp angles to smooth curves, the variety of shapes and sizes allows you to create earrings that perfectly complement your personal style. And the best part? You can create them yourself! With a few basic materials and tools, you can embark on a rewarding DIY journey to craft stunning and unique earrings.
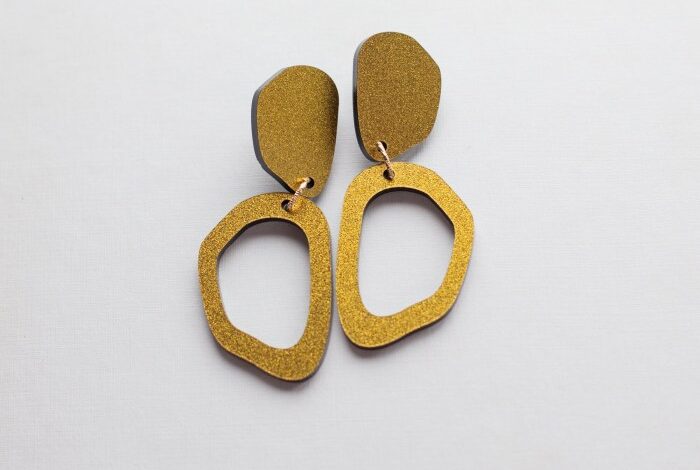
Geometric Acrylic Earrings: A Trendsetting Statement
Geometric acrylic earrings have emerged as a captivating trend in contemporary fashion, captivating wearers with their unique blend of modern aesthetics and playful versatility. These earrings seamlessly blend into diverse styles, offering a spectrum of options to complement any outfit and personal expression.
Geometric Shapes in Acrylic Earrings
Geometric shapes play a pivotal role in defining the character of acrylic earrings. From classic squares and circles to more intricate polygons and abstract designs, these shapes offer a wide range of possibilities for creating eye-catching and stylish pieces.
- Squares and Rectangles: These shapes exude a sense of clean-lined modernity and architectural precision. They are often used in minimalist designs or as the foundation for more complex geometric patterns.
- Circles and Ovals: Representing fluidity and harmony, circles and ovals bring a touch of softness and elegance to geometric earrings. They can be incorporated as standalone elements or combined with other shapes for a balanced aesthetic.
- Triangles and Pyramids: These shapes evoke a sense of dynamism and visual interest. They can be used to create angular, edgy earrings or serve as building blocks for larger, more complex geometric structures.
- Hexagons and Octagons: These shapes offer a unique blend of geometric precision and organic flow. They are often used to create earrings with a distinctive, eye-catching presence.
- Abstract Geometric Designs: Acrylic earrings often feature abstract geometric designs that defy traditional boundaries. These designs may incorporate a combination of shapes, angles, and textures to create truly unique and expressive pieces.
Materials and Tools
Creating geometric acrylic earrings requires a combination of materials and tools that allow for precise cutting, shaping, and polishing. The materials include acrylic sheets of different colors and thicknesses, while the tools encompass specialized cutters, adhesives, and finishing supplies.
Essential Materials
Acrylic sheets are the primary material for these earrings. They come in a variety of colors, thicknesses, and finishes, allowing for creative design possibilities. The choice of acrylic sheet depends on the desired earring design, size, and weight.
- Acrylic sheets: These are available in various colors, thicknesses, and finishes. Choose sheets based on the desired design, size, and weight of the earrings.
- Adhesives: Epoxies and acrylic glues are suitable for bonding acrylic pieces. Select an adhesive that is strong, clear, and dries quickly.
- Finishing supplies: Sandpaper, polishing cloths, and acrylic sealant are necessary for smoothing rough edges, achieving a polished look, and protecting the acrylic from scratches.
Cutting and Shaping Tools
Specialized tools are essential for cutting, shaping, and polishing acrylic sheets.
- Acrylic cutter: This tool features a sharp blade designed for precise cutting of acrylic sheets. It enables creating intricate shapes and designs.
- Rotary tool: This versatile tool is equipped with various attachments, including sanding drums, polishing bits, and cutting blades. It helps in shaping, smoothing, and adding intricate details to the acrylic pieces.
- Measuring tools: Rulers, protractors, and calipers are necessary for accurate measurements and ensuring precise cuts and shapes.
Material and Tool Table
This table summarizes the materials and tools used in creating geometric acrylic earrings.
| Material/Tool | Description | Purpose | Availability |
|---|---|---|---|
| Acrylic sheets | Available in various colors, thicknesses, and finishes | Primary material for earrings | Craft stores, online retailers |
| Adhesives | Epoxies and acrylic glues | Bonding acrylic pieces | Hardware stores, online retailers |
| Sandpaper | Various grits for smoothing rough edges | Smoothing and finishing acrylic | Hardware stores, online retailers |
| Polishing cloths | Microfiber or felt cloths | Achieving a polished look | Craft stores, online retailers |
| Acrylic sealant | Protective coating for acrylic | Protecting acrylic from scratches | Craft stores, online retailers |
| Acrylic cutter | Tool with a sharp blade for precise cutting | Creating intricate shapes and designs | Craft stores, online retailers |
| Rotary tool | Versatile tool with various attachments | Shaping, smoothing, and adding details | Hardware stores, online retailers |
| Rulers | For accurate measurements | Ensuring precise cuts and shapes | Hardware stores, online retailers |
| Protractors | For measuring angles | Creating geometric shapes | Hardware stores, online retailers |
| Calipers | For precise measurements of thickness | Ensuring consistent thickness | Hardware stores, online retailers |
Design Inspiration and Techniques
Geometric shapes and patterns are endlessly versatile, offering a wealth of possibilities for earring designs. From simple triangles and squares to intricate tessellations and complex polygons, the options are practically limitless. By exploring various sources of inspiration, you can unlock unique and eye-catching earring designs.
Geometric Shapes and Patterns
Geometric shapes and patterns provide a foundation for numerous earring designs. Here are some examples:
- Triangles: Triangles are a classic choice, conveying strength and stability. Equilateral triangles, with equal sides and angles, offer symmetry and balance. Isosceles triangles, with two equal sides, provide a sense of asymmetry and dynamism. Right triangles, with one 90-degree angle, introduce a sense of structure and angularity.
- Squares and Rectangles: Squares and rectangles represent order and stability. They can be used to create minimalist designs or as building blocks for more complex patterns.
- Circles and Ovals: Circles and ovals represent fluidity and harmony. They can be used to soften geometric designs or create organic shapes.
- Polygons: Polygons, shapes with three or more sides, offer a wide range of possibilities. Pentagons, hexagons, and octagons are common choices, each with its unique aesthetic.
- Tessellations: Tessellations are patterns formed by repeating geometric shapes that fit together without gaps or overlaps. They create visually intricate and captivating designs.
Inspiration from Architecture
Architectural structures, with their geometric forms and intricate details, offer a rich source of inspiration for earring designs. For example:
- Modernist architecture, with its clean lines and simple forms, can inspire minimalist earring designs featuring geometric shapes like squares, rectangles, and triangles.
- Gothic architecture, with its pointed arches and intricate stained glass windows, can inspire earring designs featuring intricate tessellations and geometric patterns.
- Art Deco architecture, with its geometric patterns and bold lines, can inspire earring designs featuring geometric shapes like circles, triangles, and diamonds.
Inspiration from Nature
Nature is full of geometric patterns and shapes that can be used to create stunning earring designs. For example:
- Honeycombs, with their hexagonal cells, offer a perfect example of a tessellation. The intricate structure of the honeycomb can inspire earring designs featuring hexagonal patterns.
- Snowflakes, with their six-pointed symmetry, are a beautiful example of nature’s geometric artistry. Snowflake designs can inspire earring designs featuring delicate and intricate patterns.
- Seashells, with their spiral patterns and geometric forms, offer a source of inspiration for organic and asymmetrical earring designs.
Inspiration from Abstract Art
Abstract art often explores geometric shapes and patterns in unconventional ways. Abstract art can inspire earring designs that are bold, expressive, and non-representational. For example:
- The works of Piet Mondrian, with their primary colors and geometric shapes, can inspire earring designs featuring bold geometric forms and minimalist color palettes.
- The paintings of Wassily Kandinsky, with their abstract shapes and vibrant colors, can inspire earring designs that are dynamic and expressive.
- The sculptures of Henry Moore, with their abstract forms and geometric shapes, can inspire earring designs that are sculptural and three-dimensional.
Cutting and Shaping Techniques
Acrylic is a versatile material that can be cut and shaped using various techniques. Here are some common methods:
Laser Cutting
Laser cutting is a precise and efficient method for cutting acrylic. A high-powered laser beam melts and vaporizes the acrylic, creating clean and intricate cuts. Laser cutting is particularly well-suited for complex designs and intricate details. The laser cuts are typically clean and require little to no sanding.
Making geometric acrylic earrings is a fun way to express your creativity. You can find all sorts of cool shapes and colors to work with, and the possibilities are endless! I’m also a big fan of getting creative in the kitchen, and recently tried out a recipe for mashed beets and potatoes that was a real hit.
It’s a great side dish for any meal, and the vibrant color adds a touch of fun to the plate. Just like with my earring designs, I love how you can experiment with different flavors and textures to create something unique and delicious.
It is a popular choice for creating intricate designs.
I’ve been so busy crafting these geometric acrylic earrings lately, it’s been hard to keep up with everything else! It seems like just yesterday I was browsing the OpenTable London Restaurant Festival website, which is almost over , and now I’m knee-deep in glitter and acrylic.
Maybe I’ll treat myself to a fancy meal after I finish this batch – these earrings are going to be a hit!
Hand-Sawing
Hand-sawing is a more traditional method for cutting acrylic. A hand saw with a fine-toothed blade is used to cut the acrylic. Hand-sawing requires patience and precision, but it allows for more control over the cutting process. Hand-sawing can be used to create both straight and curved cuts.
Rotary Tool
A rotary tool, such as a Dremel, can be used to cut, shape, and sand acrylic. Rotary tools are equipped with various attachments, including cutting wheels, sanding drums, and carving bits. Rotary tools are versatile and can be used for a wide range of tasks.
Rotary tools can be used to create both precise and free-form cuts.
Crafting geometric acrylic earrings is a fun and rewarding DIY project. It allows you to unleash your creativity and experiment with different shapes and colors. But while I’m busy creating these statement pieces, I can’t help but keep an eye on the stock market, especially with the recent talk about rate cuts.
Reading about the traders stock market playbook rate cuts helps me understand the potential impact on the economy, which in turn affects the materials I use for my earrings. Whether the market is up or down, I’ll keep on crafting, adding a touch of style and a dash of financial awareness to my creations.
Creating Geometric Shapes

The beauty of geometric acrylic earrings lies in the clean lines and sharp angles of the shapes. Let’s explore the process of cutting and shaping basic geometric forms, as well as creating more complex designs.
Cutting Basic Shapes
Cutting basic shapes like squares, triangles, and circles forms the foundation for more intricate designs.
- Squares: Use a ruler to measure and mark the desired size on the acrylic sheet. Cut along the marked lines using a craft knife or a rotary cutter. Ensure your cuts are straight and precise.
- Triangles: Draw an equilateral triangle using a ruler and protractor. Cut along the lines with a craft knife or rotary cutter. You can also create right-angled triangles by drawing perpendicular lines.
- Circles: Trace a circular object or use a compass to draw a circle on the acrylic sheet. Carefully cut along the curve with a craft knife or rotary cutter, using a steady hand and rotating the sheet as you cut.
Creating Complex Shapes
Once you’ve mastered basic shapes, you can explore more complex designs by combining basic forms or using templates.
- Combining Basic Shapes: Experiment with joining squares, triangles, and circles to create unique shapes. For example, you can combine two triangles to create a diamond shape or a square and four triangles to create a star.
- Using Templates: Create templates from paper or cardstock for more intricate designs. Trace the template onto the acrylic sheet and cut along the lines. This method allows for precise and consistent shapes.
Tips for Clean Cuts
Achieving clean and precise cuts is essential for aesthetically pleasing earrings. Here are some tips:
- Use a sharp blade: A sharp blade ensures clean cuts and reduces the risk of chipping or tearing the acrylic. Replace dull blades regularly.
- Apply even pressure: Apply steady and even pressure while cutting to avoid uneven edges or jagged lines.
- Cut on a cutting mat: Using a cutting mat protects your work surface and provides a stable base for cutting.
- Practice makes perfect: Practice cutting basic shapes to develop your skills and confidence.
Assembling the Earrings: Geometric Acrylic Earring Diy

The final step in creating your geometric acrylic earrings is assembling them. This involves attaching the findings, which are the components that allow you to wear the earrings, to your acrylic shapes. There are several methods you can use, each with its own advantages and considerations.
Choosing the Right Attachment Method
The method you choose for attaching findings to your acrylic shapes will depend on factors such as the size and weight of the earrings, the desired look, and your level of experience.
- Glue:Using a strong, clear adhesive like E6000 is a simple and popular method for attaching findings. It is especially suitable for smaller, lighter earrings. However, it’s important to use a glue that is specifically designed for acrylic and metal, and to allow the glue to cure completely before wearing the earrings.
- Wire:For heavier earrings or a more secure attachment, you can use wire to wrap around the acrylic shape and the finding. This method requires some skill in working with wire, but it offers a very strong and durable bond. It is also a good option for creating unique and intricate designs.
- Jump Rings:Jump rings are small, circular pieces of metal that can be used to connect different components. You can use jump rings to attach findings to acrylic shapes by opening the ring, threading it through both the acrylic and the finding, and then closing the ring securely.
This method is versatile and allows for easy adjustments.
Creating a Sturdy and Aesthetically Pleasing Assembly
To ensure your earrings are durable and comfortable to wear, it is important to create a secure and aesthetically pleasing assembly.
- Consider the Weight:When attaching findings to heavier acrylic shapes, it is essential to use a method that will provide adequate support. Using wire or multiple jump rings can help distribute the weight and prevent the earrings from pulling or breaking.
- Secure Connections:Ensure that all connections are secure and tight. If using glue, allow it to cure completely. If using wire, make sure the wraps are tight and the ends are properly secured. If using jump rings, close them securely using pliers.
- Aesthetics:The assembly should complement the design of the acrylic shapes. Choose findings that match the style of your earrings and use the attachment method that creates the most visually appealing look.
Remember: It is important to test the durability of your earrings before wearing them. Gently tug on the findings to ensure they are securely attached.
Finishing Touches
The final step in creating your geometric acrylic earrings is giving them a smooth and polished finish. This not only enhances their aesthetic appeal but also ensures durability and prevents sharp edges.
Sanding and Polishing
Sanding and polishing acrylic is crucial for achieving a professional and polished look. It removes any imperfections, scratches, or rough edges that may have occurred during the cutting and shaping process. Sanding is the first step in the finishing process.
It involves using sandpaper of varying grits to smooth out the surface and remove any imperfections. Start with a coarse grit sandpaper (e.g., 80 grit) to remove any major imperfections or sharp edges. Then, progressively move to finer grits (e.g., 120, 240, 400, and 600 grit) to achieve a smoother finish.
- Wet Sanding: Wet sanding is a technique that uses water to lubricate the sanding process, resulting in a smoother finish and less dust. It is particularly effective for sanding acrylic because it helps to prevent the acrylic from overheating and becoming distorted.
- Polishing Compounds: Polishing compounds are used after sanding to achieve a high-gloss finish. These compounds come in various forms, such as liquids, pastes, or powders, and are typically applied using a buffing wheel or cloth. They contain abrasive particles that remove fine scratches and imperfections, leaving a smooth and shiny surface.
Creating Unique Finishes
Beyond the basic sanding and polishing techniques, you can experiment with various methods to create unique finishes for your acrylic earrings.
- Adding Color: You can add color to acrylic by using acrylic paint, alcohol inks, or even permanent markers. For a more durable finish, consider sealing the color with a clear acrylic sealant.
- Adding Glitter: Glitter can add a touch of sparkle and glamor to your earrings. You can apply glitter using glue, resin, or a clear sealant.
- Adding Texture: You can add texture to your acrylic earrings by using sandpaper, sanding blocks, or even fabric. For example, you can create a textured surface by rubbing sandpaper over the acrylic in a circular motion or by pressing a piece of fabric into the acrylic while it’s still wet.
Creative Variations and Customization
The beauty of DIY geometric acrylic earrings lies in their endless possibilities for customization. You can take your basic designs and transform them into unique statement pieces by experimenting with colors, patterns, and embellishments. Let’s explore how to personalize your creations and make them truly your own.
Color and Pattern Exploration
Color is a powerful tool for expressing your style. You can choose acrylic sheets in a wide range of vibrant hues, from classic black and white to bold neon shades and earthy tones. Mixing and matching colors can create stunning visual effects.
For instance, combining a bright turquoise acrylic with a contrasting black can create a modern and edgy look. Experiment with different color combinations to discover your personal aesthetic.
Patterns can add another layer of complexity and interest to your earrings. Acrylic sheets come in various textures and patterns, including marbled, striped, and speckled. You can also create your own patterns by layering different colored acrylic sheets or using stencils to apply paint or etching techniques.
For example, using a stencil to create a geometric pattern on a clear acrylic sheet can create a unique and intricate design.
Combining Acrylic with Other Materials
To add texture and dimension to your earrings, you can combine acrylic with other materials like metal, wood, or fabric. These materials can be incorporated into your designs in various ways, such as:
- Metal:Metal accents like studs, chains, or wire can be used to add a touch of glamour and sophistication. You can attach these elements to your acrylic shapes using epoxy glue or jewelry wire.
- Wood:Wood can add a natural and rustic element to your earrings. Consider using thin wood slices, beads, or even wood veneer to create unique details. You can attach these elements to acrylic using wood glue or epoxy.
- Fabric:Fabric can be used to create a soft and whimsical touch. You can cut out fabric shapes and attach them to your acrylic pieces using fabric glue or by sewing them on.
Examples of Customization Techniques, Geometric acrylic earring diy
Here are some examples of how different customization techniques can be applied to create unique geometric acrylic earrings: