Crafting Your Own Leather Stud Bracelets: A Comprehensive DIY Guide
Creating personalized leather stud bracelets offers a rewarding and relatively straightforward DIY project. These accessories blend the rugged appeal of leather with the edgy aesthetic of metal studs, making them a popular choice for fashion-forward individuals seeking to express their unique style. This guide will walk you through the entire process, from material selection and tool acquisition to precise execution and finishing touches, ensuring you can produce professional-looking, durable, and stylish leather stud bracelets. Understanding the core components – the leather, the studs, and the fastening mechanism – is paramount for a successful outcome. High-quality leather will not only enhance the longevity of your bracelet but also contribute significantly to its overall aesthetic. Similarly, the type and placement of studs will dictate the bracelet’s visual impact. Finally, a secure and comfortable closure is essential for wearability.
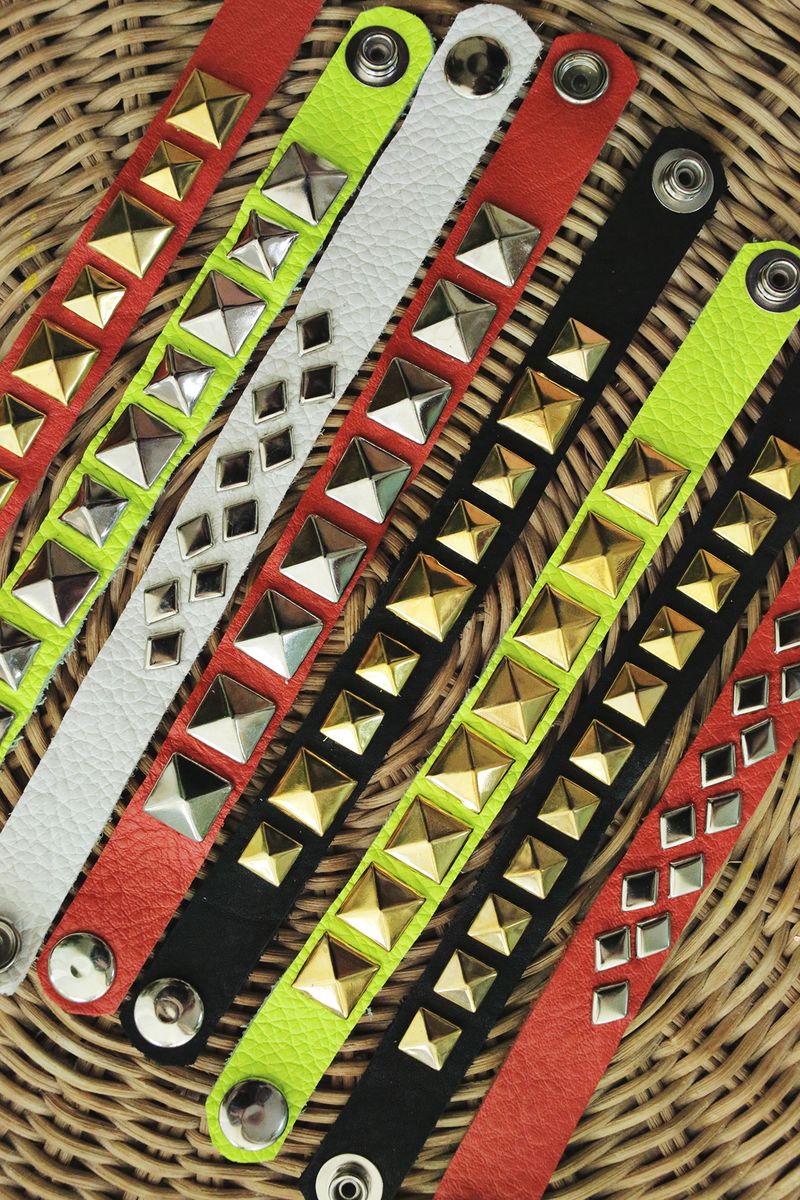
The foundational element of any leather stud bracelet is, of course, the leather. For this project, garment-grade or tooling leather is recommended. Garment leather, typically chrome-tanned, is softer, more flexible, and readily available in a variety of colors and finishes. It’s ideal for beginners as it’s easier to cut, punch, and work with. Tooling leather, on the other hand, is vegetable-tanned, firmer, and designed for stamping and shaping. While it requires a bit more effort to break in, it offers a more structured and durable finish, and allows for intricate decorative work beyond just studs. When selecting leather, consider its thickness. A weight between 4-6 ounces (1.6mm-2.4mm) is generally suitable for bracelets. Thinner leather might feel flimsy, while excessively thick leather can be difficult to manage and uncomfortable to wear. The width of the leather strip will also influence the final look. Common widths range from 1 inch to 2 inches, depending on the desired statement. Consider purchasing pre-cut leather strips to save time and ensure uniformity, especially for beginners. Alternatively, if you are buying a larger hide, ensure you have a reliable cutting tool like a rotary cutter or a sharp utility knife and a metal ruler for precise, straight cuts. Always purchase slightly more leather than you anticipate needing to account for any mistakes or to experiment with different designs.
Metal studs are the defining feature of these bracelets. They come in a vast array of shapes, sizes, and materials. The most common types include: pyramid studs, cone studs, round studs, and spikes. Pyramid and cone studs are popular for their classic punk and rock aesthetics. Round studs offer a subtler, more minimalist look. Spikes provide an overtly aggressive statement. Studs are typically made of brass, nickel, or steel, with various plating options like silver, gold, gunmetal, and antique brass. For durability and a polished finish, choose studs made from solid metal rather than plated plastic. The most crucial aspect of selecting studs is their prong mechanism. Most DIY-friendly studs feature two or four prongs on the back that are designed to be bent over to secure them to the leather. Ensure the prong length is appropriate for your chosen leather thickness; the prongs should extend through the leather and have enough length to be bent securely without being excessively long and creating an uncomfortable sharp edge on the inside of the bracelet. The spacing between the prongs is also important for even distribution. If you’re unsure about the types of studs that will best suit your project, it’s advisable to purchase a small assortment pack to test their appearance and ease of application on scrap leather before committing to a larger quantity.
The fastening mechanism is crucial for both functionality and aesthetics. Common options include: buckle closures, snap fasteners, and D-rings with O-rings. Buckle closures, similar to those found on belts, offer adjustability and a classic look. They require a buckle and a keeper loop, which also needs to be fashioned from leather. Snap fasteners, often referred to as "rivet snaps" or "burr snaps," provide a clean, secure, and easily operated closure. These come in two parts that are pressed together through the leather. D-rings and O-rings offer a more rugged, utilitarian style, where a leather strap passes through the rings and is secured, often with a snap or a buckle. For ease of use and a professional finish, snap fasteners are highly recommended for beginners. They are relatively inexpensive and can be installed with a simple hand-press tool or a specialized snap setter kit. If opting for a buckle closure, ensure the buckle size complements the width of your bracelet. For D-ring or O-ring closures, consider the size and thickness of the rings in relation to the leather strap. The choice of closure will influence the overall design and how the bracelet sits on the wrist.
Essential tools are required to successfully complete this project. A sharp utility knife or rotary cutter and a metal ruler are indispensable for precise leather cutting. A cutting mat will protect your work surface and extend the life of your cutting tools. For creating holes for studs and closures, a leather punch is necessary. This can be a rotary punch with multiple sizes or individual punch dies. A hammer is needed to strike the punch and, later, for setting snaps or other fasteners. For setting snap fasteners, a dedicated snap setter kit or a specialized pliers-type setter is highly recommended. This kit typically includes an anvil, a setter base, and a punch, all designed to work with specific snap sizes. If you’re using studs with prongs that need to be bent, needle-nose pliers are invaluable for gripping and bending them neatly. A small awl can be useful for starting holes or making minor adjustments. Finally, a clear, well-lit workspace is essential for accurate work and to prevent accidents. Consider investing in a small workbench or a sturdy table dedicated to your crafting projects. The quality of your tools can directly impact the quality of your finished product, so while you don’t need the most expensive professional-grade equipment to start, investing in reasonably good quality tools will make the process smoother and the results more satisfying.
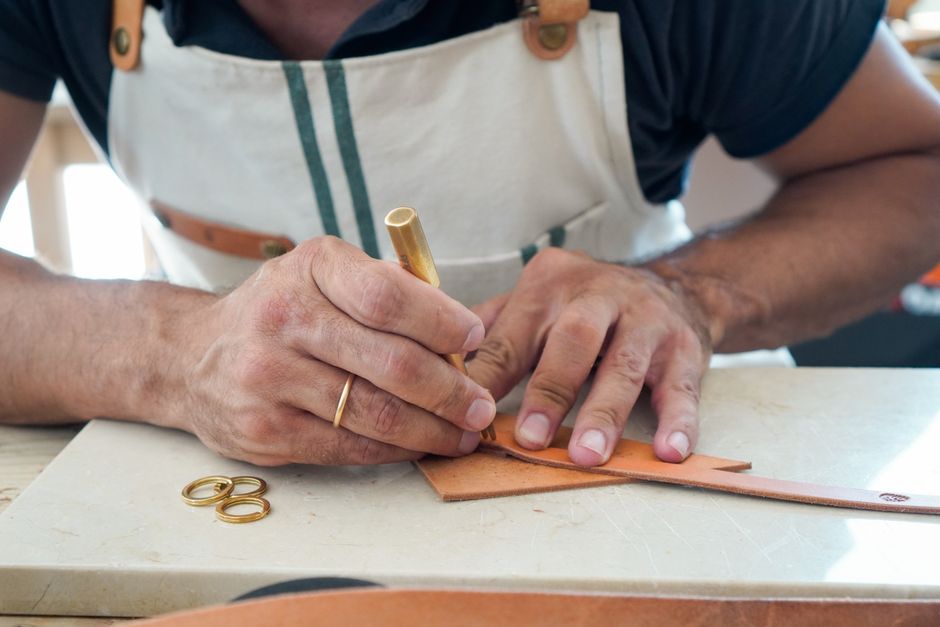
The design phase is where your creativity comes into play. Decide on the width and length of your bracelet. Measure your wrist circumference and add a little extra for comfort and the closure mechanism. Consider the placement and pattern of your studs. Will they be evenly spaced, clustered in a specific area, or arranged in a unique design? Experiment with different stud types and combinations on scrap leather to visualize the effect. Sketching your design beforehand can be incredibly helpful. You can also find inspiration from existing jewelry or fashion trends. Think about the overall aesthetic you want to achieve – minimalist and subtle, or bold and statement-making. For a minimalist look, consider a single row of small round studs. For a bolder statement, a double or triple row of pyramid studs or spikes might be more appropriate. Consider incorporating other leather embellishments like decorative stitching, tooling, or conchos if you feel adventurous. The length of the leather strip will be the total circumference of your wrist plus the overlap for the closure. For example, if your wrist is 7 inches and you’re using a buckle with a 1-inch overlap, your leather strip should be approximately 8 inches long, plus any extra needed for the buckle attachment.
Cutting the leather is the first practical step. Lay your leather flat on a cutting mat. Using your metal ruler and utility knife or rotary cutter, carefully score the leather along your desired width and length. For a clean cut, make multiple passes with the knife, rather than trying to cut through the entire thickness in one go. Ensure your cuts are straight and precise, as any unevenness will be noticeable in the final product. If you are using pre-cut strips, this step is already completed for you. However, it’s always a good idea to double-check the dimensions and ensure they are perfectly uniform. When cutting wider strips, consider using a wider rotary cutter for a cleaner, single pass cut. For those using a utility knife, ensure your blade is new and sharp for the cleanest possible cut. Always cut away from yourself to avoid injury. If your leather has a finished side and a flesh side (the rougher, un-dyed side), decide which side will be the exterior of your bracelet and ensure you are cutting with that in mind.
Next, prepare for the stud application. If your chosen studs have prongs that need to be bent, you will need to mark the placement of each stud on the leather. Use a ruler and a pencil or a chalk marker to ensure accurate spacing. For a standard, evenly spaced pattern, measure the total length of the bracelet where the studs will be placed and divide by the desired number of studs to determine the spacing. Mark the center point of where each stud will go. If using snap fasteners, you’ll need to punch holes for both parts of the snap. The size of the hole will depend on the size of the snap. Refer to your snap setter kit instructions for the correct punch size. For stud placement, you can often forgo punching a separate hole if the stud prongs are sharp enough to penetrate the leather directly when hammered. However, for more precise placement and to prevent the leather from tearing, it’s often beneficial to mark the stud locations with a light pencil line and then use an awl to create a small indentation at each mark. This indentation will guide the stud prongs.
Attaching the studs is a critical step. For studs with prongs, position the stud on the marked location on the leather. Gently tap the back of the stud with a hammer to push the prongs through the leather. Once the prongs have protruded through the other side, use needle-nose pliers to carefully bend each prong flat against the leather. Ensure the prongs are bent securely to prevent the studs from falling off. Overlapping the bent prongs slightly can create a more robust hold. For studs that require a setting tool (often called rivet studs), you will place the stud over a pre-punched hole and use a setting tool and hammer to flatten the rivet portion. If using snap fasteners, place the socket part of the snap on one end of the leather and the stud part on the other. Use your snap setter kit and hammer to firmly press each part into the leather. Follow the specific instructions provided with your snap setter kit for best results, as pressure and technique can vary. For best results when setting studs, place the leather on a firm, stable surface, like a piece of scrap wood, to provide good backing.
If you are using a buckle closure, you will need to attach it to one end of the leather strip. This usually involves folding the leather over the buckle’s shank and securing it with rivets, Chicago screws, or by stitching. For snap fasteners, you’ll typically punch holes for both the male and female parts of the snap on opposing ends of the leather strip to allow for overlap and closure. For D-ring or O-ring closures, one end of the leather will have the D-ring or O-ring attached, and the other end will have the strap that passes through it and is secured. Again, rivets, Chicago screws, or stitching are common methods for attaching these hardware components. Ensure all attachments are secure, as a loose closure can lead to the bracelet falling off. When attaching buckles or rings, it’s best to reinforce the area with a second layer of leather or a small piece of heavy-duty interfacing if you’re concerned about the leather tearing under stress, especially if you plan to wear the bracelet frequently or engage in activities that might put a strain on the closure.
The final steps involve finishing and polishing. Once all studs and closures are securely attached, examine the bracelet for any rough edges or stray threads. Use a sharp knife or scissors to trim any excess leather or thread. You can also lightly sand any rough edges with fine-grit sandpaper for a smoother finish. If you want to add a protective coating or enhance the leather’s appearance, you can apply a leather conditioner or a leather sealant. This will help protect the leather from moisture and wear, and can give it a slight sheen. For a professional touch, you can burnish the edges of the leather using a wood or plastic burnishing tool and a little water or gum tragacanth. This process smooths and seals the edges, giving them a neat, polished look. If you’ve used snap fasteners, ensure they click securely when closed and that there are no sharp edges on the inside of the bracelet that could snag on clothing or skin.
Care and maintenance are important for extending the life of your leather stud bracelet. Periodically, clean the leather with a damp cloth to remove dirt and debris. Apply a leather conditioner every few months to keep the leather supple and prevent it from drying out and cracking. Avoid exposing your bracelet to prolonged periods of direct sunlight or excessive moisture, as this can damage the leather and fade the colors of the studs. If the studs become loose, re-bend the prongs or re-secure them with a small amount of leather adhesive. Store your bracelets properly when not in use, ideally in a breathable bag or box away from extreme temperatures. By following these care instructions, your handmade leather stud bracelet will remain a stylish and durable accessory for years to come. The natural patina that develops on the leather over time will only add to its unique character and appeal, making your handmade creation even more special.
