How to Marble Fondant: A Comprehensive Guide for Stunning Cake Designs
Achieving a professional-looking marbled fondant finish on your cakes is an accessible and rewarding technique that can elevate your edible art from simple to sophisticated. This method relies on the artful combination of different colored fondant pieces, subtly swirled together to create organic, stone-like patterns. Whether you’re a seasoned cake decorator or a beginner looking to expand your repertoire, this guide will provide a detailed, step-by-step process, along with essential tips and tricks for marbling fondant with stunning results, ensuring your cakes stand out for their visual appeal. We will delve into the preparation of your fondant, the color selection, the marbling process itself, and finally, the application to your cake, covering all aspects necessary for a flawless outcome.
The foundation of successful fondant marbling begins with proper fondant preparation. It is crucial to use a good quality fondant that is pliable and easy to work with. Commercially available fondant is often suitable, but you can also make your own if you prefer. Before you begin marbling, ensure your fondant is at room temperature. Cold fondant will be stiff and difficult to knead, leading to an uneven marble effect and potential tearing during application. If your fondant has been refrigerated, allow it to sit at room temperature for at least an hour, or until it feels soft and pliable. Next, you’ll need to divide your fondant into the colors you intend to marble. The number of colors is entirely up to your artistic vision, but typically, two to three colors are used for a classic marble effect. For a more dramatic look, you can incorporate up to four or five colors. The key is to have sufficient quantities of each color to create a visually appealing swirl. As you divide the fondant, roll each portion into a log. This will make the subsequent kneading and swirling process more manageable. The size of these logs will depend on the overall size of the cake you are covering. For a standard 8-inch round cake, logs roughly 1-2 inches in diameter for each color should suffice. Ensure your workspace is clean and lightly dusted with cornstarch or powdered sugar to prevent sticking. Avoid using too much dusting agent, as this can dry out the fondant and affect its texture and pliability.
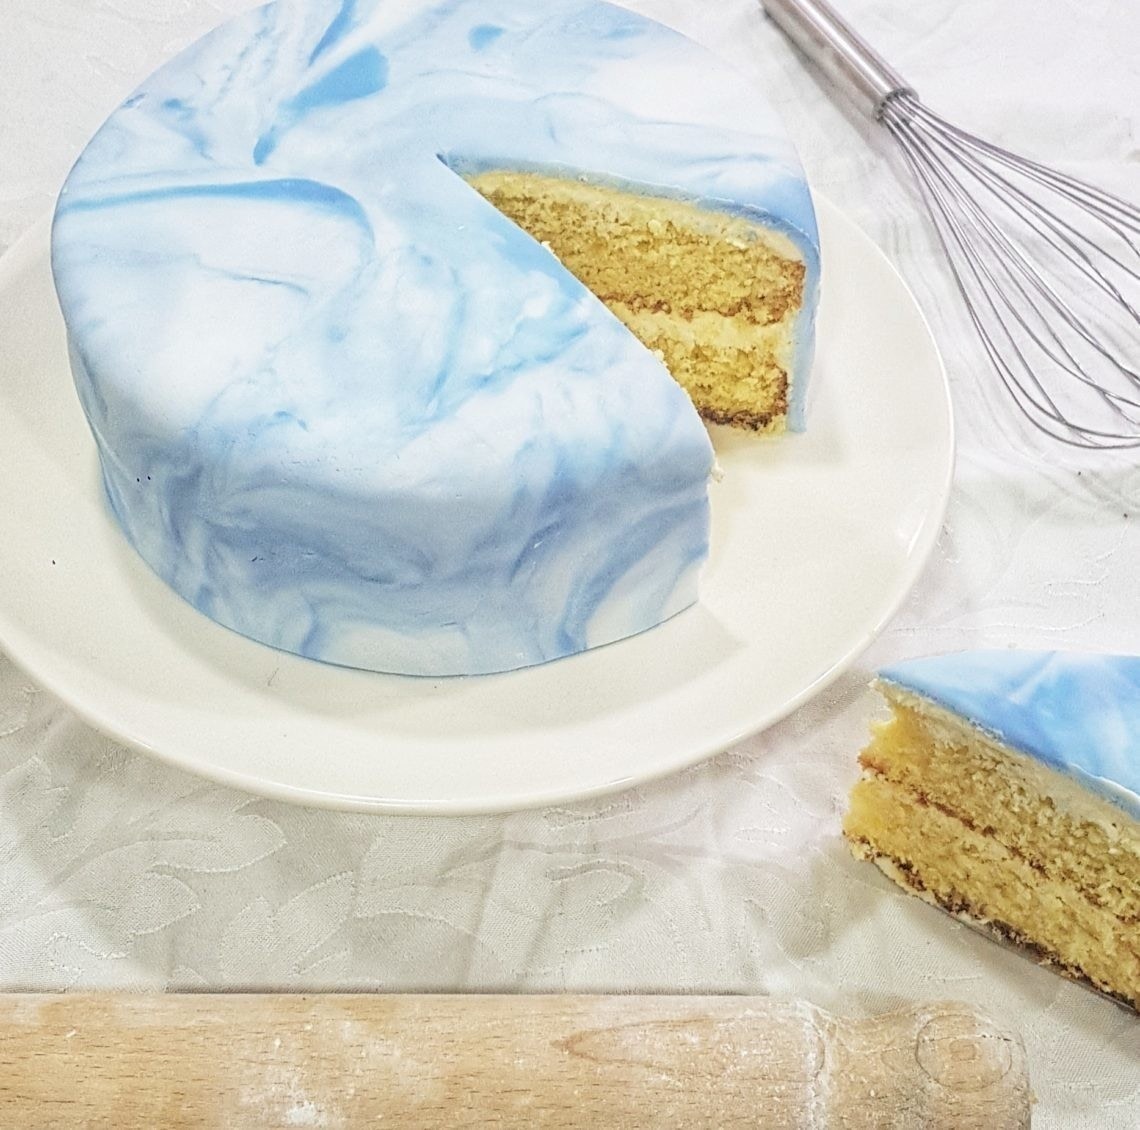
Color selection is paramount in achieving a visually striking marbled fondant. The traditional marble patterns often evoke the look of natural stone like marble or granite, which typically feature veins of grey, black, white, and sometimes earth tones like beige or brown. However, the beauty of fondant marbling lies in its versatility. You can opt for classic, monochromatic schemes or embrace vibrant, unexpected color combinations. For a sophisticated look, consider pairing shades of white, cream, and a deep charcoal grey or black. Alternatively, for a more contemporary feel, you could combine pastel shades like blush pink, mint green, and soft lavender, or even bold contrasting colors such as navy blue and gold. The contrast between your chosen colors will significantly impact the final appearance. Higher contrast colors will create bolder, more defined swirls, while lower contrast colors will result in a subtler, more blended effect. When deciding on your colors, think about the overall theme and aesthetic of your cake. Consider the event the cake is for – a wedding might call for elegant, muted tones, while a birthday party could be an opportunity for bright and playful hues. It’s also beneficial to have a significant amount of your base color, usually white or a light neutral, as this will form the dominant background of your marble design. The accent colors, in smaller quantities, will be the ones that create the striking veins. Plan to have roughly 70-80% of your fondant in the base color, and the remaining 20-30% distributed among your accent colors.
The marbling process itself is where the magic happens. Once your fondant is divided into colored logs, it’s time to bring them together. Lay out your colored logs side-by-side on your lightly dusted work surface. Gently press them together, ensuring they are touching along their lengths. The goal here is not to fully integrate the colors, but rather to create a unified mass that can be manipulated. Begin to knead the combined fondant logs. The kneading action is crucial for introducing the marbling effect. Do not over-knead, as this will result in a uniform color blend, losing the distinct veins. Instead, perform gentle, repetitive folds and presses. Imagine you are gently pushing and pulling the mass, allowing the colors to begin to streak and swirl into each other. You can use your hands for this, or a fondant smoother or rolling pin to apply gentle pressure and folds. As you knead, you will start to see the colors intertwine. The more you fold and press, the more the colors will blend. Observe the pattern as it develops. If you desire more distinct veins, perform fewer folds. If you prefer a more blended, watercolor-like effect, continue kneading for a few more moments, but always with a watchful eye. A common technique is to fold the fondant in half, then press down gently, rotate, and repeat. Another approach is to gently twist the combined logs before kneading. Experimentation is key here, and understanding how different folding and pressing techniques influence the marble pattern is part of the learning process. Aim for an uneven distribution of colors, with thick and thin veins creating a naturalistic look.
Once you have achieved your desired marble effect, it’s time to prepare the fondant for application to your cake. This involves shaping the marbled fondant into a smooth, even sheet. Gently flatten the marbled fondant mass into a rough disc. Using a fondant rolling pin, begin to roll out the fondant to the desired thickness. For covering a cake, you’ll want a thickness of approximately 1/8 inch, ensuring it’s even across the entire surface. Work from the center outwards, rotating the fondant periodically to ensure an even roll and prevent sticking. As you roll, you may notice that some of the marbling has become more pronounced or blended. This is normal. Continue rolling until the sheet is large enough to comfortably cover your cake, with a little extra to trim. It’s important to roll it smoothly and avoid creating any creases or tears. If at any point the fondant feels like it’s sticking, lightly dust your work surface and rolling pin with a minimal amount of cornstarch or powdered sugar. The key is to maintain the integrity of your marble pattern while achieving a smooth, usable sheet. Don’t be discouraged if the pattern looks different after rolling; it will still be beautiful. The rolling process can sometimes slightly alter the visual density of the veins, but the inherent swirl will remain.
Applying the marbled fondant to your cake requires precision and a steady hand. Ensure your cake is properly prepared and crumb-coated. A smooth crumb coat is essential for a flawless fondant finish. Once your cake is ready, lightly dust your work surface with cornstarch or powdered sugar, and carefully lift your rolled marbled fondant sheet. You can do this by gently rolling it onto your rolling pin and then unrolling it over the cake, or by carefully folding it in half and then unfolding it over the cake. Gently drape the fondant over the top of your cake, centering it as much as possible. Begin by smoothing the fondant over the top surface of the cake, working from the center outwards to push out any air bubbles. Once the top is smooth, begin to gently ease the fondant down the sides of the cake. Use your hands to smooth the fondant, coaxing it down without stretching it too much, which can distort the marble pattern. For a smooth finish, you can use a fondant smoother or your hands. Work in sections, gently pressing the fondant against the sides of the cake. As you work your way down, pay attention to the marbling. You want to maintain the integrity of the swirl as much as possible. Avoid pulling or stretching the fondant excessively, as this can create uneven patterns or even tears.
Trimming excess fondant is the final step in achieving a clean, professional look. Once the fondant is smoothed and adhered to the cake, you will have excess fondant around the base. Using a sharp pizza cutter or a sharp knife, carefully trim away the excess fondant. Work your way around the entire base of the cake, making a clean, straight cut. For a very neat finish, you can hold the knife at a slight angle towards the cake as you cut. This will create a slight bevel on the edge, making it blend seamlessly. After trimming, gently run your hand or a fondant smoother around the base of the cake to ensure the edge is smooth and well-attached. Inspect your cake for any imperfections, such as air bubbles (which can sometimes be pricked with a fine pin and smoothed) or areas where the fondant didn’t adhere perfectly. Small adjustments can often be made at this stage. The beauty of the marble pattern is that it is inherently forgiving of minor imperfections, as the naturalistic swirls can mask small flaws. However, taking the time to ensure a clean trim and smooth finish will significantly enhance the overall presentation.
To achieve truly exceptional marble effects, consider these advanced tips and techniques. For sharper, more defined veins, try adding a tiny amount of piping gel or clear edible glue to your accent color fondant before kneading. This helps to create a slightly more resistant texture during the marbling process. Conversely, for a softer, more blended look, you can lightly mist your fondant colors with water before bringing them together. This introduces a touch of moisture, encouraging a smoother fusion of colors during kneading. When working with multiple colors, consider alternating the colors you place side-by-side. For example, instead of placing all your accent colors together, intersperse them with your base color. This can lead to more dynamic and visually interesting patterns. Another technique for creating unique marble effects is to use a marbled fondant impression mat. After you have marbled your fondant and rolled it into a sheet, gently press a decorative impression mat onto the surface. This will add texture and a secondary layer of visual interest to your marble design. For a truly metallic marble effect, consider incorporating edible luster dusts or metallic food coloring into your fondant. You can mix these directly into the fondant, or dust them onto the marbled fondant after it has been applied to the cake for a shimmering, high-end finish. Remember to allow sufficient drying time for any edible glues or luster dusts applied.
Troubleshooting common issues can help ensure a smoother marbling experience. If your fondant is tearing during the kneading or rolling process, it might be too dry or too cold. Allow it to warm up and become more pliable, and ensure you’re using just enough cornstarch or powdered sugar to prevent sticking. Over-kneading is a frequent pitfall that leads to a muddy, uniform color. Be mindful of your kneading time and observe the marble pattern developing. If you’ve over-kneaded and the colors are too blended, you can sometimes salvage it by dividing the fondant and re-introducing a few small, contrasting pieces and gently folding them in. Air bubbles are another common concern. These can often be gently pricked with a fine sewing needle and the fondant smoothed over the tiny hole. Uneven thickness when rolling can also be an issue. Try to consistently roll from the center outwards and rotate the fondant frequently. For advanced decorators, consider using a fondant sheeter for perfectly even thickness. Finally, if the marble pattern isn’t as distinct as you’d hoped, it may be due to insufficient contrast between your chosen colors or not enough distinct swirling during the kneading stage. Don’t be afraid to experiment with different color palettes and kneading techniques for your next marbling project.
In conclusion, marbling fondant is a versatile and visually impactful decorating technique that offers endless creative possibilities. By understanding the nuances of fondant preparation, color selection, the marbling process, and careful application, you can achieve stunning, professional-quality results. The key lies in practice, experimentation, and paying attention to the subtle details that transform a simple cake into a work of art. Whether you are aiming for the classic elegance of natural stone or a vibrant, contemporary design, mastering the art of fondant marbling will undoubtedly elevate your cake decorating skills and impress your clients and guests alike. Embrace the process, enjoy the creative freedom it offers, and don’t hesitate to push the boundaries with your color choices and patterns. The world of edible artistry awaits your unique marbled creations.
