
Craft Your Own Tiny World: A Comprehensive Guide to Making Matchbox Dolls
The charm of miniature worlds has captivated imaginations for centuries, and at the heart of many of these tiny universes lie the inhabitants – the dolls. While elaborate dollhouses offer grand stages, the humble matchbox provides an accessible and incredibly versatile foundation for creating your own miniature characters. Making matchbox dolls is a deeply rewarding craft, allowing for immense creativity within a small, self-contained space. This guide will walk you through every step, from selecting your materials to adding those crucial finishing touches, ensuring your matchbox doll creations are unique, engaging, and even SEO-friendly for discoverability if you choose to share them online.
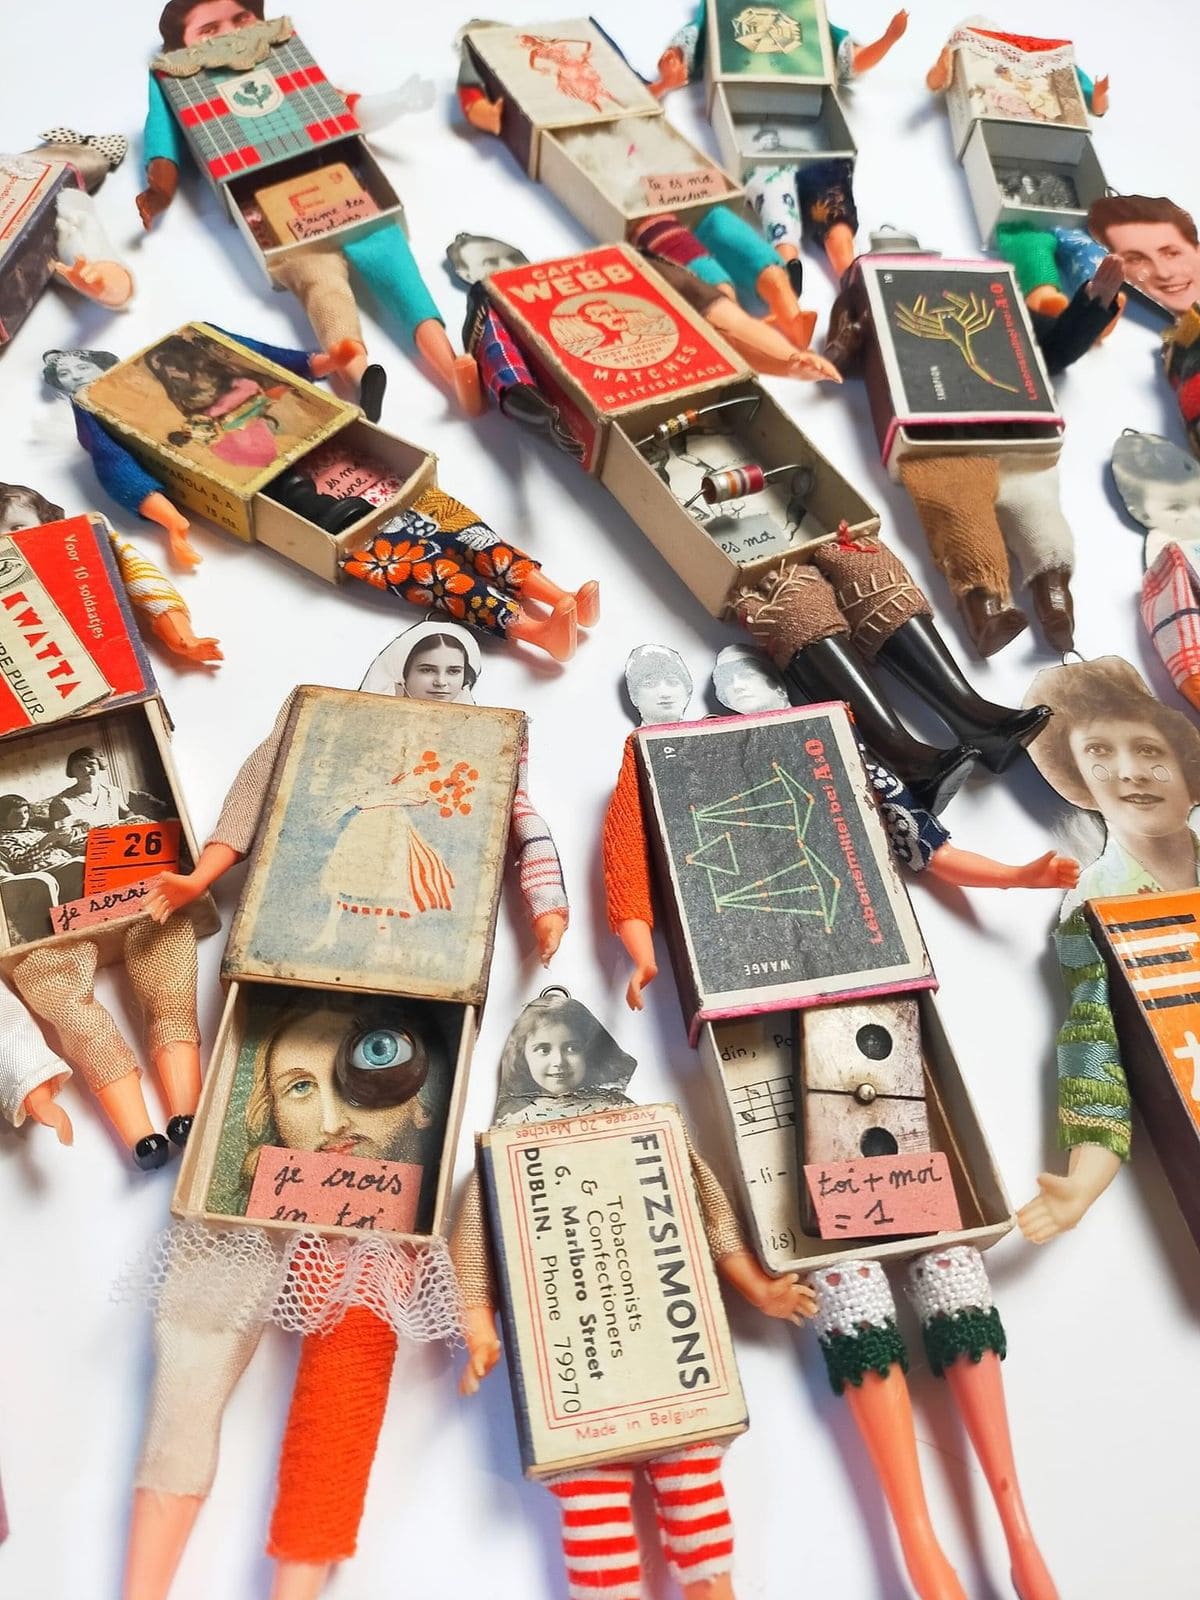
The appeal of matchbox dolls lies in their inherent storytelling potential. A single matchbox, with its enclosed walls and distinct compartments, can represent a bedroom, a workshop, a secret hideaway, or even a miniature stage. The doll itself, though diminutive, can embody a specific character, a moment in time, or a whimsical concept. This guide aims to equip you with the knowledge to translate these imaginative sparks into tangible, delightful creations. We’ll cover a spectrum of techniques, from simple, no-sew approaches suitable for beginners to more intricate methods for experienced crafters. Understanding the core principles of scale, proportion, and material selection is paramount to achieving successful matchbox doll projects.
Materials and Tools: The Foundation of Your Miniature Universe
Before embarking on your matchbox doll adventure, gathering the right materials is essential. The beauty of this craft is its adaptability; you can often use repurposed items and readily available craft supplies.
-
The Matchbox: The star of the show. Standard cardboard matchboxes are ideal. Look for the slide-out kind, as these offer two distinct surfaces: the outer sleeve and the inner tray. Both can be utilized to create environments or as part of the doll’s accessory. For a more robust creation, consider small wooden or tin boxes, though these will require different adhesives and potentially more robust cutting tools.
-
Doll Materials: This is where your creativity truly shines.
- Fabric Scraps: Small pieces of cotton, felt, silk, or even old clothing can be used for doll bodies, clothing, and accessories.
- Thread and Embroidery Floss: For stitching, hair, and decorative elements.
- Yarn: Excellent for creating voluminous hair or textured clothing.
- Paper and Cardstock: For printing faces, making hats, creating furniture, or adding decorative elements to the matchbox interior.
- Wooden Beads or Small Balls: Can serve as doll heads.
- Felt Sheets: Versatile for clothing, accessories, and backgrounds.
- Wire or Pipe Cleaners: For creating posable limbs or structural support.
- Natural Elements: Tiny dried flowers, twigs, or seed pods can add a touch of organic charm.
- Found Objects: Buttons, beads, small charms, sequins, glitter, and even tiny pieces of LEGO can become integral parts of your doll or her environment.
-
Adhesives: The right glue will make or break your creation.
- White Craft Glue (PVA): Good for paper, fabric, and general crafting.
- Fabric Glue: Specifically designed for bonding fabrics, offering flexibility and durability.
- Hot Glue Gun: Excellent for quick assembly, securing larger components, and creating dimensional elements. Use with caution, especially around small parts and delicate materials.
- Tacky Glue: A thicker, faster-drying white glue that’s useful for heavier items.
- Double-Sided Tape: Handy for attaching paper elements or creating temporary holds.
-
Cutting Tools:
- Sharp Craft Scissors: Essential for precise cutting of fabric, paper, and thin materials.
- Small Craft Knife or X-Acto Knife: For intricate cutting, scoring, and detail work, particularly on cardstock or when working with thicker materials. Always use a cutting mat.
- Pinking Shears: Can add a decorative edge to fabric.
-
Other Essential Tools:
- Tweezers: Invaluable for handling tiny pieces, placing small embellishments, and threading needles.
- Needles (various sizes): For hand-sewing.
- Ruler: For measuring.
- Pencil or Pen: For marking.
- Paintbrushes (small): For applying glue or paint.
- Optional: Acrylic Paints, Markers, Mod Podge: For decorating the matchbox interior or doll elements.
Designing Your Matchbox Doll and Scene: The Conceptual Stage
Before you start cutting and gluing, take time to conceptualize your doll and her matchbox dwelling. This planning phase is crucial for a cohesive and engaging final product.
-
Character Development: Who is your doll? Is she a fairy, a baker, a librarian, a scientist, a tiny adventurer? Give her a personality, a story, and a purpose. This will inform her appearance, her clothing, and the environment you create for her. Consider her age, her mood, and her occupation.
-
The Matchbox as a Stage: How will you use the interior of the matchbox?
- The Inner Tray: This is your primary stage. Will it be a floor, a wall, or a combination? You can paint it, cover it with paper or fabric, or create a diorama within it.
- The Outer Sleeve: This can be a backdrop, a roof, a door, or an extension of the interior.
- Consider the Orientation: Will the matchbox be viewed from the front, the side, or from above?
-
Scale and Proportion: Even in miniatures, maintaining some sense of scale is important. If your doll is to interact with furniture or accessories, ensure they are proportionate to her size.
-
Color Palette: Choose a color scheme that reflects your character and her environment. Will it be bright and cheerful, moody and mysterious, or natural and earthy?
-
Sketching: A quick sketch can help you visualize your ideas. Draw your doll, her clothing, and a rough layout of the matchbox interior. Don’t worry about perfection; it’s a tool for clarifying your thoughts.
Constructing the Doll: Bringing Your Character to Life
There are numerous ways to construct a matchbox doll, ranging from the very simple to the more detailed.
-
The Simple Fabric Doll (No-Sew Option):
- Cut two identical body shapes from fabric (e.g., a rounded rectangle for the body and head combined, or separate pieces).
- Place the two shapes right sides together and stitch around the edges, leaving a small opening for turning.
- Turn the body right side out and gently stuff with fiberfill or cotton batting.
- Close the opening with a few discreet stitches.
- For limbs, you can use small fabric tubes, twisted pipe cleaners covered in fabric, or even small wooden dowels. Attach them securely to the body.
-
The Bead Head Doll:
- Use a small wooden bead or pom-pom as the head.
- Create a body from fabric scraps. A simple method is to cut a rectangle of fabric, fold it in half, stitch up one side and the bottom to create a pouch. Stuff it lightly.
- Thread a needle with strong thread, pass it through the stuffed body, and then through the bead. Secure the bead to the body by stitching around the neck.
- Attach fabric or yarn to the bead for hair.
-
The Pipe Cleaner Doll:
- Bend pipe cleaners to create a basic armature for the body and limbs. Twist them together to secure.
- Wrap the pipe cleaner frame with fabric scraps, yarn, or felt, securing with glue or small stitches.
- This method allows for posable dolls.
-
Adding Features:
- Face:
- Drawing: Use fine-tip permanent markers or fabric markers to draw eyes, a mouth, and cheeks directly onto the doll’s head.
- Embroidery: Use embroidery floss and simple stitches (like French knots for eyes) for a more textured look.
- Fabric Paint: Small dabs of fabric paint can create simple features.
- Paper Cutouts: Tiny paper circles or ovals can be glued on for eyes or blush.
- Hair:
- Yarn: Cut lengths of yarn, attach them to the head with glue or stitches, and style as desired.
- Embroidery Floss: Similar to yarn, but offers finer detail.
- Felt: Cut strips or shapes of felt to create hair.
- Clothing:
- Simple Wraps: Cut fabric rectangles and wrap them around the doll’s body, securing with glue or tiny safety pins.
- Basic Stitched Garments: For more advanced crafters, you can stitch simple dresses, shirts, or skirts. Use small buttons or beads for closures.
- Felt: Felt is easy to cut and glue, making it ideal for simple clothing shapes.
- Face:
Creating the Matchbox Environment: Building the Miniature World
The matchbox itself is more than just a container; it’s the stage, the home, the world for your doll.
-
Preparing the Matchbox:
- Cleanliness: Ensure the matchbox is clean and free of any debris.
- Optional: Painting: You can paint the exterior or interior of the matchbox with acrylic paints. Consider a background scene or a solid color. Allow ample drying time.
- Optional: Covering: Line the interior with decorative paper (scrapbook paper, wrapping paper) or fabric. Use white glue or spray adhesive for a smooth finish.
-
The Inner Tray as the Primary Space:
- Flooring: Cover the bottom with felt, fabric, tiny mosaic tiles, or even a printed image of grass or a wooden floor.
- Walls: Decorate the sides of the tray with wallpaper (small patterned paper), painted murals, or textured materials like sandpaper (for a workshop) or moss (for a fairy scene).
- Furniture and Accessories: This is where you bring the scene to life.
- DIY Furniture: Craft miniature furniture from cardstock, small wooden blocks, beads, or even repurposed bottle caps. A tiny book can be made from folded paper.
- Found Objects: A thimble can become a chair, a button a table, a small spool of thread a bed.
- Natural Elements: Tiny twigs can be a fence, dried flowers a bouquet, small pebbles a path.
-
Utilizing the Outer Sleeve:
- Backdrop: Glue it to the back of the inner tray to create a continuous scene.
- Door or Window: Cut an opening in the sleeve to act as an entrance. You can create a hinged door from cardstock.
- Roof: Attach it to the top of the inner tray to create a more enclosed space.
-
Adding Details and Depth:
- Lighting: While you can’t add actual lights, you can create the illusion of light with painted highlights or by strategically placing shiny elements like sequins.
- Texture: Introduce various textures to make the scene more visually interesting. Use rough bark, soft felt, smooth paper, and shiny beads.
- Storytelling Elements: Include objects that hint at your doll’s story. If she’s a baker, add tiny miniature pastries. If she’s a reader, place a minuscule book beside her.
Finishing Touches and Presentation: The Final Flourish
The final details are what elevate a crafted object from a simple toy to a treasured keepsake.
-
Securing Everything: Ensure all elements are securely glued or stitched in place. Test for stability.
-
The Doll’s Pose: Position your doll within her environment in a way that tells a story or captures a moment. Is she sitting, standing, reaching for something?
-
Adding a "Stand": If your doll is meant to stand on her own, you might need to create a small base from cardstock or wood, or simply ensure her feet are flat and stable.
-
Sealing (Optional): For painted surfaces or delicate paper elements, you might consider a light coat of Mod Podge or a clear sealant to protect them.
-
Display and Storage:
- The Closed Matchbox: A closed matchbox doll can be a delightful surprise. The exterior can be decorated as well.
- Displaying Open: When open, the matchbox becomes a miniature diorama.
- Protection: Consider a small clear plastic box or a display stand if you wish to protect your creation from dust and damage.
SEO Considerations for Your Matchbox Doll Creations
If you plan to share your creations online, whether on a blog, social media, or an Etsy shop, incorporating SEO principles will increase their discoverability.
-
Keywords: Use relevant keywords in your titles, descriptions, and tags. Think about what people would search for. Examples include: "DIY matchbox doll," "miniature doll making," "tiny house craft," "handmade doll," "diorama craft," "craft project for kids," "vintage dollhouse," "fairy doll," "art doll tutorial."
-
Descriptive Titles: Make your titles informative and engaging. Instead of "Matchbox Doll," try "Enchanting Fairy Matchbox Doll: A Whimsical Miniature Craft Tutorial" or "Cozy Baker’s Nook Matchbox Doll: DIY Miniature Scene."
-
Detailed Descriptions: Provide comprehensive descriptions of your doll and the crafting process. Mention the materials used, the techniques involved, and the story behind the creation. This is where the detailed information from this guide comes in handy.
-
High-Quality Images: Use clear, well-lit photographs of your finished matchbox doll from multiple angles. Show the doll, the interior scene, and any special details.
-
Tags and Hashtags: Use a variety of relevant tags and hashtags on social media platforms and e-commerce sites. Mix broad terms with more specific ones.
-
Content Quality: The more detailed and informative your content (whether a blog post, video, or product description), the higher the chance of ranking well in search results. This comprehensive guide is designed to provide that depth.
-
Engage with Your Audience: Respond to comments, answer questions, and participate in crafting communities. This can drive traffic to your creations.
-
Unique Content: While this guide provides a framework, aim to make your creations unique. This originality will stand out and attract attention.
Conclusion: The Enduring Appeal of Tiny Worlds
Making matchbox dolls is an accessible, affordable, and incredibly satisfying craft that taps into our innate desire to create and tell stories. From the initial spark of an idea to the final, meticulously placed detail, the process is a journey of imagination and skillful execution. Whether you’re a seasoned crafter or a complete beginner, the world of matchbox doll making offers a boundless landscape for creativity. The ability to construct an entire world, complete with its own inhabitant, within the confines of a simple matchbox is a testament to the power of miniature artistry. These tiny creations are not just toys; they are miniature universes waiting to be explored, each with its own unique charm and narrative, ready to spark wonder and inspire imaginations.
