
My First Thanksgiving Turkey: A Culinary Rite of Passage
Embarking on the journey of preparing a Thanksgiving turkey for the first time is more than just a cooking endeavor; it’s a culinary rite of passage, a significant step into the heart of holiday traditions. For many, it represents a graduation from observer to active participant, a testament to burgeoning independence and a desire to contribute meaningfully to the family feast. The sheer scale of the undertaking, the iconic status of the bird itself, and the weight of expectations can feel daunting, yet the rewards—a sense of accomplishment, delicious results, and the creation of cherished memories—are immeasurable. This article aims to demystify the process, offering a comprehensive guide to navigating your maiden voyage into turkey preparation, from selection to carving, ensuring a stress-free and successful experience.
The selection of the right turkey is paramount to the success of your first Thanksgiving feast. This initial decision sets the stage for everything that follows. The two primary types of turkeys available are fresh and frozen. Fresh turkeys, generally available in the days leading up to Thanksgiving, offer convenience as they require no thawing time. However, their availability can be limited, and they typically come at a higher price point. Frozen turkeys, on the other hand, are widely available weeks in advance, allowing for more flexibility in purchasing and budget planning. The crucial factor with frozen turkeys is the thawing process, which necessitates advance planning. Size considerations are also critical. A general rule of thumb is to purchase 1 to 1.5 pounds of turkey per person. This accounts for bone weight and ensures ample leftovers, a quintessential element of the Thanksgiving experience. Consider the number of adults and children, as well as any guests with hearty appetites. Overestimating is usually preferable to underestimating. Beyond fresh vs. frozen and size, explore options like heritage breeds or naturally raised turkeys, which often boast superior flavor and texture, though they may be more expensive and harder to find. Read labels carefully, looking for terms like "no added hormones" or "antibiotic-free" if these are priorities. Understanding these nuances will empower you to make an informed choice, laying a solid foundation for your first Thanksgiving turkey.
The thawing process for a frozen turkey is perhaps the most critical, and often overlooked, step for first-time cooks. Improper thawing can lead to uneven cooking, bacterial growth, and a compromised final product. The safest and most effective method is refrigerator thawing. This involves placing the frozen turkey, still in its original packaging, on a tray or in a pan to catch any drips, on the bottom shelf of your refrigerator. The general guideline is to allow approximately 24 hours for every 4-5 pounds of turkey. For a 15-pound bird, this means starting the thawing process at least three to four days before Thanksgiving. While this requires significant advance planning, it is the most reliable method for ensuring the turkey thaws safely and evenly. An alternative, faster method is cold-water thawing. This involves submerging the turkey, in its original leak-proof packaging, in a large container or sink filled with cold tap water. The water must be changed every 30 minutes to maintain a safe temperature and prevent bacterial proliferation. This method takes approximately 30 minutes per pound. While quicker than refrigerator thawing, it is more labor-intensive and carries a slightly higher risk if not managed meticulously. Never attempt to thaw a turkey at room temperature. This creates a breeding ground for harmful bacteria. Understanding and adhering to proper thawing protocols is non-negotiable for a safe and delicious first Thanksgiving turkey.
Brining, whether wet or dry, is a technique that can elevate your turkey from good to extraordinary, particularly for a first-time endeavor. Brining introduces moisture and flavor deep into the meat, resulting in a more succulent and tender bird. Wet brining involves submerging the turkey in a saltwater solution, often infused with herbs, spices, and aromatics like garlic and onions. A basic wet brine recipe typically involves a ratio of 1 cup of kosher salt to 1 gallon of water, with additions like sugar, bay leaves, peppercorns, and rosemary. The turkey is left to soak in this solution for a period ranging from 12 to 24 hours, depending on its size, typically in the refrigerator. This method is highly effective for infusing moisture but requires a large container and significant refrigerator space. Dry brining, on the other hand, is a simpler and less demanding approach. It involves generously seasoning the turkey, inside and out, with a mixture of kosher salt, herbs, and spices. The salted turkey is then left uncovered in the refrigerator for 24 to 72 hours. The salt draws out moisture, which then dissolves the salt, creating a concentrated brine that is reabsorbed into the meat. This process not only seasons the turkey but also helps to crisp the skin to a beautiful golden-brown. For your first Thanksgiving turkey, dry brining is often recommended due to its simplicity and the exceptional results it yields with minimal fuss. Regardless of the method chosen, brining is an invaluable tool in achieving a memorable Thanksgiving centerpiece.
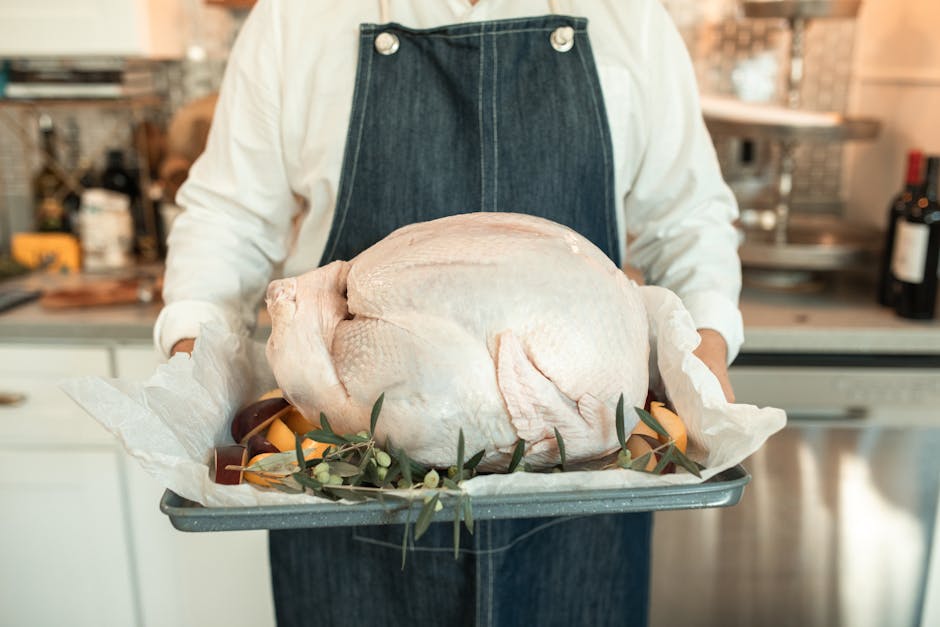
Prepping the turkey for roasting involves a series of thoughtful steps that contribute to both flavor and presentation. Once thawed and brined (if applicable), the turkey should be thoroughly patted dry, both inside and out, with paper towels. This is crucial for achieving crispy skin. Remove any giblets or the neck from the cavity; these can be used to make gravy or stock. Trimming excess fat from the neck and cavity can also be beneficial. For a more cohesive presentation and to promote even cooking, the legs can be trussed. This involves tying the legs together with kitchen twine. The wings can also be tucked underneath the body. Now, for the crucial step of flavoring. Generously season the cavity with aromatics such as halved onions, lemons, apples, and sprigs of fresh herbs like rosemary, thyme, and sage. These will steam and infuse the turkey from the inside as it cooks. For the exterior, rub the skin with softened butter or olive oil, which helps with browning and crisping. Season the skin liberally with salt and freshly ground black pepper. You can also create a compound butter by mixing softened butter with chopped herbs, garlic, or citrus zest and gently loosening the skin over the breast and thighs to spread this mixture underneath. This not only adds flavor but also helps to keep the breast meat moist. Some cooks also choose to stuff the turkey, but for a first attempt, it is generally recommended to cook it unstuffed. Stuffing can absorb excess moisture, leading to a drier bird, and it also increases the cooking time, making it more challenging to achieve perfectly cooked breast and leg meat simultaneously. Therefore, focusing on cavity aromatics and flavorful seasonings applied externally will yield excellent results for your inaugural Thanksgiving turkey.
The roasting process is the culmination of all your preparation. Preheat your oven to the recommended temperature, typically 325°F (160°C) for a whole turkey. Place the prepared turkey on a rack in a roasting pan. The rack elevates the turkey, allowing hot air to circulate around it for more even cooking and preventing the bottom from becoming soggy. If you don’t have a roasting rack, you can create one by arranging thick slices of onion, carrot, and celery on the bottom of the pan to elevate the bird. Pour about an inch of liquid, such as water, chicken broth, or white wine, into the bottom of the roasting pan. This liquid will create steam, which helps to keep the turkey moist and prevents drippings from burning. Tent the turkey loosely with aluminum foil, especially during the initial stages of cooking. This helps to prevent the breast meat from drying out before the dark meat is cooked through. The foil can be removed for the last 45 minutes to an hour of cooking to allow the skin to brown and crisp up. Cooking times will vary depending on the size of the turkey and whether it is stuffed or unstuffed. A general guideline for an unstuffed turkey at 325°F is approximately 13-15 minutes per pound. However, the most reliable method for determining doneness is by using a meat thermometer. Insert the thermometer into the thickest part of the thigh, avoiding the bone. The turkey is done when the internal temperature reaches 165°F (74°C). The juices should run clear when the thigh is pierced with a fork. It is crucial to check the temperature in multiple places, including the thickest part of the breast and the wing joint, to ensure even cooking.
Resting the turkey after roasting is arguably as important as the cooking itself. Skipping this crucial step will result in juices running out onto the carving board, leaving you with a dry bird. Once the turkey reaches its target internal temperature, carefully remove it from the oven. Transfer the turkey to a clean cutting board or platter. Tent it loosely with aluminum foil. This allows the muscle fibers to relax and reabsorb the juices that have been forced to the surface during cooking. A resting period of at least 20 to 30 minutes is recommended for a medium-sized turkey, and up to 45 minutes for a larger bird. During this time, the internal temperature will continue to rise slightly, and the juices will redistribute throughout the meat, ensuring maximum moisture and flavor. While the turkey rests, you can use the drippings in the roasting pan to make gravy, another essential component of the Thanksgiving meal. Don’t underestimate the importance of this resting period; it’s the secret to a truly succulent and enjoyable first Thanksgiving turkey.
Carving a turkey for the first time can be an intimidating prospect, but with a few key techniques, you can achieve a presentable and efficient presentation. Before you begin, ensure you have a sharp carving knife and a sturdy fork. Allow the turkey to rest for the recommended time before carving. Begin by removing the legs and thighs. With a sharp knife, slice through the skin between the leg and the breast. Then, locate the hip joint and cut around it to detach the entire leg quarter. Repeat for the other side. Next, separate the drumstick from the thigh by slicing through the joint. For the thighs, you can carve them into bite-sized pieces or slice them lengthwise. Now, move to the breast. Slice downwards along the breastbone, then slice across the breast to create individual portions. You can also remove the entire breast by slicing along the rib cage. The wings can be removed by locating the joint where they attach to the body and cutting through it. For a more traditional presentation, you can slice the breast meat lengthwise into thick portions. Don’t worry if your first attempt isn’t perfectly uniform; the focus is on getting the meat off the bone and onto plates. The practice of carving, like the cooking itself, improves with each subsequent Thanksgiving. Embrace the learning curve, and enjoy sharing the fruits of your labor.
