Spring garland diy idea yarn carrots – Spring Garland DIY Idea: Yarn Carrots – Imagine a whimsical garland, bursting with the vibrant colors of spring, adorning your home or garden. This DIY project brings the charm of carrots to life, using yarn as the medium for creation.
It’s a perfect way to celebrate the arrival of warmer weather and infuse your space with a touch of playful creativity.
Creating yarn carrots is a simple and rewarding craft that can be enjoyed by crafters of all skill levels. The process involves shaping yarn into adorable carrot forms, adding a sprinkle of green for the tops, and then assembling them onto a garland base.
The result is a charming and unique decoration that’s sure to bring smiles to everyone who sees it.
Spring Garland DIY: Adorable Yarn Carrots
Spring is a time for fresh starts and cheerful decorations. Garlands, with their whimsical charm, are a popular choice for adding a touch of spring to homes and gardens. DIY projects are a fantastic way to personalize your decor and unleash your creativity, and yarn is a versatile material that can be used to craft countless adorable creations.
Carrots, with their bright orange hue and playful shape, are a perfect springtime motif, bringing a touch of whimsy and a nod to the season’s bounty.
Spring is all about fresh starts, and what better way to celebrate than with a DIY yarn carrot garland? It’s a fun and easy project that’s perfect for adding a touch of whimsy to your home decor. But if you’re looking for inspiration for your winter wardrobe, check out this L.K.
Bennett winter guide to office dressing for some chic and stylish ideas. Once the weather warms up, you can return to those adorable yarn carrots and let their cheerful colors brighten up your spring!
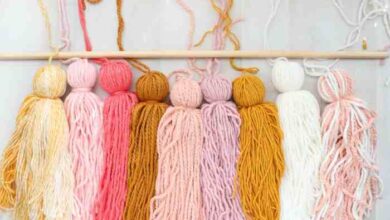
Yarn Carrot Garland: A Springtime Delight
Yarn carrot garlands are a delightful addition to any spring decor. They are easy to make, customizable, and add a touch of whimsy to any space. The bright orange yarn evokes the color of fresh carrots, while the simple shape is easy to replicate, making this a project suitable for crafters of all skill levels.
Materials and Tools
Creating a yarn carrot garland is a fun and easy craft project that requires minimal supplies. You’ll need a few basic materials to get started, and you can even get creative with your choices to personalize your garland.This section will cover the essential materials and tools needed for making a yarn carrot garland.
I’m feeling so inspired by the idea of making a spring garland with yarn carrots! I’ve been wanting to add some whimsy to my porch, and this project seems like the perfect way to do it. Maybe I’ll even take some inspiration from my recent quick biz trip to Phoenix , where I saw some amazing yarn art installations.
The colors and textures of the yarn really got my creative juices flowing. Now, back to those carrots! I can already picture them hanging from my porch, adding a touch of spring cheer.
It will also discuss tips for choosing the right yarn colors and textures, as well as alternative materials you can use to create your own unique version.
Yarn Selection
Choosing the right yarn is crucial for creating realistic-looking carrots. Consider these tips when selecting your yarn:
- Color Palette:Opt for shades of orange, yellow, and green. You can use a single shade of orange for the carrot body or experiment with different shades to create a more dimensional effect.
- Texture:Choose a yarn with a texture that resembles the rough surface of a carrot. Consider using a chunky yarn for a more rustic look or a smooth yarn for a polished finish.
- Yarn Weight:The weight of the yarn will affect the size and sturdiness of your carrots. Lighter yarns are ideal for smaller carrots, while heavier yarns create larger and more substantial carrots.
Essential Materials
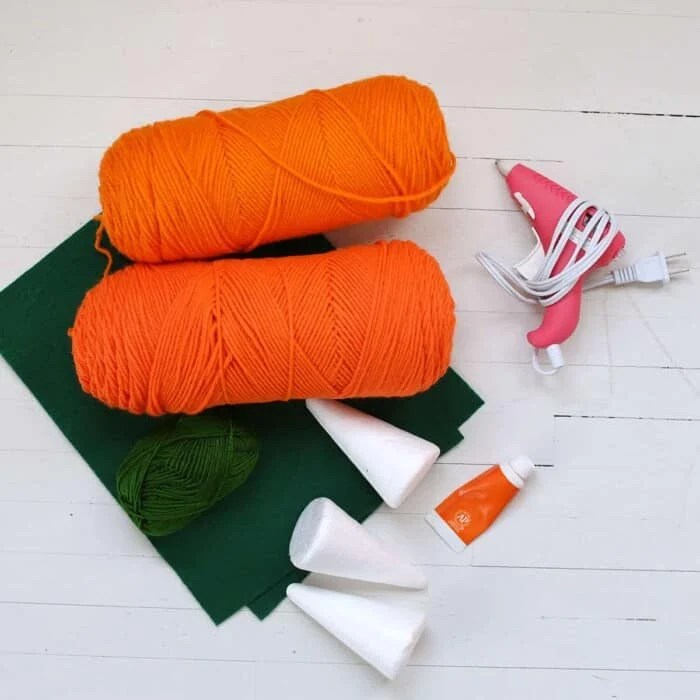
Here’s a list of essential materials needed to make your yarn carrot garland:
- Yarn:Orange, yellow, and green yarn for the carrot body, leaves, and stem.
- Scissors:For cutting the yarn and shaping the carrots.
- Glue:A strong adhesive like hot glue or craft glue to secure the yarn and attach the carrots to the garland base.
- Garland Base:Choose a string, wire, or ribbon to create the base of your garland.
Alternative Materials
While yarn is a popular choice for making yarn carrots, you can also use other materials to create your own unique versions:
- Felt:Felt is a great alternative to yarn for creating carrots. You can cut out carrot shapes from felt and use glue or fabric adhesive to attach them to the garland base.
- Fabric Scraps:Use fabric scraps in various shades of orange, yellow, and green to create your carrots. You can sew or glue the fabric pieces together to form the carrot shapes.
- Paper:Paper is another budget-friendly option for creating carrots. You can use construction paper, cardstock, or even recycled paper to cut out carrot shapes and decorate them with markers, paint, or glitter.
Design and Construction
Now that you have all your materials ready, it’s time to bring your yarn carrot garland to life! We’ll guide you through crafting adorable yarn carrots and attaching them to your garland base for a cheerful spring display.
I’m so excited about my spring garland DIY project using yarn carrots! I’m thinking of adding some pops of color with a few festive accents, and maybe even a touch of vintage charm. Before I get started, though, I need to check out the Ralph Lauren Memorial Day sale – I’m hoping to find a new outfit to wear while I’m crafting! Once I’ve snagged some new threads, I’ll be back to my yarn carrots and creating a truly springy masterpiece.
Creating Yarn Carrot Shapes
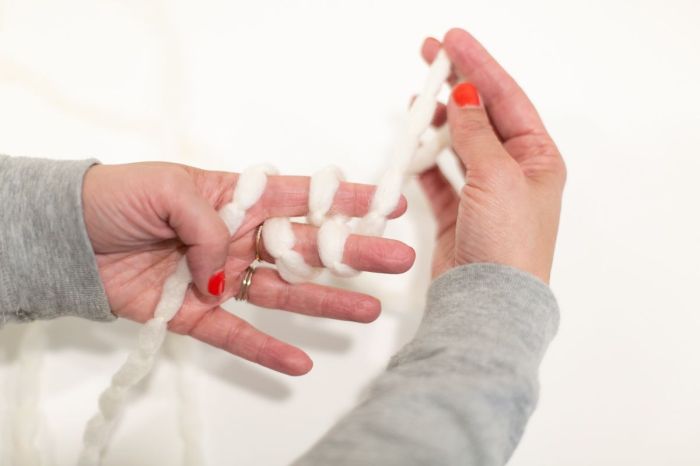
To create the yarn carrot shapes, you’ll need to use your fingers to shape the yarn around a piece of cardboard or a similar object. This will help you to create a uniform shape for each carrot. The following steps provide detailed instructions:
- Wrap yarn around the cardboard to create a cone shape. Start by wrapping the yarn around the base of the cardboard, then continue wrapping up to the top, creating a cone shape.
- Secure the yarn with a knot at the base. Once you’ve created the desired cone shape, tie a knot at the base of the yarn to secure it in place.
- Cut the yarn and remove the cardboard. Carefully cut the yarn at the top of the cone shape and then remove the cardboard. You’ll be left with a yarn cone that resembles the shape of a carrot.
- Repeat steps 1-3 to create additional yarn carrots. You can create carrots of different sizes by using cardboard of different sizes or wrapping the yarn more or less tightly.
Attaching Carrots to the Garland Base
Once you have your yarn carrots ready, you can start attaching them to the garland base. Here are a few methods to ensure a secure and aesthetically pleasing arrangement:
- Use hot glue to attach the carrots to the garland base. Apply a small amount of hot glue to the base of each carrot and then press it firmly onto the garland base. This method offers a strong and durable bond.
- Use a needle and thread to sew the carrots to the garland base. Thread a needle with strong yarn or thread, and then sew the carrots to the garland base using a simple running stitch. This method allows for a more delicate and subtle attachment.
- Use yarn or twine to tie the carrots to the garland base. Tie a piece of yarn or twine around the base of each carrot and then tie the other end to the garland base. This method offers a simple and rustic look.
Incorporating Spring Elements
To enhance the spring charm of your garland, consider incorporating additional elements like flowers, leaves, or butterflies. These elements can add a touch of color and texture to your creation.
- Use artificial flowers or fabric flowers to add a touch of vibrancy. Choose flowers in colors that complement the yarn carrots, such as pink, yellow, or purple.
- Cut out leaf shapes from felt or fabric and attach them to the garland base. This will add a touch of greenery and a natural feel to your garland.
- Create butterflies from felt or fabric and attach them to the garland base using glue or thread. Butterflies add a whimsical touch to your garland.
Variations and Ideas
The yarn carrot garland is a charming and versatile craft, opening up endless possibilities for creativity. Let’s explore some exciting variations and ideas to personalize your garland and make it truly unique.
Yarn Techniques for Unique Carrot Shapes, Spring garland diy idea yarn carrots
Experimenting with different yarn techniques can create a variety of carrot shapes, adding visual interest and texture to your garland.
- Crocheting: Crocheting allows for intricate designs and detailed shaping. Try crocheting the carrot body in a spiral pattern, creating a more three-dimensional effect. You can also experiment with different crochet stitches for a unique texture, such as single crochet, double crochet, or even bobble stitch for a bumpy texture.
- Knitting: Knitting can also be used to create the carrot body, offering a different texture and a smoother finish. Consider using a circular needle for a seamless and continuous shape. You can also experiment with different knit stitches for a textured effect, such as garter stitch, seed stitch, or even a cable stitch for a more intricate look.
- Freeform Crochet: This technique allows for complete creative freedom, allowing you to create organic and free-flowing carrot shapes. Embrace the imperfections and let your creativity guide you, resulting in a truly unique and personalized garland.
Alternative Designs for the Garland
Beyond a simple garland, the yarn carrot concept can be expanded into various decorative designs.
- Hanging Mobile: Transform your yarn carrots into a whimsical mobile by attaching them to different lengths of string or yarn. Arrange the carrots in a cascading pattern, adding a touch of whimsy to any room. Consider incorporating other spring-themed elements like felt flowers or paper butterflies for added visual interest.
- Table Centerpiece: Create a delightful centerpiece by arranging your yarn carrots in a bowl or vase. Surround the carrots with other spring-inspired decorations, such as faux grass, miniature flower pots, or even a small bird’s nest. This arrangement adds a touch of charm and whimsy to your table setting.
Personalizing the Garland
Adding individual touches can personalize your garland and make it even more special.
- Names or Initials: Embroidered names or initials can be added to the carrot tops, creating a personalized touch for a baby shower, birthday party, or a special gift. Use embroidery floss in a contrasting color for a pop of visual interest.
- Embellishments: Consider adding embellishments like buttons, beads, or felt flowers to the carrots for a more whimsical look. You can also use different colors of yarn to create striped or patterned carrots, adding a touch of personality.
- Themes: Adapt the garland to specific themes by using color schemes or incorporating additional elements. For example, a bunny-themed garland could include small felt bunny ears attached to the carrot tops.
Display and Usage: Spring Garland Diy Idea Yarn Carrots

The adorable yarn carrot garland is a versatile decorative element that can add a touch of whimsy and charm to various spaces. Its playful design makes it suitable for both indoor and outdoor settings, and its adaptability allows for a range of creative uses beyond just decoration.
Indoor Display and Usage
The yarn carrot garland can be displayed in various indoor spaces to add a touch of spring cheer. Here are some ideas:
- Mantlepiece:Drape the garland across the mantelpiece for a welcoming touch, especially during spring celebrations.
- Above doorways:Create a festive entryway by hanging the garland above doorways leading to different rooms.
- Window treatments:Add a whimsical touch to windows by incorporating the garland into window treatments, such as valances or curtains.
- Staircase railing:Drape the garland along the staircase railing for a charming visual element that adds a touch of spring to the entire space.
- Children’s room:The garland can be a fun and playful addition to a child’s room, adding a whimsical touch to the decor.
Outdoor Display and Usage
The yarn carrot garland can also be used to decorate outdoor spaces, bringing a touch of spring to patios, porches, and gardens. Here are some ideas:
- Patio railing:Hang the garland along the railing of your patio for a cheerful and welcoming touch.
- Garden fence:Drape the garland across a garden fence to add a playful touch to your outdoor space.
- Tree branches:Hang the garland from tree branches in your garden to create a whimsical and eye-catching display.
- Outdoor party decor:Use the garland as part of your outdoor party decorations, adding a playful touch to the festivities.
Beyond Decoration
The yarn carrot garland can be used for more than just decoration. Here are some ideas for its use as a playful party prop or a child’s craft project:
- Party prop:The garland can be used as a playful party prop for a spring-themed event, adding a touch of whimsy to the celebrations.
- Child’s craft project:The garland can be used as a starting point for a child’s craft project, allowing them to personalize it with their own creative touches.