Stamped initial bracelet DIY is more than just a craft; it’s a journey into personal expression. It’s about creating a tangible piece of jewelry that holds meaning and tells your story. From ancient civilizations adorning themselves with personalized amulets to the modern trend of stacking initial bracelets, this form of jewelry has always resonated with our desire to express individuality.
This guide will walk you through the process of creating your own stamped initial bracelet, from selecting materials to adding finishing touches. Whether you’re a seasoned crafter or a curious beginner, this DIY project is sure to ignite your creativity and leave you with a cherished piece of jewelry.
Introduction to Stamped Initial Bracelets
The desire to express individuality through personal adornment has existed for centuries. From ancient civilizations using jewelry as status symbols to modern-day fashion trends, personalized accessories have always played a significant role in self-expression. Stamped initial bracelets, in particular, have gained immense popularity in recent years, becoming a timeless and meaningful way to showcase one’s identity.
The Significance of Stamped Initial Bracelets
Stamped initial bracelets are more than just fashionable accessories; they are powerful symbols of personal identity and connection. The simple act of wearing a bracelet adorned with one’s initials or the initials of loved ones carries a deep emotional weight, reflecting a sense of belonging, individuality, and cherished relationships.
Materials and Tools
Creating a stamped initial bracelet is a fun and rewarding craft project. You’ll need a few essential materials and tools to get started. This section will guide you through the materials you’ll need, their purpose, and how to use them safely.
Making a stamped initial bracelet is a great way to personalize a simple piece of jewelry. It’s a fun project for beginners, and you can customize it with different colors and styles. It reminds me of the time I started learning new skills in upholstery, which I found incredibly rewarding.
Learning new skills adventures in upholstery taught me about patience and precision, just like crafting a beautiful stamped initial bracelet. It’s all about taking the time to get it right, and the result is something you can truly be proud of.
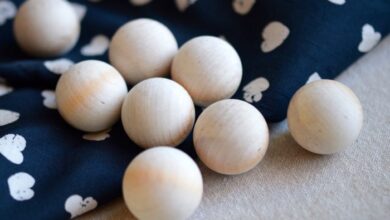
Metal Blanks
Metal blanks are the foundation of your stamped initial bracelet. They come in various shapes, sizes, and metals, offering a wide range of creative possibilities.
- Silver:A popular choice for its classic elegance and durability. Sterling silver is a common option for jewelry making.
- Gold:Offers a luxurious and timeless look. You can find gold-filled or gold-plated blanks, which provide a good balance of affordability and durability.
- Copper:A versatile metal known for its warm tones and affordability. Copper blanks are often used for rustic or bohemian styles.
Stamping Tools
Stamping tools are essential for creating your initial designs on the metal blanks. They come in various sizes and styles, allowing you to customize your bracelet.
- Alphabet Stamps:These stamps come in different fonts and sizes, allowing you to create personalized messages and initials.
- Hammer:Used to strike the stamps and imprint the designs onto the metal blanks. Choose a hammer with a flat striking surface for clean and consistent impressions.
- Stamping Block:Provides a solid and stable surface for stamping. This helps prevent damage to the metal blank and ensures even impressions.
- Safety Glasses:Always wear safety glasses when using stamping tools to protect your eyes from flying metal fragments.
Jewelry Findings
Jewelry findings are essential for completing your bracelet. They provide the finishing touches and allow you to secure the bracelet to your wrist.
- Jump Rings:Small metal rings used to connect different components of the bracelet, such as the metal blank to the clasp.
- Clasps:Secure the bracelet to your wrist. You can choose from various styles, including lobster clasps, toggle clasps, and magnetic clasps.
Optional Materials
While not essential, these optional materials can add extra flair and personality to your stamped initial bracelet.
- Leather Cord:Can be used to create a more rustic or bohemian look. You can weave the leather cord around the metal blank or use it to create a wrap bracelet.
- Beads:Add color, texture, and visual interest to your bracelet. Choose beads that complement your metal blank and overall style.
- Charms:Small decorative elements that can be added to the bracelet to personalize it further. You can find charms in various themes and styles.
Design Considerations
Once you’ve gathered your materials and tools, it’s time to start thinking about the design of your stamped initial bracelet. There are many different styles to choose from, and you can customize your bracelet to match your personal style. You can add charms or embellishments, and choose from a variety of font styles and sizes for your initials.
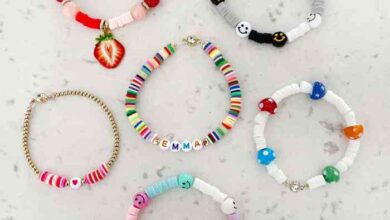
Styles of Stamped Initial Bracelets
There are many different styles of stamped initial bracelets. You can choose a style that is simple and classic, or you can choose a style that is more elaborate and eye-catching.
- Single initial braceletsare a simple and classic option. They are perfect for everyday wear and can be easily dressed up or down.
- Multiple initial braceletsare a great way to personalize your bracelet. You can add initials for your children, your significant other, or your friends and family.
- Stackable braceletsare a trendy option that allows you to create a unique look by layering different bracelets together. You can stack different styles of bracelets, or you can stack bracelets with different initials.
- Bracelets with additional charms or embellishmentsare a great way to add a touch of personality to your bracelet. You can add charms that represent your hobbies, interests, or beliefs.
Font Styles and Sizes
The font style and size you choose for your initials will affect the overall look of your bracelet. There are many different font styles to choose from, so you can find one that matches your personal style.
- Script fontsare a popular choice for stamped initial bracelets. They are elegant and feminine, and they add a touch of sophistication to any bracelet.
- Block fontsare a more modern and masculine option. They are bold and easy to read, and they make a statement.
- Cursive fontsare a good choice for a more personal touch. They are unique and stylish, and they can add a touch of whimsy to your bracelet.
You can also choose from a variety of font sizes. Smaller fonts are more delicate and subtle, while larger fonts are more bold and eye-catching.
Choosing the Right Size and Length
The size and length of your bracelet will depend on your wrist size and your personal preference. You want to make sure that your bracelet is comfortable to wear and that it fits snugly on your wrist.
To measure your wrist, wrap a measuring tape around your wrist just above your wrist bone. Make sure the tape is snug but not too tight.
Once you have your wrist measurement, you can use this to determine the length of your bracelet. A good rule of thumb is to add 1-2 inches to your wrist measurement. This will allow for some extra room to move your hand and wrist freely.
You can also adjust the length of your bracelet by adding or removing links. If you’re not sure how to do this, you can take your bracelet to a jeweler for help.
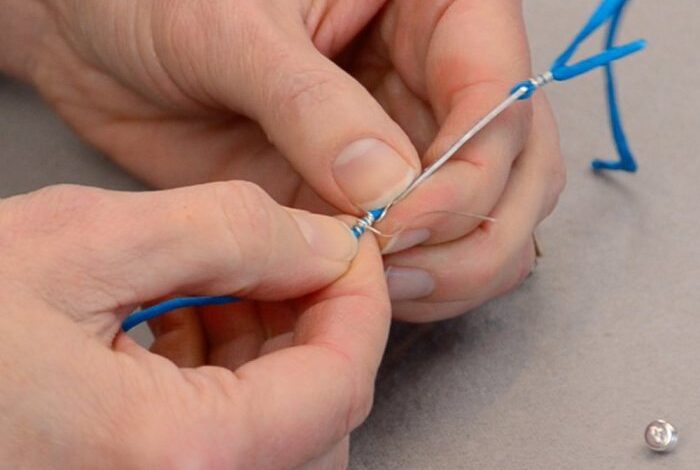
Stamping Techniques: Stamped Initial Bracelet Diy
Now that you have your materials and tools ready, it’s time to dive into the fun part: stamping! Stamping initials on metal blanks is a relatively simple process, but mastering the technique takes practice and patience. Let’s break down the basic steps and explore different techniques to achieve unique effects.
Basic Stamping Steps
To create beautiful stamped initials, follow these steps:
- Prepare the metal blank by cleaning it thoroughly with a jewelry cleaner or rubbing alcohol to remove any oils or residues that could interfere with the stamping process. Then, use fine-grit sandpaper to smooth out any imperfections on the surface, creating a consistent base for your stamp.
- Position the stamp on the blank using a stamping block. This helps to ensure even pressure and prevents the stamp from slipping during the hammering process. A stamping block is a solid surface with a recessed area that holds the blank securely while you stamp.
- Strike the stamp with a hammer to create the impression. Use a hammer specifically designed for metal stamping, as it will provide the right amount of force without damaging the metal. Start with light taps and gradually increase the force as needed. The number of strikes required will vary depending on the metal’s thickness and the desired depth of the impression.
- Repeat the process for each initial or design element. Ensure that each initial is spaced evenly and aligned properly for a polished look.
Stamping Techniques for Different Effects
- Raised Stamping: This technique involves striking the stamp with a hammer from the back of the blank. This creates a raised impression on the front of the blank. Raised stamping is ideal for creating bold, prominent initials that stand out.
- Recessed Stamping: This technique involves striking the stamp with a hammer from the front of the blank. This creates a recessed impression on the front of the blank. Recessed stamping is ideal for creating a subtle, understated look.
- Hammered Stamping: This technique involves striking the blank with a hammer, not directly on the stamp, but around the edges of the stamp. This creates a hammered texture around the initial, adding a rustic or vintage touch to the bracelet.
Tips for Aligning and Spacing Initials
- Use a ruler or measuring tapeto ensure that your initials are evenly spaced and aligned.
- Mark the blank with a pencilbefore stamping to guide the placement of your initials.
- Practice on scrap metalbefore stamping on your final blank. This will help you to get a feel for the stamping process and to ensure that your initials are spaced and aligned properly.
Finishing Touches

Your stamped initial bracelet is almost complete! Now it’s time to give it that professional, polished look. The finishing touches involve cleaning, polishing, and adding a protective coating to ensure your bracelet shines and lasts.
Making a stamped initial bracelet is a great way to personalize a gift, and it’s a fun project that can be customized with different charms and beads. If you’re looking for a more ambitious DIY project, consider building a copper pipe child’s desk.
It’s a unique and functional piece of furniture that you can design to fit your child’s needs. Once you’ve mastered the art of hammering metal, you can even try adding copper pipe accents to your bracelets for a truly unique look!
Cleaning the Metal
Cleaning the metal blank after stamping is essential to remove any residue from the stamping process. This residue can be from the metal itself, the stamping tools, or any cleaning products used. A simple solution of warm soapy water and a soft-bristled brush can do the trick.
For stubborn residue, a commercial jewelry cleaner can be used. Be sure to rinse the bracelet thoroughly and dry it completely with a soft cloth.
Polishing the Metal
Polishing your bracelet enhances its shine and brings out the metal’s natural beauty. There are different polishing techniques and tools available:* Buffing wheels:These are attached to a polishing motor and are used with polishing compounds to achieve a high shine.
Polishing cloths
These are made from soft materials like microfiber and can be used with polishing pastes or creams.
Making a stamped initial bracelet is a great way to personalize a gift or add a touch of whimsy to your own style. I recently discovered a great resource for setting realistic goals and tracking progress, which is especially helpful when tackling a project like this.
This guide on progress report ceilings and floors provides a framework for setting achievable milestones, which is exactly what I need to stay motivated as I learn the art of metal stamping.
Sandpaper
Fine-grit sandpaper can be used to smooth out any rough edges or imperfections.The type of polish you choose will depend on the metal and the desired finish. For example, silver bracelets may benefit from a silver polishing cloth, while gold bracelets might require a gold polishing cloth.
Adding a Protective Coating
A protective coating, like sealant or lacquer, helps prevent tarnishing and scratches, extending the life of your bracelet. These coatings come in various finishes, including:* Clear:This is the most common type of coating and offers a transparent finish, preserving the metal’s natural color.
Matte
This finish provides a less shiny, subdued look.
Glossy
This finish adds a high shine to the bracelet.When applying the coating, follow the manufacturer’s instructions carefully. Most coatings require several thin coats for optimal protection.
Attaching the Clasp and Findings
Once the bracelet is cleaned, polished, and coated, it’s time to attach the clasp and any additional findings. There are different types of clasps available, including:* Lobster clasps:These are the most common type of clasp and are easy to open and close.
Toggle clasps
These clasps feature a small bar that slides through a loop, providing a secure closure.
Magnetic clasps
These clasps use magnets to secure the bracelet.You can also add other findings, such as charms, beads, or pendants, to personalize your bracelet. To attach the clasp and findings, you can use jump rings or soldering techniques. Be sure to use high-quality findings that are compatible with the metal of your bracelet.
Variations and Ideas
The beauty of stamped initial bracelets lies in their endless possibilities for personalization. Don’t limit yourself to a simple initial; explore creative variations to make your bracelet truly unique.
Using Different Metal Colors and Textures
Experimenting with different metal colors and textures adds depth and dimension to your bracelet. Consider using silver, gold, rose gold, or even copper for a vintage look. Explore different finishes like brushed, hammered, or polished to create contrasting textures.
- Silver:A classic choice, offering a sleek and modern aesthetic.
- Gold:Adds a touch of luxury and sophistication.
- Rose Gold:Offers a warm and romantic feel.
- Copper:Provides a vintage and rustic appeal.
- Brushed Finish:Creates a matte, textured surface.
- Hammered Finish:Adds a unique and organic look.
- Polished Finish:Creates a smooth and shiny surface.
Incorporating Additional Symbols or Motifs
Beyond initials, consider adding symbols or motifs that hold personal significance. This could include:
- Hearts:Represent love, friendship, or family.
- Stars:Symbolize hope, dreams, and aspirations.
- Flowers:Represent beauty, nature, and growth.
- Animals:Can symbolize personal traits or represent favorite creatures.
- Geometric Shapes:Offer a modern and minimalist touch.
Adding Beads or Charms to the Bracelet
Beads and charms can enhance the bracelet’s visual appeal and add a personal touch. Consider using:
- Birthstone Beads:Represent the month of birth.
- Gemstone Beads:Add color and sparkle.
- Wooden Beads:Offer a natural and earthy feel.
- Metal Charms:Can be personalized with initials, dates, or symbols.
Creating Matching Sets of Bracelets, Stamped initial bracelet diy
Matching sets of bracelets are a thoughtful gift idea for couples, friends, or family members. You can create bracelets with:
- Matching Initials:For couples or best friends.
- Family Initials:For a family bracelet set.
- Matching Symbols:For a cohesive and meaningful design.
Safety Precautions
Metal stamping is a fun and rewarding craft, but it’s essential to prioritize safety to prevent injuries. Working with metal tools requires caution and awareness, so always follow these safety guidelines to ensure a safe and enjoyable crafting experience.
Eye Protection
Protecting your eyes is paramount when working with metal stamping tools. The force of hammering can cause metal shards or debris to fly off, posing a risk to your eyes. Always wear safety glasses that are designed to protect against flying objects.
Ensure that the glasses fit snugly and provide adequate coverage.
Work Surface
A sturdy work surface is crucial for safe metal stamping. A solid, flat surface prevents the metal blank from shifting or moving during stamping, reducing the risk of accidental injury. Use a workbench, table, or a dedicated crafting area with a stable and non-slip surface.
Avoid using surfaces that are prone to vibrations or movement, as these can affect the accuracy of your stamping and increase the risk of accidents.
Tool Handling
Handle all metal stamping tools with care and respect. Avoid dropping them, as this can damage the tools and create sharp edges. Always store tools in a designated area to prevent accidental contact and injuries. Regularly inspect tools for signs of wear and tear, and replace them as needed.
Sharp Edges
Metal blanks and tools can have sharp edges and points, which can cause cuts or punctures. Be mindful of these sharp edges and handle the metal pieces carefully. Use protective gloves if necessary, especially when working with smaller pieces or delicate designs.
Troubleshooting

Stamping initial bracelets is a fun and rewarding craft, but like any DIY project, you may encounter some challenges along the way. Don’t worry, most issues are easily solved with a little patience and the right techniques. Here are some common problems and solutions to help you create perfect stamped bracelets.
Uneven Stamping Impressions
Uneven stamping impressions can occur due to several factors, including improper pressure, uneven surfaces, or the angle of the stamp. Here are some tips to achieve consistent and clear impressions:
- Apply consistent pressure: Practice applying even pressure with your hammer or mallet. Avoid hitting the stamp too hard, as this can cause the metal to deform. Use a light, even tapping motion to ensure a clear impression.
- Use a stable surface: Ensure the metal blank is resting on a firm, flat surface. This will prevent the metal from shifting or bending during stamping. A stamping block or a piece of wood is ideal for this purpose.
- Position the stamp correctly: Make sure the stamp is positioned squarely on the metal blank. A slight angle can result in uneven impressions. Use a ruler or a stamping guide to ensure proper alignment.
- Adjust the hammer: If you’re using a hammer, experiment with different hammer sizes and weights. A lighter hammer may be better for delicate stamps and thinner metal.
- Consider the metal thickness: Thicker metal may require more pressure to create a clear impression. Thinner metal may be more susceptible to bending. Choose the right metal gauge for your project.
Bent or Damaged Stamps
Bent or damaged stamps can make it difficult to achieve clear impressions. This can happen if the stamps are dropped or used improperly.
- Handle stamps carefully: Store stamps in a safe place, away from sharp objects or heavy items. Avoid dropping them.
- Inspect stamps regularly: Check for any signs of damage or wear before using stamps. If you notice any bending or warping, try to gently straighten them with a pair of pliers.
- Replace damaged stamps: If a stamp is severely damaged, it’s best to replace it. Using a damaged stamp can lead to inconsistent results and further damage to the metal blank.
Difficulty Attaching Findings
Attaching findings, such as jump rings or clasps, can be challenging if the holes are too small or the metal is too thick.
- Use the right tools: Use a pair of round-nose pliers or chain-nose pliers to open and close jump rings. Make sure the pliers are the right size for the jump rings.
- Use a mandrel: A mandrel is a tool that helps to open jump rings without damaging them. Wrap the jump ring around the mandrel and use the pliers to open it.
- Lubricate the findings: Apply a small amount of lubricant, such as soap or graphite, to the jump rings or clasps. This can make it easier to insert them into the holes.
- Consider using larger findings: If the holes in your bracelet are too small, consider using larger jump rings or clasps.