Progress report dining room wallpaper – Progress Report: Dining Room Wallpaper – are you ready to transform your dining room into a stylish haven? Wallpaper is a fantastic way to add personality and visual interest to any space, and the dining room is no exception. From bold patterns to subtle textures, the right wallpaper can set the stage for unforgettable meals and create a warm and inviting atmosphere.
Whether you’re looking for a modern update or a classic touch, let’s explore the latest trends and discover how wallpaper can elevate your dining room design.
This post will dive into the world of dining room wallpaper, covering everything from trending designs and materials to practical installation tips and inspiring examples. We’ll explore how different wallpaper choices can influence the ambiance of your dining room, and we’ll guide you through the process of selecting the perfect wallpaper to complement your existing furniture and décor.
Dining Room Wallpaper Trends
The dining room is a space where families and friends gather to enjoy meals and create lasting memories. As such, it’s a space that deserves special attention when it comes to interior design. Wallpaper has become increasingly popular in recent years as a way to add personality and style to the dining room.
It offers a unique way to express your taste and transform the room into a welcoming and stylish space.
Popular Color Palettes and Patterns
The color palette and pattern you choose for your dining room wallpaper will have a significant impact on the overall ambiance of the room. Popular color palettes for dining room wallpaper include:
- Neutral Colors:Neutral colors like white, gray, beige, and cream provide a clean and timeless backdrop for any dining room decor. They create a sense of calm and sophistication and are perfect for smaller dining rooms as they make the space feel larger.
- Bold Colors:Bold colors like navy blue, emerald green, or deep red can add a touch of drama and personality to the dining room. These colors can create a more formal and sophisticated ambiance, and they can be used to accentuate a specific feature of the room, such as a statement chandelier or a beautiful dining table.
The dining room wallpaper project is moving along nicely, but I’m starting to feel a bit overwhelmed with all the decisions. I’m thinking of taking a break and planning a trip to Charleston, South Carolina, to get some inspiration.
I’ve heard amazing things about the city’s historic architecture and charming streets, and I’m sure I’ll find some beautiful wallpaper designs there. This Charleston travel guide looks like a great resource for planning my trip, so I’m going to start researching now.
After all, a little escape can be just what I need to get back on track with my dining room makeover!
- Earthy Tones:Earthy tones like terracotta, olive green, and mustard yellow bring a sense of warmth and nature into the dining room. These colors are perfect for creating a cozy and inviting atmosphere, and they can be paired with natural materials like wood and rattan to enhance the rustic feel.
Popular patterns for dining room wallpaper include:
- Geometric Patterns:Geometric patterns, such as stripes, chevron, and triangles, add a modern and sophisticated touch to the dining room. They can be used to create a sense of movement and interest in the space, and they can be paired with a variety of color palettes to create different looks.
- Floral Patterns:Floral patterns are a classic choice for dining room wallpaper, and they can add a touch of elegance and romance to the space. From delicate florals to bold blooms, there are endless options to choose from to suit your personal style.
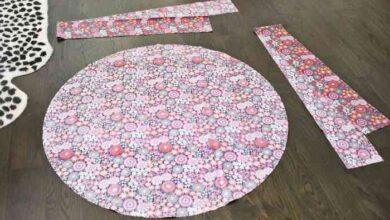
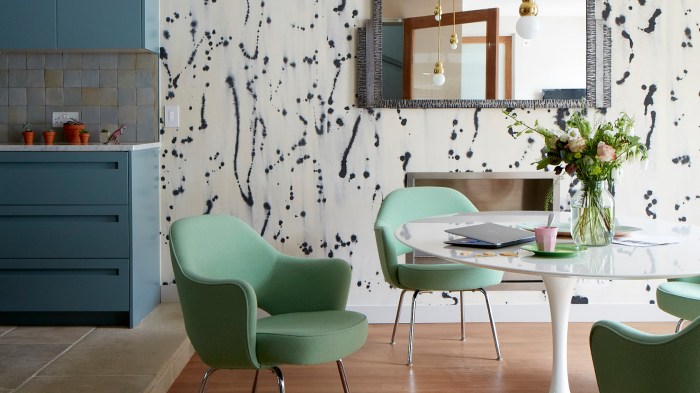
The progress report on the dining room wallpaper is coming along nicely. I’m still deciding on the exact pattern, but I’m leaning towards something with a bit of whimsy. Maybe something like the adorable polka dot etched drinking glass I saw the other day, but in a larger scale.
It’ll be a fun contrast to the traditional furniture and give the room a playful touch.
- Damask Patterns:Damask patterns are a luxurious and traditional choice for dining room wallpaper. They feature intricate designs that are often inspired by historical textiles, and they can add a touch of grandeur to the space.
Textured Wallpaper
Textured wallpaper adds depth and dimension to the dining room, creating a tactile and visually appealing surface. It can be used to create a statement wall or to enhance the overall texture of the room. Some popular textured wallpaper options include:
- Embossed Wallpaper:Embossed wallpaper features raised patterns that create a three-dimensional effect. This type of wallpaper can add a touch of luxury and sophistication to the dining room.
- Grasscloth Wallpaper:Grasscloth wallpaper is made from natural fibers, such as jute or hemp, and it has a distinctive textured surface. It’s a durable and eco-friendly option that adds a touch of warmth and natural beauty to the dining room.
- Cork Wallpaper:Cork wallpaper is a sustainable and versatile option that provides a unique textured surface. It’s available in a variety of colors and patterns, and it can be used to create a modern and stylish dining room.
Murals
Murals are a dramatic and eye-catching way to add personality and style to the dining room. They can transform a plain wall into a focal point and create a unique and memorable dining experience. Some popular mural options include:
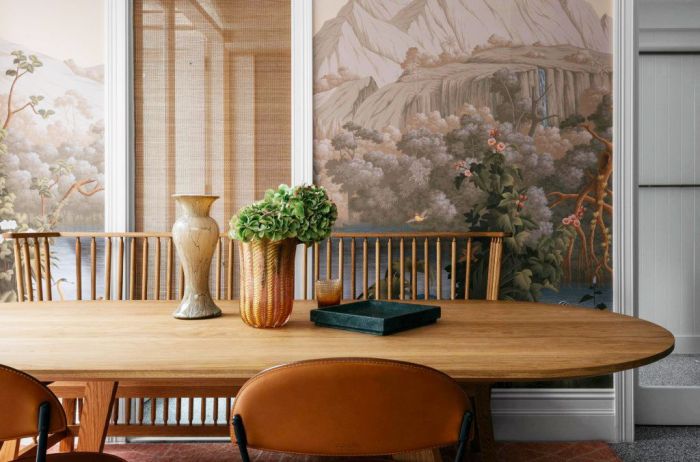
- Scenic Murals:Scenic murals depict landscapes, cityscapes, or other natural scenes. They can create a sense of depth and perspective in the dining room, and they can transport you to another place and time.
- Abstract Murals:Abstract murals feature geometric shapes, colors, and textures. They can add a modern and artistic touch to the dining room, and they can be used to create a unique and personalized space.
- Custom Murals:Custom murals are designed specifically for your dining room, and they can incorporate your favorite colors, patterns, and themes. They are a great way to personalize the space and create a truly unique dining experience.
Peel-and-Stick Wallpaper
Peel-and-stick wallpaper is a convenient and affordable option for adding a touch of style to the dining room. It’s easy to apply and remove, making it a great choice for renters or homeowners who want to experiment with different looks.
- Easy Application:Peel-and-stick wallpaper is self-adhesive, making it easy to apply without the need for paste or glue. It’s a great option for DIY enthusiasts who want to add a touch of style to their dining room without the hassle of traditional wallpaper installation.
- Removable and Reusable:Peel-and-stick wallpaper is removable and reusable, making it a great choice for renters or homeowners who want to change their decor frequently. It can be easily removed without damaging the walls, making it a convenient and hassle-free option.
- Affordable:Peel-and-stick wallpaper is often more affordable than traditional wallpaper, making it a budget-friendly way to update the dining room. It’s a great option for homeowners who want to achieve a stylish look without breaking the bank.
The Impact of Wallpaper on Dining Room Ambiance
Wallpaper is more than just a decorative element; it’s a powerful tool that can profoundly influence the mood and atmosphere of your dining room. By carefully selecting patterns and colors, you can transform your dining space into a haven of tranquility, a vibrant gathering place, or anything in between.
The Influence of Pattern and Color
The choice of wallpaper pattern and color can dramatically impact the overall feel of your dining room.
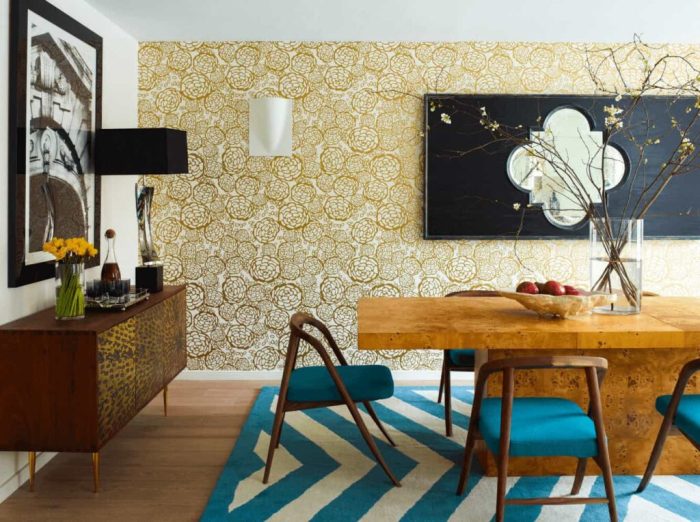
- Bold Patterns: Bold patterns, such as geometric designs, floral prints, or animal motifs, create a sense of energy and excitement. They can make a statement and draw attention, making the dining room feel more dynamic and lively. For example, a wallpaper featuring large-scale floral prints in vibrant hues like crimson or emerald green can create a bold and luxurious ambiance, perfect for a formal dining experience.
- Subtle Designs: In contrast, subtle designs, like delicate patterns, stripes, or textured wallpapers, create a more calming and sophisticated atmosphere. They can add visual interest without overwhelming the space, making it feel more serene and inviting. A wallpaper with a subtle damask pattern in muted tones of gray or beige can create a refined and elegant ambiance, perfect for a more intimate dining experience.
Incorporating Wallpaper into Dining Room Design: Progress Report Dining Room Wallpaper
Wallpaper is more than just a decorative element; it’s a powerful tool to transform the ambiance and character of your dining room. From adding a splash of color to creating a focal point, wallpaper can elevate your space to new heights.
The progress report on the dining room wallpaper is coming along nicely. I’m happy with the color choices and the overall design, but I’m still trying to decide on the exact pattern. I’ve been doing a lot of research online, and I even came across an article about the recent layoffs at Kaser Focus kaser focus lay off , which made me think about the importance of finding the right fit for a project.
I’m sure I’ll find the perfect wallpaper for my dining room, and I can’t wait to see it all come together.
Designing a Dining Room Layout with Wallpaper as a Focal Point
A well-designed dining room layout can make a statement and enhance the overall flow and functionality of the space. When incorporating wallpaper as a key design element, consider these strategies:
- Feature Wall:Choose a bold, statement-making wallpaper to create a focal point behind the dining table. This instantly draws the eye and sets the tone for the room. For example, a dramatic floral wallpaper could be used behind a rustic farmhouse table, creating a stunning contrast.
- Accent Wall:Use wallpaper on a single wall to add visual interest and break up the monotony of a neutral color scheme. A geometric wallpaper on an accent wall could complement a minimalist dining set, adding a touch of sophistication.
- Wallpapered Ceiling:For a truly unique look, consider wallpapering the ceiling. A subtle patterned wallpaper on the ceiling can create a sense of intimacy and grandeur, especially in a room with high ceilings.
- Wallpapered Furniture:Add a touch of personality to your dining room by wallpapering a piece of furniture. A vintage sideboard or a dining room hutch could be given a fresh look with a stylish wallpaper application.
Table of Wallpaper Styles and Dining Room Themes
Here’s a table showcasing different wallpaper styles and their suitability for various dining room themes:
| Wallpaper Style | Dining Room Theme | Description |
|---|---|---|
| Geometric | Modern, Minimalist | Clean lines, bold patterns, and abstract designs add a touch of sophistication. |
| Floral | Romantic, Victorian, Cottagecore | Delicate blooms, intricate patterns, and vibrant colors create a cozy and inviting atmosphere. |
| Tropical | Bohemian, Eclectic | Exotic foliage, vibrant colors, and bold prints bring a touch of the tropics to your dining room. |
| Damask | Traditional, Formal | Elegant and intricate patterns, often featuring repeating motifs, create a classic and luxurious feel. |
| Stripes | Contemporary, Nautical | Vertical or horizontal stripes add visual interest and can create the illusion of space. |
Selecting the Right Wallpaper for Your Dining Room
The right wallpaper can make all the difference in creating the desired ambiance for your dining room. Here’s a guide to selecting the perfect wallpaper:
- Room Size:Consider the size of your dining room. Small rooms benefit from light and airy patterns, while larger rooms can accommodate bolder designs.
- Lighting:The amount of natural light in your dining room will affect how the wallpaper appears. Darker rooms require lighter patterns to avoid making the space feel cramped, while well-lit rooms can handle darker or more dramatic patterns.
- Furniture Style:The style of your dining room furniture should complement the wallpaper. A modern dining set would look great with a geometric wallpaper, while a traditional dining set might be best suited for a floral or damask wallpaper.
- Personal Style:Ultimately, the most important factor is your own personal style. Choose a wallpaper that you love and that reflects your personality and taste.
Dining Room Wallpaper Installation and Maintenance
Installing wallpaper in your dining room can be a rewarding DIY project that adds a touch of personality and style to the space. It’s a great way to transform the look and feel of your dining room, making it a more inviting and enjoyable area for meals and gatherings.
However, successful wallpaper installation requires careful planning and execution to ensure a smooth, professional finish.
Wallpaper Installation
The success of your wallpaper installation depends on proper preparation and the use of appropriate tools. Before you begin, gather the necessary supplies and familiarize yourself with the steps involved.
Preparing the Walls
Before applying wallpaper, ensure your walls are clean, smooth, and free from any imperfections. This step is crucial for a successful and long-lasting wallpaper installation.
- Remove existing wallpaper:If there’s old wallpaper on the walls, carefully remove it using a wallpaper steamer or scoring tool.
- Fill cracks and holes:Use spackle or patching compound to fill any cracks, holes, or imperfections in the walls. Allow the spackle to dry completely before sanding it smooth.
- Prime the walls:Apply a primer to the walls to create a smooth, even surface for the wallpaper to adhere to. Primer helps to seal the walls, preventing the wallpaper from absorbing moisture and creating uneven patterns.
Tools and Materials
Having the right tools on hand is essential for a smooth and successful wallpaper installation. The tools listed below are commonly used and recommended for a professional finish.
- Wallpaper paste:Choose a wallpaper paste specifically designed for the type of wallpaper you’re using.
- Paste brush:A paste brush helps evenly apply wallpaper paste to the back of the wallpaper.
- Smoothing tool:A smoothing tool, such as a plastic smoother or a soft sponge, helps to remove air bubbles and ensure the wallpaper adheres properly to the wall.
- Utility knife:A utility knife is used for trimming excess wallpaper along the edges.
- Level:A level helps ensure the wallpaper is hung straight and aligned.
- Measuring tape:A measuring tape is essential for accurately measuring the walls and cutting the wallpaper to size.
- Pencil:A pencil is used for marking the wallpaper and walls.
- Scissors:Scissors are used for trimming the wallpaper.
- Stepladder:A stepladder provides access to higher areas of the walls.
Hanging the Wallpaper
Hanging wallpaper requires patience and precision. Start with the first panel and work your way around the room, ensuring each panel is aligned and smooth.
- Measure and cut:Measure the wall and cut the wallpaper panels to size, leaving a few inches of extra length for trimming later.
- Apply paste:Apply wallpaper paste to the back of the wallpaper panel, using a paste brush to ensure even coverage.
- Hang the panel:Align the first panel with the top of the wall, ensuring it’s straight and level. Use a smoothing tool to remove any air bubbles and ensure the wallpaper adheres to the wall.
- Trim excess:Use a utility knife to trim any excess wallpaper along the edges, ensuring a clean and professional finish.
- Repeat for remaining panels:Continue hanging the remaining panels, ensuring each panel is aligned with the previous one.
Wallpaper Maintenance
Dining room wallpaper is prone to spills and stains, so it’s essential to implement proper maintenance practices to keep it looking its best.
Cleaning Wallpaper
Regular cleaning is essential to maintain the appearance and longevity of your dining room wallpaper.
- Dust regularly:Use a soft brush or a feather duster to remove dust and debris from the wallpaper surface.
- Spot clean spills:For spills or stains, use a damp cloth with mild soap or a wallpaper cleaner specifically designed for your wallpaper type. Avoid using harsh chemicals or abrasive cleaners, as they can damage the wallpaper.
- Avoid scrubbing:Avoid scrubbing the wallpaper surface, as this can cause damage or discoloration.
Protecting Wallpaper
Taking preventive measures can help protect your dining room wallpaper from damage and extend its lifespan.
- Use furniture pads:Place furniture pads on the bottom of furniture legs to prevent scratching or rubbing against the wallpaper.
- Avoid direct sunlight:Prolonged exposure to direct sunlight can fade the colors of your wallpaper. Consider using curtains or blinds to protect the wallpaper from excessive sunlight.
- Keep humidity levels stable:High humidity levels can cause wallpaper to peel or bubble. Ensure your dining room has adequate ventilation to prevent moisture buildup.
Dining Room Wallpaper Inspiration

Let’s dive into the exciting world of dining room wallpaper inspiration, where creativity meets functionality. Discover how wallpaper can transform your dining space into a haven of style and personality.
Examples of Unique and Creative Wallpaper Designs
Wallpaper offers a boundless canvas for artistic expression. Here are some inspiring examples of dining rooms that showcase unique and creative wallpaper designs:
- Geometric Patterns:A bold geometric wallpaper in vibrant hues can create a visually stimulating backdrop for a modern dining room. Imagine a sleek dining table paired with minimalist chairs against a backdrop of geometric shapes, adding a touch of dynamism to the space.
- Floral Motifs:For a touch of romance and elegance, consider a wallpaper adorned with delicate floral motifs. A vintage-inspired dining table with intricately carved details would complement this style beautifully. The wallpaper can be a soft pastel shade or a rich, vibrant hue, depending on the desired ambiance.
- Tropical Prints:Bring the outdoors in with a tropical wallpaper featuring lush foliage, exotic birds, or vibrant flowers. This design is perfect for creating a lively and inviting atmosphere in a dining room. Consider pairing it with natural materials like rattan furniture and woven placemats.
- Murals:For a truly unique and dramatic effect, consider a wallpaper mural. Imagine a captivating cityscape mural that creates a sense of depth and grandeur in your dining room. You can choose a mural that reflects your personal interests, such as a scenic landscape or a captivating abstract design.
Visual Guide to Wallpaper Styles and Dining Room Furniture and Décor
A visual guide can help you understand how different wallpaper styles complement specific dining room furniture and décor:
- Modern Dining Room:Pair a sleek, minimalist dining table with contemporary chairs against a backdrop of geometric or abstract wallpaper. Choose a wallpaper with bold colors and clean lines to create a modern and sophisticated ambiance.
- Traditional Dining Room:For a traditional dining room, opt for wallpaper with classic patterns such as damask, toile, or floral motifs. These designs will complement antique furniture and elegant tableware.
- Rustic Dining Room:Create a cozy and inviting rustic dining room with wallpaper featuring natural elements such as wood grain, stone, or foliage. This style complements wooden furniture and rustic décor.
- Bohemian Dining Room:Embrace a bohemian aesthetic with wallpaper featuring eclectic patterns, bold colors, and intricate details. This style pairs well with global-inspired furniture and textiles.
Creating a Focal Point with Wallpaper, Progress report dining room wallpaper
Wallpaper can be a powerful tool for creating a focal point in your dining room. Here are some ideas:
- Accent Wall:Select a statement wallpaper for one wall in your dining room, creating a visually striking focal point. This technique is particularly effective when using a wallpaper with a bold pattern or color.
- Dining Room Niche:If your dining room features a niche or alcove, consider using wallpaper to define the space and create a sense of intimacy. Choose a wallpaper that complements the overall style of the room and enhances the niche’s architectural features.