
Laura’s Modern DIY Table: A Comprehensive Guide to Building Your Own Statement Piece
Building a custom piece of furniture can be an incredibly rewarding experience, offering both a sense of accomplishment and a unique, personalized addition to your home. Laura’s Modern DIY Table project is a testament to this, showcasing how a well-executed DIY approach can result in a stylish, functional, and budget-friendly furniture item that rivals store-bought options. This guide will walk you through every aspect of creating your own version of Laura’s modern DIY table, from understanding its design principles to sourcing materials, executing the build, and finishing touches, ensuring you can replicate its success and tailor it to your specific needs and aesthetic.
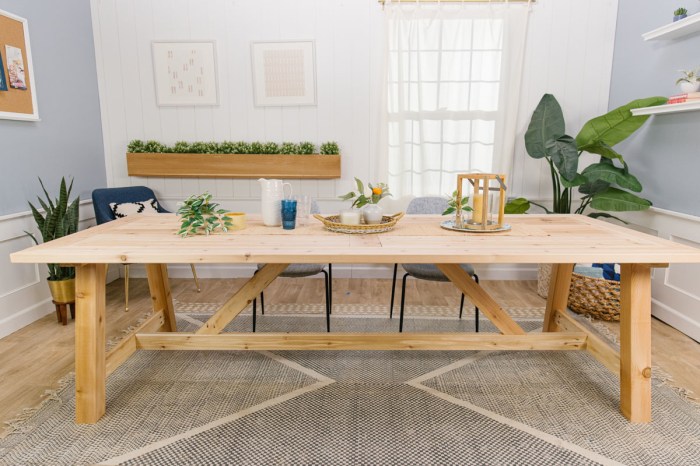
The appeal of Laura’s modern DIY table lies in its elegant simplicity and robust construction. It embodies a contemporary aesthetic characterized by clean lines, minimalist forms, and an emphasis on natural materials. Typically, such a design features a substantial tabletop, often crafted from solid wood or a high-quality veneer, supported by a sturdy and visually interesting base. The "modern" aspect comes into play through the geometric simplicity of the base, which might incorporate angled legs, a pedestal design, or a trestle-style support. This fusion of form and function makes it a versatile piece, suitable for a dining room, living area, or even as a statement desk. The DIY nature allows for customization in terms of dimensions, wood species, stain color, and even minor design modifications, enabling the builder to create a truly bespoke item that perfectly complements their existing décor.
To embark on building Laura’s modern DIY table, a thorough understanding of the core design elements is paramount. The table’s silhouette is key. Imagine a clean, rectangular or square tabletop. The thickness of the tabletop is also a design consideration; a thicker top often lends a more substantial and high-end feel. The base is where much of the modern flair is expressed. Common modern bases include: A-frame legs, where two angled legs meet at the top to form a triangular support; sled legs, which are essentially continuous loops that provide stability and a sleek profile; pedestal bases, offering a single, central support that can be visually striking; and trestle bases, typically consisting of two vertical supports connected by a horizontal beam. The connection between the tabletop and the base needs to be robust yet aesthetically integrated. This often involves hidden joinery or visually complementary hardware. The overall proportions are also critical – a table that is too tall or too short, too wide or too narrow, will feel out of place. Careful measurement and planning are the bedrock of a successful modern DIY table build.
The materials list for Laura’s modern DIY table is generally straightforward, prioritizing quality and durability. For the tabletop, solid wood is the preferred choice for a premium look and feel. Popular options include: Oak (known for its strength and distinctive grain), Maple (offering a smoother, lighter finish), Walnut (for its rich, dark tones and elegance), and Pine (a more budget-friendly option that stains beautifully). Alternatively, a high-quality plywood with a wood veneer can be a more cost-effective way to achieve a similar aesthetic, provided it’s thick enough and edges are carefully finished. For the base, the same wood species can be used, or a contrasting material could be employed for visual interest. Hardwood plywood can also be a suitable and strong option for certain base designs, especially for structural elements. Beyond the wood, you’ll need:
- Wood screws: Various lengths and gauges depending on the joinery.
- Wood glue: A high-strength PVA glue is essential for strong joints.
- Sandpaper: A range of grits from coarse (80-120) for initial shaping and removing mill marks, to medium (150-180) for smoothing, and fine (220-320) for a silky-smooth finish.
- Wood filler: For any minor imperfections or screw holes.
- Finishing products: This includes stains, varnishes, polyurethanes, or oils, chosen based on the desired look and level of protection.
- Clamps: Various sizes are crucial for holding pieces together while glue dries. Bar clamps and pipe clamps are particularly useful for tabletops.
- Hardware: Depending on the base design, you might need specialized mounting brackets or angled metal braces for added stability.
Essential tools for constructing Laura’s modern DIY table include:
- Measuring tape and pencil: For accurate marking.
- Circular saw or miter saw: For precise cuts of lumber. A miter saw is highly recommended for angled cuts on legs and base components.
- Jigsaw: Useful for any curved elements or intricate cuts, though often not necessary for very minimalist modern designs.
- Orbital sander: Significantly speeds up the sanding process.
- Drill/driver: For pre-drilling holes and driving screws.
- Countersink bit: For creating flush screw heads.
- Safety glasses and hearing protection: Non-negotiable safety equipment.
- Workbench or stable work surface: Essential for accurate cutting and assembly.
- Optional but beneficial tools: Router (for edge profiling and joinery), biscuit joiner (for strengthening panel glue-ups), pocket hole jig (for strong, hidden joinery).
The construction process for Laura’s modern DIY table is a step-by-step endeavor that demands patience and precision.
Step 1: Design and Planning. This is the most critical phase. Sketch your design, determine the exact dimensions based on your space and intended use. Consider the height of the tabletop, the width and length of the tabletop, and the dimensions and angles of the base components. Create a cut list detailing every piece of wood needed and its exact measurements.
Step 2: Sourcing Materials. Based on your cut list, purchase your chosen lumber and hardware. Ensure the wood is as straight and free of major knots or defects as possible.
Step 3: Cutting the Tabletop. If using multiple planks for the tabletop, joint the edges to create perfectly straight mating surfaces. Apply wood glue to these edges, clamp the planks together tightly, ensuring they are perfectly aligned, and allow the glue to cure completely. Once cured, sand the tabletop flat and smooth, working through progressively finer grits of sandpaper.
Step 4: Building the Base. This will vary significantly depending on your chosen base design.
- For A-frame legs: Cut four identical angled pieces for the legs. Cut connecting pieces to form the top of the "A". Assemble two "A" shapes using wood glue and screws, ensuring perfect angles and stability. Connect the two "A" frames with a sturdy stretcher.
- For sled legs: Cut the components for the continuous loops. Join them securely with glue and screws, ensuring the base remains level and stable.
- For pedestal bases: Construct the column and the supporting base. This might involve laminating thicker pieces or using a robust internal structure.
- For trestle bases: Cut the vertical supports and the connecting beam. Assemble these components securely using strong joinery techniques (e.g., mortise and tenon, or robust screws and reinforcing blocks).
Step 5: Attaching the Base to the Tabletop. This is a crucial step for both stability and aesthetics. There are several methods: - Direct attachment: For simpler designs, you can screw directly through the base into the underside of the tabletop. Use appropriately sized screws and consider using a pocket hole jig for a cleaner look and stronger joint.
- Mounting brackets: For heavier tabletops or more complex base designs, metal mounting brackets can provide superior stability. Ensure the brackets are hidden as much as possible for a modern look.
- Apron: Many modern tables incorporate a subtle apron – a frame that runs along the underside of the tabletop and connects to the legs. This adds significant strength and can also provide a clean visual transition. Construct the apron from narrower planks, join the corners with pocket holes or miter joints, and then attach it to the tabletop. The legs are then attached to the apron.
Step 6: Sanding and Preparation for Finishing. Once the table is fully assembled, conduct a final sanding. Pay close attention to all surfaces, edges, and joints. Remove any dust thoroughly with a tack cloth or vacuum. Fill any minor imperfections with wood filler, let it dry, and then sand smooth.
The finishing of Laura’s modern DIY table is what truly elevates it from a DIY project to a statement piece.
Choosing Your Finish:
- Stain: To alter the natural color of the wood. Apply evenly with a brush or cloth, wiping off excess. Experiment with different stain colors on scrap wood first.
- Polyurethane (water-based or oil-based): Offers excellent durability and protection. Apply multiple thin coats, sanding lightly with very fine grit sandpaper (320-400) between coats for a smooth finish. Water-based poly dries faster and is less likely to yellow. Oil-based poly provides a warmer tone but takes longer to cure.
- Varnish: Similar to polyurethane, offering good protection.
- Oils (tung oil, linseed oil): Penetrate the wood, offering a natural, matte finish. They require more frequent reapplication but create a beautiful, tactile surface.
- Paint: For a bolder, more contemporary look, you can paint the table. Use a high-quality primer and then multiple coats of durable furniture paint.
Application Process:
- Apply Stain (if desired): Follow the manufacturer’s instructions. Work in good lighting and ensure even application.
- Apply Top Coat (Polyurethane, Varnish, or Oil): Apply thin, even coats. Avoid applying too much at once, which can lead to drips and an uneven finish. Allow each coat to dry completely according to the product’s recommendations.
- Sand Between Coats: Lightly sand with fine-grit sandpaper (320-400) between coats of polyurethane or varnish. This removes any dust nibs or imperfections and helps the next coat adhere better.
- Final Coat and Curing: Apply the final coat. Allow the table to cure fully before placing heavy items on it or using it for regular dining. Curing can take several days to a couple of weeks, depending on the product and environmental conditions.
Customization and Enhancements:
Laura’s modern DIY table offers numerous avenues for personalization. Consider these enhancements:
- Edge Profiling: Use a router to create a chamfered, rounded, or decorative edge on the tabletop.
- Inlays: For a touch of luxury, consider adding wood or metal inlays to the tabletop.
- Tabletop Variations: Explore live-edge wood for a more organic modern look, or use contrasting wood species for a geometric pattern.
- Base Modifications: Experiment with different leg angles, widths, or even combine base styles. For example, a pedestal base could be integrated into a more elaborate geometric structure.
- Sustainable Materials: Opt for reclaimed wood or sustainably sourced lumber to enhance the eco-friendly aspect of your DIY project.
- Integrated Features: For a desk version, consider adding built-in drawers or cable management solutions.
By following these detailed steps and embracing the spirit of DIY customization, you can create Laura’s Modern DIY Table – a functional, aesthetically pleasing, and deeply personal piece of furniture that will be a cherished addition to your home for years to come. The satisfaction of building something beautiful and functional with your own hands is unparalleled, and with this comprehensive guide, the creation of your own modern statement table is well within reach.
