Mastering Leather Sewing: A Comprehensive Guide for Durability and Precision
Sewing leather presents unique challenges and rewards. Unlike fabric, leather is a dense, non-fraying material that requires specialized tools and techniques to achieve professional results. Understanding these nuances is crucial for anyone aiming to create durable, aesthetically pleasing leather goods. This guide will delve into essential tips, from selecting the right leather and needles to proper tension settings and finishing techniques, enabling you to confidently tackle any leather sewing project.
Choosing the Right Leather: Foundation for Success
The type of leather you select directly impacts the sewing process and the final product. For beginners, vegetable-tanned leather is often recommended. It’s firmer, less stretchy, and takes to tooling and dyeing well, making mistakes more forgiving. Chrome-tanned leathers, commonly found in garments and upholstery, are softer and more pliable but can stretch significantly, requiring careful handling. Full-grain leather, the highest quality, retains the natural grain and imperfections of the hide, offering superior durability and character. Top-grain leather has had the outermost layer buffed off, resulting in a smoother, more uniform surface but reducing its longevity. Genuine leather, often a split leather with a sprayed or embossed finish, is the lowest quality and can be more challenging to sew due to its inconsistent thickness and tendency to tear. Consider the intended use of your project. Thicker leathers (5-8 oz) are ideal for bags, wallets, and belts, while thinner leathers (2-4 oz) are suitable for garments, gloves, and smaller accessories. Always feel the leather’s weight, flexibility, and texture to gauge its suitability.
Essential Tools for Leather Sewing: Beyond the Standard
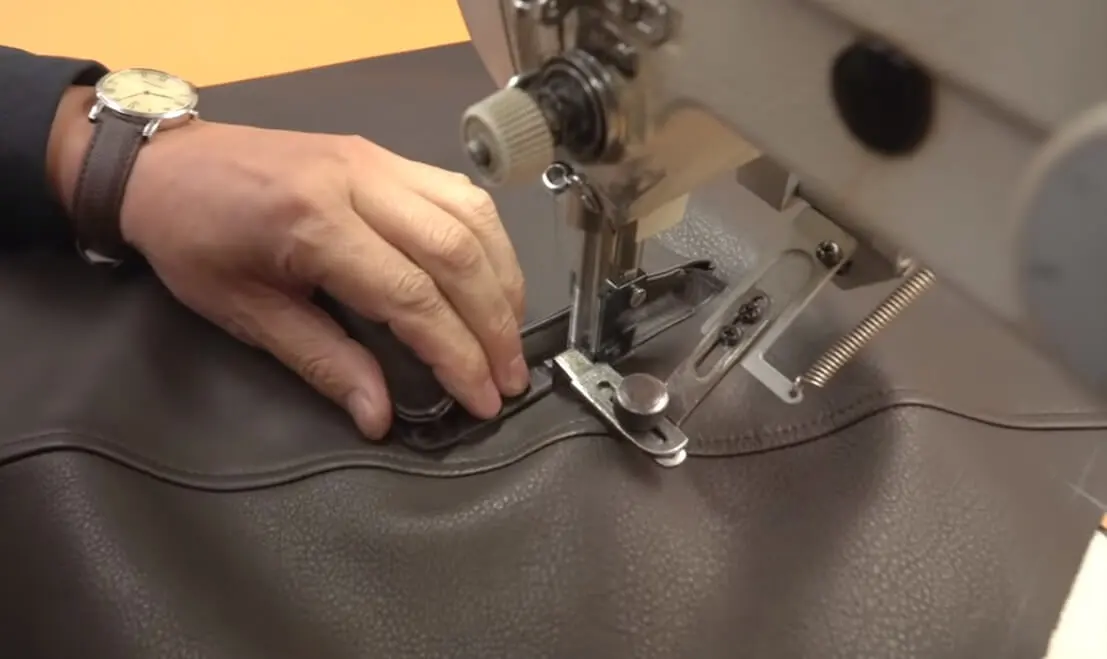
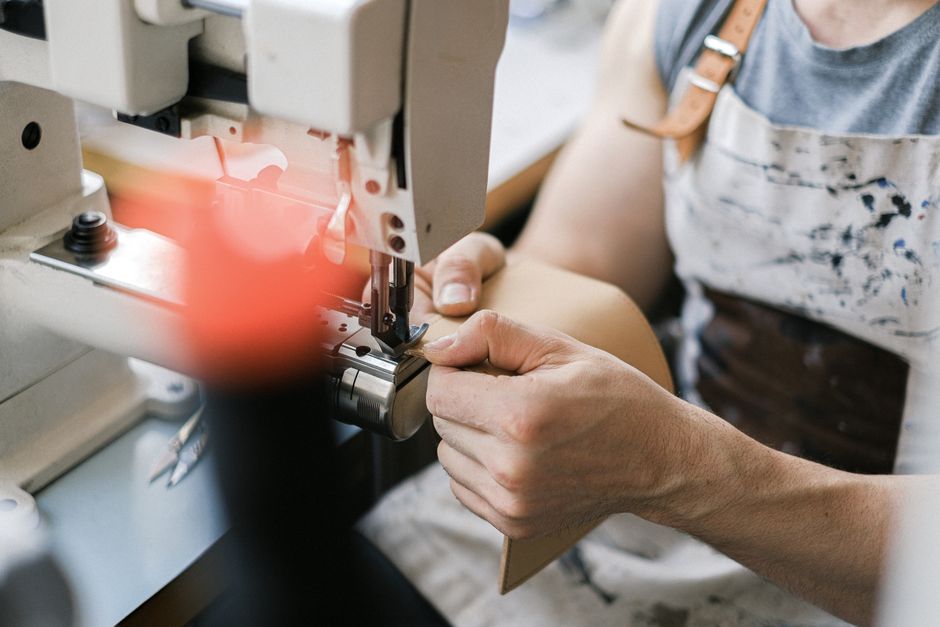
Standard sewing machines and tools are often insufficient for leather. Investing in specialized equipment is paramount. A heavy-duty sewing machine capable of handling thicker materials is a primary requirement. Look for machines with a robust motor, metal components, and a walking foot or roller foot attachment. A walking foot, also known as a dual-feed foot, is indispensable. It works in conjunction with the machine’s feed dogs to feed the top and bottom layers of leather evenly, preventing slippage and puckering. A roller foot is another excellent option, allowing the material to glide smoothly under the needle. For hand sewing, harness needles are essential. These needles have a triangular or diamond-shaped point that pierces leather cleanly without elongating the stitch holes. You’ll also need heavy-duty thread, such as waxed polyester or nylon thread, which offers superior strength and abrasion resistance. Leather shears or a rotary cutter with a mat are vital for precise cutting. Avoid using scissors meant for fabric, as they can dull quickly and create jagged edges on leather. A leather punch set is necessary for creating clean stitch holes for hand sewing or for pre-punching holes for rivets and other hardware. Measuring tools like a metal ruler and a tailor’s chalk or awl for marking are also indispensable.
Needle Selection: The Sharp Truth
The needle is your primary point of contact with the leather, and choosing the right one is critical to avoid skipping stitches, broken needles, and damaged leather. For machine sewing, opt for needles specifically designed for leather or denim. These needles have a wedge-shaped or chisel tip that cuts through the leather fibers cleanly. Avoid universal needles, which are designed for woven fabrics and can shred leather. Needle size is also important. For thinner leathers (under 4 oz), a size 90/14 or 100/16 might suffice. For thicker leathers (4 oz and above), a size 110/18 or even a 120/20 is recommended. Experiment with different needle types and sizes to find what works best with your specific leather and machine. For hand sewing, harness needles are the standard. They come in various sizes, and the triangular or diamond point ensures a clean entry and exit through the leather.
Thread Choice: Strength and Durability
Leather sewing demands thread that can withstand significant stress and abrasion. Standard cotton or polyester threads used for garment sewing are generally not strong enough. Waxed polyester or nylon thread is the preferred choice for both machine and hand sewing. The wax coating not only lubricates the thread, helping it glide smoothly through the leather and reducing friction, but also adds a degree of water resistance and prevents fraying. The thickness of the thread should be proportional to the thickness of the leather and the size of your stitch holes. Thicker threads will create more prominent, decorative stitches and are more durable for heavy-duty applications. Common thread weights for leather include Tex 40, Tex 60, and Tex 90, with higher numbers indicating thicker threads. Always test your thread on a scrap piece of leather to ensure it runs smoothly through your machine without snagging or breaking.
Machine Setup: Tension, Stitch Length, and Lubrication
Proper machine setup is paramount for successful leather sewing. The tension settings on your sewing machine will likely need to be adjusted. Leather is denser and stiffer than fabric, requiring a looser top tension and potentially a slightly tighter bobbin tension to achieve a balanced stitch. Start with your machine’s standard settings and gradually adjust the top tension counter-clockwise (looser) until you achieve a smooth, consistent stitch. Test on scrap leather. Skips stitches or looping on the underside usually indicate the top tension is too tight. Puckering or gathering on the top of the leather suggests the bobbin tension is too loose. Stitch length is another critical factor. A longer stitch length (e.g., 3.0-4.0mm) is generally recommended for leather. Shorter stitches create more perforations, weakening the leather over time. Longer stitches also allow the thread to flex more easily, preventing it from breaking under stress. Many leather sewing machines benefit from specialized lubricants. Some machines have an oil reservoir, while others require manual application of sewing machine oil or specialized leather machine oil to the needle bar and presser bar area. This lubrication reduces friction and heat, extending the life of your machine and needle.
Stitching Techniques: Hand vs. Machine
Both hand sewing and machine sewing have their place in leatherwork. Machine sewing is faster and more efficient for long, straight seams. Hand sewing, particularly with saddle stitching, offers unparalleled strength and a beautiful, artisanal aesthetic. Saddle stitching involves using two needles and a single strand of thread, creating a lockstitch that is incredibly durable and resistant to unraveling. For machine sewing, the walking foot or roller foot is essential to ensure even fabric feed. For hand sewing, a stitching awl or groover can be used to create consistent channels for your stitches, ensuring a neater appearance. When hand sewing, use a thimble to protect your finger as you push the needle through the leather. A beeswax-coated thread will also make hand sewing smoother. Always pre-punch your stitch holes for hand sewing to ensure accuracy and consistency.
Preparing Leather for Sewing: Marking and Punching
Precise marking and hole punching are vital for clean, professional leather projects. Use a scratch awl or a silver gel pen designed for leather to mark your stitching lines. Avoid ballpoint pens, as they can leave permanent marks. For stitch holes, a stitching chisel or rotary punch is ideal. Stitching chisels have multiple teeth that create evenly spaced, angled holes, which are perfect for hand sewing. Rotary punches allow you to create single holes of various sizes for hardware or decorative elements. If hand sewing, ensure your holes are punched through both layers of leather before you begin stitching. For machine sewing, you might choose to mark your stitching line and sew directly along it, or you can pre-punch holes for a more traditional hand-sewn look achieved with a machine. For thicker leathers, you may need to pre-drill holes with a drill bit specifically designed for leather or a slow-speed drill with a fine bit to prevent tearing.
Seam Finishes and Reinforcement: Durability at its Core
Leather seams are subjected to significant stress, so proper finishing and reinforcement are crucial for longevity. For machine-sewn seams, a French seam or a flat-felled seam can provide a neat, durable finish. A French seam encloses raw edges within a folded seam, preventing them from abrading. A flat-felled seam, often used in heavy-duty applications like denim and leather, involves folding one raw edge under the other and stitching over it, creating a very strong and low-profile seam. For hand-sewn seams, saddle stitching is inherently strong. Consider reinforcing high-stress areas, such as corners or attachment points for straps, with additional stitching, rivets, or bonding agents. Leather glue can be used as an adhesive to hold pieces together before stitching, creating a cleaner seam and preventing slippage. Ensure you use a leather-specific contact cement.
Dealing with Bulk and Thick Layers
Sewing thick leather or multiple layers can be challenging for any sewing machine. A walking foot or roller foot is essential for feeding the bulk evenly. Some machines have a "needle up/needle down" function that allows you to keep the needle in the leather while repositioning the material, helpful for navigating corners. If your machine struggles, consider hand sewing or using specialized leather sewing machines designed for heavy-duty work. For extremely thick projects, you might need to skive the edges of the leather. Skiving involves thinning the edges of the leather so they can be overlapped more easily and reduce bulk in the seam. This is a specialized skill that can be done with a skiving knife or a professional skiving machine. Alternatively, consider butt-joining edges with strong leather adhesive and then reinforcing with stitching.
Finishing Touches: Elevating Your Leatherwork
The finishing touches can elevate your leather project from functional to professional. Burnishing the edges of your leather with a wooden burnisher and water or gum tragacanth creates a smooth, polished edge that not only looks good but also protects the raw edges from wear. Edge painting is another option for a more decorative and protective finish. Leather dyes and finishes can be applied to alter the color or add protection to the surface. For a professional sheen, a leather conditioner or wax can be applied after the project is complete. Always test dyes and finishes on scrap leather to ensure the desired color and effect. When trimming excess threads, use a sharp pair of scissors or a rotary cutter to ensure a clean, flush finish.
Troubleshooting Common Leather Sewing Issues
- Skipped Stitches: This is often due to a dull or incorrect needle, improper thread tension, or lint in the bobbin case. Try a new, sharp leather needle, adjust tension, and clean your machine.
- Thread Breaking: Could be caused by a burr on the needle plate or bobbin case, wrong needle size, or thread that is too thick. Inspect your machine for burrs, try a larger needle, or a thinner thread.
- Puckering: Usually indicates the top tension is too tight or the fabric feed is uneven. Loosen top tension and ensure your walking foot is properly engaged.
- Needle Breaking: Often a result of forcing the needle through too thick a material without proper preparation, or a bent needle. Ensure you are using the correct needle size and type, and that your leather is skived or prepared to reduce bulk.
- Uneven Stitches: Can be caused by uneven feeding of the leather, incorrect tension, or inconsistent hole spacing. Ensure your walking foot is functioning correctly, adjust tension, and use a guide or template for consistent hole punching.
By understanding these principles and dedicating time to practice, you can master the art of sewing leather and create durable, beautiful, and long-lasting pieces.
