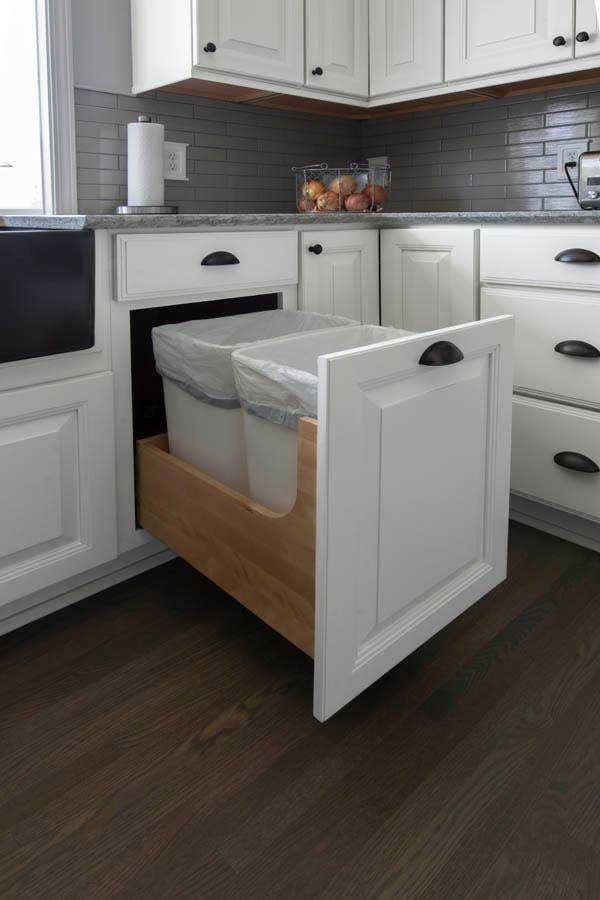

Convert a Cabinet into a Pull-Out Trash Bin: A Practical DIY Guide
Transforming an existing kitchen cabinet into a discreet and functional pull-out trash bin is a highly effective DIY project for optimizing kitchen space and improving aesthetics. This guide provides a comprehensive, step-by-step approach, detailing material selection, measurement techniques, tool requirements, and the assembly process, ensuring a professional and durable result. By integrating a waste receptacle directly into your cabinetry, you eliminate the visual clutter of standalone bins, create a more streamlined kitchen environment, and enhance overall accessibility for waste disposal. This project is suitable for individuals with moderate DIY experience and can be adapted to various cabinet sizes and configurations.
I. Planning and Preparation: Laying the Foundation for Success
Thorough planning is paramount to a successful cabinet conversion. The initial stage involves assessing the target cabinet and its suitability for housing a pull-out trash system. Consider the dimensions of the cabinet interior, paying close attention to height, width, and depth. This will dictate the maximum size of the trash bin that can be accommodated. Measure the internal clearance meticulously, accounting for any existing shelving, pipes, or structural elements that might impede the installation. The chosen cabinet should ideally be at floor level, allowing for easy access and installation of the pull-out mechanism. Avoid cabinets with shallow drawers or those housing plumbing, as these can complicate the project.
Next, determine the type of pull-out mechanism you will use. The most common and practical options are drawer slides. These come in various weight capacities and extension lengths. For a trash bin, it’s crucial to select heavy-duty drawer slides capable of supporting the weight of a full bin and its contents. Full-extension slides are highly recommended as they allow the bin to be pulled out completely, providing maximum accessibility. Consider slides with integrated soft-close features for a more premium and quieter operation.
The trash receptacle itself is another key consideration. You can purchase a dedicated pull-out trash bin insert designed for this purpose, or adapt a standard plastic or metal trash can. If using a standard bin, measure its dimensions carefully to ensure it fits within the chosen cabinet and allows for sufficient clearance for the drawer slides and door operation. Factor in the height of the bin, leaving adequate space for the lid to open, if applicable, or to comfortably remove and replace it.
II. Material and Tool Procurement: Assembling Your Arsenal
With the planning complete, it’s time to gather the necessary materials and tools. This ensures a smooth and efficient workflow once you begin the physical conversion.
A. Materials:
- Drawer Slides: Select heavy-duty, full-extension drawer slides with a weight capacity suitable for your intended bin size and typical usage. Look for brands known for durability and smooth operation.
- Trash Receptacle:
- Option 1 (Dedicated Insert): Purchase a purpose-built pull-out trash bin insert. These often come with their own mounting hardware.
- Option 2 (Standard Bin Adaptation): A sturdy plastic or metal trash can that fits the cabinet dimensions. Ensure it has a relatively flat bottom for stable mounting.
- Plywood or MDF: For constructing a mounting frame for the trash bin or for the base of the drawer slide system. A thickness of 1/2 inch or 3/4 inch is typically sufficient.
- Screws: A variety of wood screws of appropriate lengths for attaching drawer slides to the cabinet and mounting frame, and for securing the frame itself.
- Wood Glue: For reinforcing the mounting frame construction.
- Optional: Cabinet Door Mounting Hardware: If you plan to attach the trash bin unit directly to the cabinet door, you’ll need appropriate hinges and mounting plates.
- Optional: Door Handle/Pull: To operate the cabinet door.
B. Tools:
- Measuring Tape: For precise measurements of the cabinet and components.
- Pencil: For marking measurements and cutting lines.
- Safety Glasses: Essential eye protection.
- Work Gloves: For hand protection.
- Circular Saw or Jigsaw: For cutting plywood or MDF for the mounting frame.
- Drill/Driver: For pre-drilling holes and driving screws.
- Drill Bits: Various sizes for pilot holes and clearance holes.
- Screwdriver Bits: Matching your chosen screws.
- Level: To ensure the drawer slides and mounting frame are installed horizontally.
- Clamps: To hold components in place during assembly and gluing.
- Sandpaper or Orbital Sander: For smoothing edges of the mounting frame.
- Optional: Stud Finder: If attaching slides directly to cabinet walls that may not be solid.
- Optional: Utility Knife: For any minor adjustments or cleaning.
III. Building the Mounting Frame: A Stable Platform
The construction of a robust mounting frame is critical for the longevity and functionality of your pull-out trash bin. This frame will serve as the base upon which the drawer slides and the trash receptacle will be mounted.
- Measure and Cut: Based on your cabinet’s internal dimensions, measure and cut pieces of plywood or MDF to create a rectangular or U-shaped frame. The goal is to create a structure that fits snugly within the cabinet and provides a stable surface for attaching the drawer slides. If you are adapting a standard trash can, the frame should be sized to accommodate its base. If using a dedicated insert, consult its specifications for mounting dimensions.
- Assemble the Frame: Apply wood glue to the edges of the frame pieces that will join. Assemble the frame using clamps to hold the pieces together while the glue sets. For added strength, reinforce the joints with screws. Pre-drill pilot holes to prevent the wood from splitting. Ensure all corners are square.
- Reinforce (if necessary): Depending on the weight capacity of your chosen drawer slides and the trash bin, you may need to add reinforcing brackets or additional bracing to the frame.
- Sand and Finish: Once the glue is fully dry and the frame is securely assembled, sand down any rough edges. You can opt to leave the frame unfinished or apply a sealant or paint to match your cabinet interior.
IV. Installing the Drawer Slides: The Heart of the Mechanism
Precise installation of the drawer slides is paramount for smooth operation and proper alignment. This step requires careful measurement and a level approach.
- Cabinet Wall Preparation: Ensure the internal walls of the cabinet where the slides will be mounted are clean and free of debris. If the cabinet walls are not solid (e.g., thin particle board), consider reinforcing them with additional wood backing before proceeding.
- Marking Slide Positions: Determine the exact placement of the drawer slides. The slides will be mounted on the internal walls of the cabinet and on the sides of your mounting frame (or the trash bin itself if directly mounting).
- Cabinet Side: Measure the desired height for the slides on both the left and right internal cabinet walls. Use a level to ensure these marks are perfectly horizontal. For full-extension slides, the front edge of the slide should be positioned slightly back from the cabinet face, accounting for the cabinet door thickness and any clearance needed for the door to close.
- Frame/Bin Side: Position the corresponding slide components on your mounting frame or the sides of your trash receptacle, ensuring they are parallel to each other and at the same height as the cabinet-mounted slides.
- Pre-Drilling Pilot Holes: Use a drill bit slightly smaller than your screw diameter to pre-drill pilot holes at your marked locations on both the cabinet walls and the mounting frame/bin. This prevents the wood from splitting and makes screw insertion easier.
- Attaching Slides to Cabinet: Carefully align the cabinet-side portion of the drawer slides with your pilot holes. Use a level to confirm they are still horizontal. Secure the slides to the cabinet walls using the provided screws. Ensure they are firmly attached and do not wobble.
- Attaching Slides to Frame/Bin: Align the frame-mounted or bin-mounted portion of the drawer slides with their respective pilot holes. Secure them firmly with screws.
- Connecting the Slides: Once both sets of slides are installed, carefully align them and slide the frame (or bin) into the cabinet. The slides should engage smoothly. Test the extension and retraction to ensure they operate freely without binding. You may need to make minor adjustments to the alignment if you encounter resistance.
V. Integrating the Trash Receptacle: Bringing it all Together
This stage involves securely attaching your chosen trash receptacle to the mounting frame or directly to the drawer slides.
- Mounting Frame to Bin: If you are using a standard trash can and a separate mounting frame, position the trash can onto the frame. Secure it in place using screws driven through the bottom of the bin into the frame, or by using straps or brackets designed to hold the bin firmly. Ensure the bin is centered and stable.
- Direct Mounting (Dedicated Inserts): If you are using a dedicated pull-out trash bin insert, follow the manufacturer’s instructions for mounting. This usually involves attaching the bin directly to the drawer slides using provided hardware.
- Securing the Unit: Once the trash receptacle is secured to the frame or slides, perform another test of the pull-out mechanism. Ensure the entire assembly glides smoothly in and out of the cabinet.
VI. Cabinet Door Integration: The Finishing Touches
The final step is to ensure the cabinet door operates correctly with the new pull-out trash system.
- Door Attachment Option 1: Independent Door Operation: If you want the trash bin to pull out independently of the cabinet door, you can simply close the cabinet door as usual. In this scenario, you might consider installing a door handle or pull on the cabinet door for aesthetic appeal.
- Door Attachment Option 2: Direct Door Mount: For a more integrated look and operation, you can attach the pull-out trash bin system directly to the cabinet door.
- Measure and Mark: With the trash bin unit fully retracted, position it within the cabinet. Then, carefully align the cabinet door with the front of the unit. Mark the screw locations on the cabinet door that correspond to the mounting points on the front of your trash bin assembly or its frame.
- Pre-Drill and Attach: Pre-drill pilot holes in the cabinet door at the marked locations. Then, securely attach the cabinet door to the front of the pull-out unit using screws. Ensure the attachment is robust to handle the weight and movement of the door and the bin.
- Hinge Adjustment: You may need to adjust your cabinet hinges to accommodate the added weight and slightly altered door operation. Soft-close hinges can be particularly beneficial here.
- Handle Installation: Install a cabinet door handle or pull that complements your kitchen hardware. This will be used to open the cabinet door, which in turn pulls out the trash bin.
VII. Testing and Refinement: Ensuring Flawless Functionality
Before considering the project complete, thorough testing and any necessary refinements are crucial.
- Smooth Operation Test: Open and close the pull-out bin multiple times. Observe for any sticking, binding, or excessive noise. Ensure the slides extend and retract fully and smoothly.
- Weight Test: Place a moderately full trash bag into the bin and test the operation again. This will simulate typical usage and ensure the drawer slides can handle the load.
- Door Clearance: If the bin is attached to the door, ensure the door opens and closes without impediment from the surrounding cabinets or countertop. Check for any scraping or rubbing.
- Alignment Check: Visually inspect the alignment of the trash bin with the cabinet opening and the surrounding cabinetry. Make any minor adjustments to the slides or door mounting as needed to achieve a flush and professional look.
- Securing Loose Ends: Double-check that all screws are tight and all components are securely fastened.
VIII. SEO Optimization Considerations:
- Keyword Integration: Naturally incorporate keywords such as "pull-out trash bin," "kitchen cabinet modification," "DIY trash can," "cabinet organizer," "waste disposal solution," "under sink trash bin," "kitchen renovation," and "home improvement" throughout the article.
- Clear Headings and Subheadings: Use descriptive headings (H2, H3) to break up the content and improve readability for both users and search engines.
- Descriptive Image Alt Text (Implied): While not directly writing images, remember that for a real SEO strategy, all accompanying images should have descriptive alt text incorporating relevant keywords.
- Internal and External Linking (Implied): In a live article, linking to relevant product pages for drawer slides or dedicated inserts, or to other DIY guides, would enhance SEO.
- Long-Tail Keywords: Phrases like "how to convert a kitchen cabinet into a pull out trash bin" or "easy DIY pull out garbage can cabinet" should be addressed.
- User Intent: The article directly addresses the user’s intent to find a practical, step-by-step guide for this specific DIY project.
By meticulously following these steps, you can successfully convert a standard kitchen cabinet into a highly functional and aesthetically pleasing pull-out trash bin, significantly improving your kitchen’s organization and visual appeal.

