DIY Home Improvement: A Comprehensive Guide to Enhancing Your Living Space
DIY home improvement encompasses a broad spectrum of projects undertaken by homeowners to maintain, repair, renovate, or upgrade their residences. These projects range from simple cosmetic changes like painting a room to more complex structural alterations. The primary motivations behind DIY endeavors include cost savings, personal satisfaction derived from accomplishment, the ability to customize spaces to individual needs and aesthetics, and the development of new skills. Understanding the fundamentals of DIY, from planning and safety to tool selection and execution, is crucial for successful project completion. This guide delves into the various facets of DIY home improvement, offering insights and practical advice for homeowners looking to enhance their living spaces effectively and efficiently.
Planning Your DIY Home Improvement Projects: Foundation for Success
Effective planning is the bedrock of any successful DIY home improvement project, regardless of its scale. This initial phase involves a thorough assessment of the project’s scope, defining clear objectives, and establishing a realistic budget. The first step is to accurately identify the problem or the desired outcome. Is it a leaky faucet, a desire for a more modern kitchen, or an expansion of living space? This clarity dictates the subsequent planning stages.
Next, break down the project into manageable tasks. For instance, a bathroom renovation might include demolition, plumbing, electrical work, tiling, fixture installation, and painting. Listing these tasks sequentially helps in understanding the workflow and identifying dependencies. This task breakdown also forms the basis for estimating time and material requirements.
Budgeting is paramount. Homeowners should research the cost of materials, tools (if new purchases are necessary), and potential professional assistance for specialized tasks. It’s advisable to include a contingency fund of 10-20% of the total estimated cost to account for unforeseen issues or material price fluctuations. Failing to budget adequately is a common pitfall that can lead to project abandonment or compromise on quality.
Material selection is another critical aspect of planning. This involves choosing appropriate materials that align with the project’s aesthetic goals, functional requirements, and budget. Researching material durability, maintenance needs, and environmental impact is also beneficial. For example, selecting a durable flooring for a high-traffic area or moisture-resistant paint for a bathroom is a practical consideration.
Finally, consider the necessary permits and regulations. Depending on the locality and the nature of the project (e.g., structural changes, electrical or plumbing work), building permits may be required. Understanding these requirements beforehand prevents costly fines and ensures compliance with local building codes, which are often in place for safety reasons. Consulting with local building departments or experienced contractors can provide clarity on permit necessities.
Essential Tools and Equipment for DIY Home Improvement
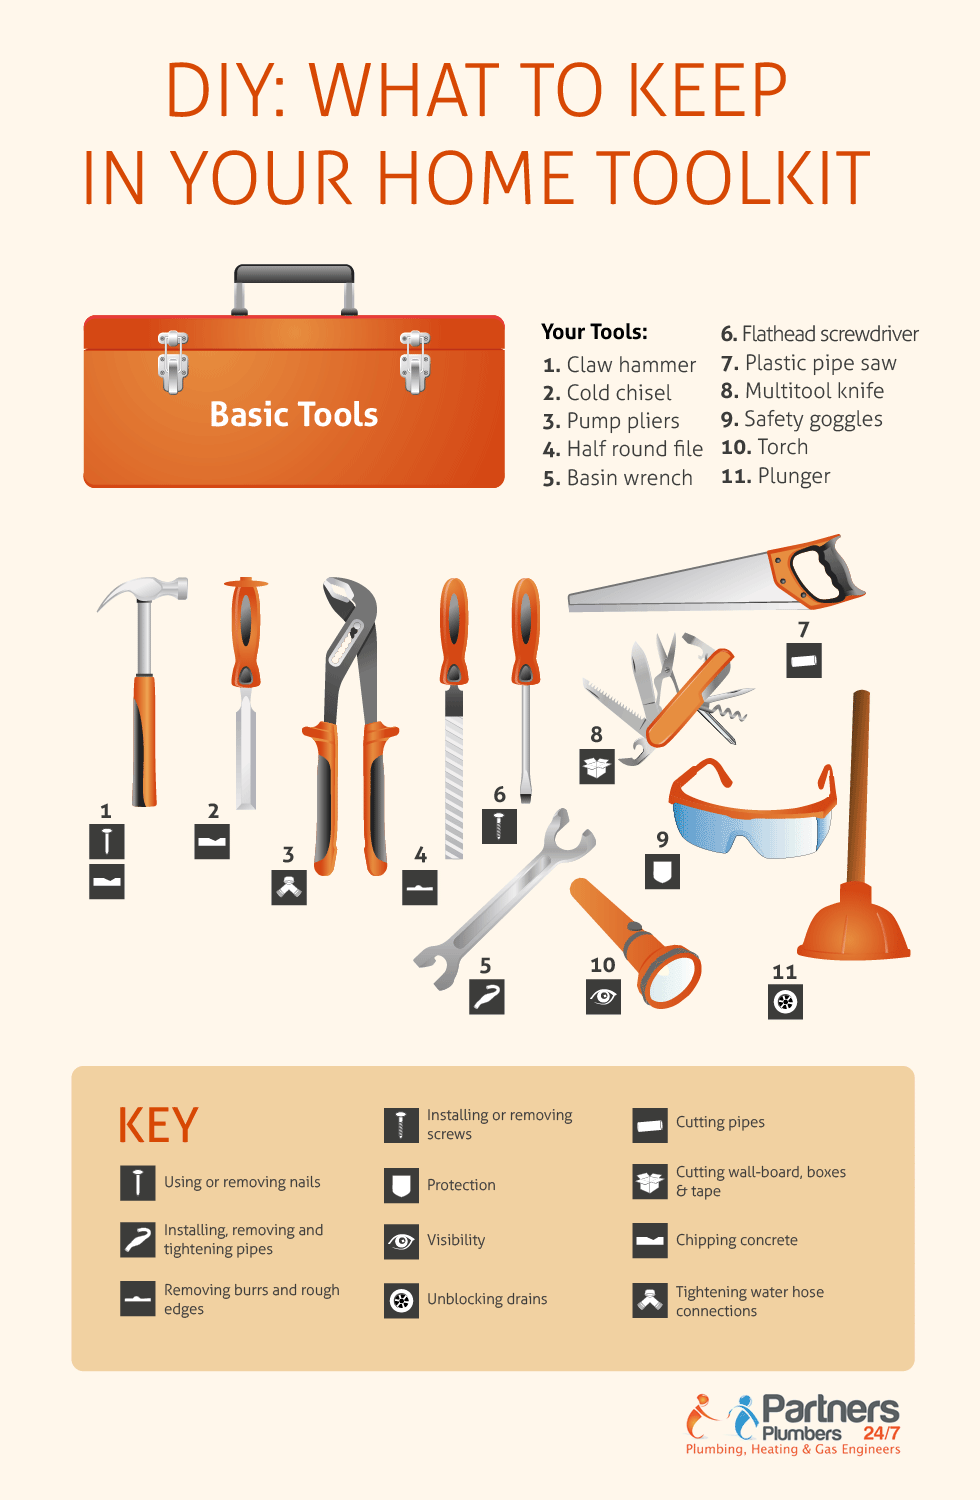
The right tools are indispensable for executing DIY home improvement projects efficiently and safely. While the specific tools required will vary based on the project, a foundational set of equipment can handle a wide array of tasks.
Hand Tools: These are the workhorses of many DIY projects. Essential hand tools include:
- Screwdriver Set: A comprehensive set with various sizes and types (Phillips, flathead) is crucial for assembly and disassembly.
- Hammer: A claw hammer is standard for driving nails and pulling them out.
- Pliers: Needle-nose, slip-joint, and locking pliers offer versatility for gripping, bending, and cutting.
- Wrench Set: Adjustable wrenches and socket sets are vital for tightening and loosening nuts and bolts.
- Measuring Tape: An accurate tape measure is fundamental for all projects requiring precise dimensions.
- Utility Knife: Useful for cutting various materials like drywall, carpet, and packaging.
- Level: A spirit level ensures surfaces are straight and plumb.
- Putty Knife/Scraper: Ideal for applying filler, removing paint, and cleaning surfaces.
Power Tools: Power tools significantly increase efficiency and capability, though they require careful handling and adherence to safety guidelines.
- Drill/Driver: A cordless drill/driver is perhaps the most versatile power tool, capable of drilling holes and driving screws. Look for models with variable speed and torque settings.
- Circular Saw: Essential for cutting wood, plywood, and other sheet materials.
- Jigsaw: Ideal for making curved cuts and intricate shapes.
- Orbital Sander: A power sander simplifies the process of smoothing surfaces, preparing them for painting or finishing.
- Heat Gun: Useful for stripping paint, thawing pipes, and shaping plastics.
Safety Equipment: Safety is non-negotiable in DIY. Always prioritize personal protective equipment (PPE).
- Safety Glasses/Goggles: Protect eyes from dust, debris, and flying particles.
- Work Gloves: Prevent cuts, abrasms, and splinters.
- Dust Mask/Respirator: Essential when working with dust-generating materials like drywall, wood, or insulation.
- Hearing Protection: Earplugs or earmuffs are necessary when operating loud power tools.
- Knee Pads: Provide comfort and protection during tasks requiring prolonged kneeling.
Other Useful Equipment:
- Ladder: A sturdy ladder is necessary for reaching high areas.
- Work Bench/Sawhorses: Provide a stable surface for cutting and assembly.
- Tool Belt/Organizer: Keeps tools readily accessible and organized.
Investing in quality tools, even if it means starting with a few key items and expanding over time, will enhance the DIY experience and contribute to better project outcomes.
Common DIY Home Improvement Project Categories
DIY home improvement can be broadly categorized into several areas, each addressing different aspects of home maintenance and enhancement.
1. Painting and Wall Coverings: This is often the most accessible DIY category, offering a significant visual impact with relatively low effort and cost.
- Interior Painting: Refreshing walls, ceilings, and trim can dramatically alter a room’s ambiance. This involves preparation (cleaning, sanding, patching), priming (especially for drastic color changes or damaged surfaces), and applying paint. Choosing the right paint finish (matte, eggshell, satin, semi-gloss, high-gloss) depends on the room’s function and desired aesthetic.
- Exterior Painting: Protecting and enhancing the curb appeal of a home. This is a more labor-intensive task requiring careful surface preparation, appropriate exterior-grade paints, and consideration of weather conditions.
- Wallpapering/Wall Murals: Installing wallpaper or decals can add texture, pattern, and personality to walls. Proper alignment, adhesive application, and smoothing are key to a professional finish.
2. Flooring Installation and Repair: Upgrading or repairing flooring can improve both aesthetics and functionality.
- Carpet Installation: Laying down new carpet, often achievable with DIY kits and rental tools for stretching.
- Hardwood/Laminate/Vinyl Plank Installation: These click-together systems are increasingly popular for DIYers due to their ease of installation over existing subfloors. Proper subfloor preparation is crucial.
- Tile Installation: Ceramic, porcelain, or natural stone tiles can be laid in kitchens, bathrooms, and entryways. This involves precise cutting, adhesive application, grouting, and sealing.
- Floor Refinishing: Sanding down old hardwood floors and applying new stains and finishes can restore their beauty.
3. Plumbing and Fixture Upgrades: Basic plumbing tasks can save significant costs compared to hiring a professional.
- Faucet and Sink Replacement: Swapping out old faucets or sinks is a common DIY project, involving disconnecting water supply lines and proper sealing.
- Toilet Repair/Replacement: Fixing leaks or replacing an old toilet is manageable with the right instructions.
- Garbage Disposal Installation/Replacement: Connecting the disposal to the sink and plumbing requires careful attention to detail.
- Pipe Leak Repair: Minor pipe leaks can often be temporarily or permanently fixed with appropriate sealants or replacement parts.
4. Electrical Work and Lighting: While more complex and potentially hazardous, some electrical tasks are within the reach of a diligent DIYer.
- Light Fixture Installation/Replacement: Swapping out old ceiling lights or installing new pendant lights is a common DIY upgrade. Always ensure power is disconnected.
- Ceiling Fan Installation: Requires understanding electrical wiring and secure mounting.
- Outlet and Switch Replacement: Replacing damaged or outdated outlets and switches.
- Smart Home Device Installation: Integrating smart thermostats, lighting controls, or security cameras.
5. Carpentry and Woodworking: Projects involving wood can range from building shelves to constructing furniture.
- Building Shelving Units: Custom shelving can maximize storage and enhance room organization.
- Deck Repair/Staining: Maintaining and enhancing outdoor wooden structures.
- Window and Door Casing Installation: Adding trim around windows and doors for a finished look.
- Minor Furniture Repair/Refinishing: Restoring the appearance and integrity of wooden furniture.
6. Exterior and Landscaping Improvements: Enhancing the outside of the home.
- Gutter Cleaning and Repair: Essential for home maintenance.
- Fence Repair/Painting: Maintaining and improving property boundaries.
- Window and Door Replacement (Minor): Some simpler window or door replacements might be DIY-friendly.
- Basic Landscaping: Mulching, planting, and creating garden beds.
7. Kitchen and Bathroom Renovations: These are often larger-scale projects but can be tackled in stages by DIYers.
- Cabinet Refacing/Repainting: A cost-effective way to update kitchen or bathroom cabinets.
- Countertop Installation (Laminate/Butcher Block): Some countertop materials are suitable for DIY installation.
- Backsplash Installation: Adding a tile or other material backsplash for visual appeal and protection.
- Updating Fixtures: Replacing cabinet hardware, lighting, and faucets.
Safety First: Essential Practices for DIY Home Improvement
Safety must be the absolute priority in any DIY home improvement project. Ignoring safety protocols can lead to severe injuries, costly repairs, and project delays.
1. Understand Your Limits: Be realistic about your skills and experience. If a project requires specialized knowledge or poses significant risks (e.g., complex electrical wiring, structural modifications, working at significant heights), it is far safer and often more cost-effective to hire a qualified professional. Do not attempt tasks that are beyond your capabilities.
2. Read and Follow Instructions: For any new tool, material, or equipment, meticulously read the manufacturer’s instructions and safety warnings before use. This includes understanding weight limits for ladders, proper ventilation for chemicals, and operating procedures for power tools.
3. Wear Appropriate Personal Protective Equipment (PPE): As detailed earlier, always use safety glasses, gloves, hearing protection, and respiratory protection when necessary. Ensure PPE fits correctly and is in good condition.
4. Secure Your Work Area:
- Clear the Space: Remove any clutter or obstacles that could cause trips or falls.
- Ventilation: Ensure adequate ventilation when working with paints, solvents, adhesives, or in enclosed spaces to prevent the buildup of hazardous fumes.
- Secure Materials: Ensure materials are stacked safely and will not fall.
- Electrical Safety: Before working with any electrical components, always turn off the power at the circuit breaker and verify that the power is off using a voltage tester. Never work on live electrical circuits.
- Water Safety: When working with plumbing, turn off the main water supply to the area or the entire house. Have towels and buckets ready to catch any residual water.
5. Proper Tool Usage:
- Inspect Tools: Before each use, inspect tools for damage. Do not use damaged tools.
- Correct Tool for the Job: Use the right tool for the specific task. Forcing a tool to do something it wasn’t designed for can lead to breakage and injury.
- Power Tool Safety: Keep guards in place, use both hands when operating power tools, and be aware of the power cord to avoid cutting it or tripping over it. Keep bystanders, especially children and pets, away from the work area.
6. Ladder Safety:
- Stable Surface: Ensure ladders are placed on a stable, level surface.
- Proper Angle: Maintain the correct angle (approximately 75 degrees) when using extension ladders.
- Three Points of Contact: Always maintain three points of contact (two hands and one foot, or two feet and one hand) when climbing or descending a ladder.
- Do Not Overreach: Move the ladder rather than overreaching.
7. Fire Safety:
- Flammable Materials: Store flammable materials like paints and solvents in approved containers and away from ignition sources.
- Electrical Hazards: Be mindful of old wiring, overloaded circuits, and potential sparks.
- Fire Extinguisher: Have a fire extinguisher readily accessible and know how to use it.
8. Clean Up Regularly: Regularly clean up your work area to prevent the accumulation of debris, which can be a trip hazard or a fire risk. Dispose of waste materials properly.
Troubleshooting Common DIY Home Improvement Issues
Even with careful planning and execution, DIY projects can encounter unexpected challenges. Having a strategy for troubleshooting is essential for successful problem-solving.
1. Inaccurate Measurements:
- Issue: Cuts are incorrect, materials don’t fit, or installations are uneven.
- Solution: Double-check all measurements before cutting or assembling. Use a reliable measuring tape and ensure it’s held straight and taut. If a mistake is made, assess if the piece can be salvaged or if new material is required. For critical measurements, measure twice, cut once.
2. Material Defects or Incompatibility:
- Issue: Purchased materials are damaged, warped, or do not work well with other chosen materials.
- Solution: Thoroughly inspect materials before purchase and upon delivery. If defects are found, return or exchange them promptly. Research material compatibility beforehand. For example, certain adhesives may not bond effectively with specific surfaces.
3. Unexpected Structural or Hidden Problems:
- Issue: Discovering rot, mold, old wiring, or unforeseen plumbing issues behind walls or under floors.
- Solution: This is where a contingency fund and flexibility are crucial. Document the discovery, assess the severity, and research solutions. For significant issues, consulting a professional may be necessary. Temporarily address minor issues if they pose a safety risk until a permanent solution can be implemented.
4. Tool Malfunctions or Inadequacies:
- Issue: A tool breaks, or a purchased tool proves insufficient for the task.
- Solution: Inspect tools regularly. If a tool malfunctions, cease use immediately and repair or replace it. If a tool is inadequate, research more suitable options. Renting specialized tools for infrequent use can be a cost-effective alternative to purchasing.
5. Project Stalling Due to Complexity:
- Issue: A task proves more difficult or time-consuming than anticipated, leading to frustration and potential abandonment.
- Solution: Revisit the project plan and break down the challenging step further. Search online tutorials, forums, or instructional videos for similar projects. If the complexity remains overwhelming, consider seeking help from a friend with relevant experience or a professional for that specific task.
6. Aesthetic Discrepancies:
- Issue: The finished product doesn’t match the desired look or blend with existing décor.
- Solution: This often stems from insufficient planning regarding style and color coordination. Review inspiration photos and samples before committing. If the outcome is unsatisfactory, consider minor adjustments like repainting, swapping hardware, or adding decorative elements to improve the aesthetic.
7. Permitting and Code Violations (Discovered Post-Project):
- Issue: Realizing a permit was required, or the work doesn’t meet local building codes.
- Solution: Contact your local building department immediately. They can advise on the necessary steps, which may include inspections, retrofitting, or even dismantling work. Addressing this proactively is far better than being caught in a violation.
Effective troubleshooting involves a calm, methodical approach. Documenting the problem, researching solutions, and not being afraid to ask for help are key strategies for overcoming obstacles in DIY home improvement.
Maximizing Value and ROI with DIY Home Improvement
While cost savings are a primary driver for DIY home improvement, strategically executed projects can significantly enhance a home’s value and return on investment (ROI). Identifying projects that offer the greatest financial and functional benefits is key.
Projects with High ROI:
- Kitchen and Bathroom Updates: These are often the most impactful areas for increasing home value. Minor updates like new paint, updated fixtures, refaced cabinets, and modern countertops can yield substantial returns. Full renovations, while more expensive, can command even higher appreciation.
- Curb Appeal Enhancements: The exterior of a home creates the first impression. Projects like fresh exterior paint, new landscaping, updated front doors, and well-maintained gutters can significantly boost perceived value and attract buyers.
- Energy Efficiency Upgrades: Improving insulation, sealing air leaks, installing energy-efficient windows and doors, and upgrading to energy-efficient HVAC systems not only reduce utility bills but also make a home more attractive to environmentally conscious buyers and can lead to higher resale values.
- Flooring Replacements: Replacing worn or outdated flooring with popular options like hardwood, laminate, or high-quality vinyl planks can make a significant aesthetic and functional improvement, appealing to a broader range of buyers.
- Interior Painting: A fresh coat of neutral, modern paint is one of the most cost-effective ways to refresh a home’s interior, making it feel cleaner, brighter, and more spacious.
Strategic DIY Approaches for Value:
- Focus on Aesthetics and Functionality: Prioritize projects that improve the visual appeal and practical usability of the home. Buyers are often drawn to updated kitchens, bathrooms, and inviting living spaces.
- Neutral Color Palettes: When painting or choosing finishes, opt for neutral and widely appealing colors. These tend to have broader appeal and allow potential buyers to envision their own décor.
- Quality Over Quantity: While DIY saves labor costs, using good quality materials is essential for durability and long-term value. Cheap materials can look dated quickly and may require premature replacement.
- Professional Presentation: Even for DIY projects, aim for a professional finish. Sloppy work can detract from value. If a particular skill is lacking, consider hiring a professional for that specific aspect.
- Document Your Work: Keep records of significant DIY projects, including the materials used and the processes involved. This can be valuable information for future owners and for insurance purposes.
- Target Your Market: Understand the expectations of buyers in your local real estate market. What features and improvements are most sought after in your area?
DIY projects that might have lower ROI (depending on the scale and execution):
- Highly Specialized or Niche Renovations: Projects catering to very specific personal tastes might not appeal to a broad buyer base.
- Structural Changes Without Professional Oversight: Significant structural work that isn’t properly permitted or executed can be a red flag for buyers and appraisers.
- Excessive Personalization: While personalizing a home is a benefit of DIY, over-personalizing with highly unique design choices may limit broad appeal.
By carefully selecting and executing DIY home improvement projects that align with market demands and enhance the home’s core appeal, homeowners can effectively increase their property’s value and achieve a significant return on their investment of time and effort.
Conclusion
DIY home improvement offers a rewarding pathway to enhancing living spaces, fostering personal accomplishment, and potentially increasing property value. From meticulous planning and the acquisition of essential tools to the diligent application of safety protocols and strategic troubleshooting, every stage of a DIY project demands attention to detail and a commitment to quality. By understanding the diverse categories of improvement projects, from cosmetic updates like painting and flooring to more involved endeavors in plumbing and carpentry, homeowners can tailor their efforts to their specific needs and aspirations. Prioritizing safety ensures that the journey of transforming a house into a dream home is not only successful but also free from preventable hazards. Furthermore, a strategic approach to DIY, focusing on projects that offer high ROI, allows homeowners to maximize the value and appeal of their property, making every invested hour and dollar work towards a tangible increase in their home’s worth and livability.
