Easy clay votive DIY takes center stage, inviting you to create charming and personalized accents for your home. With just a few basic materials and a touch of creativity, you can transform ordinary clay into beautiful votives that add warmth and elegance to any space.
These handmade treasures are perfect for gifting, enhancing your own decor, or simply enjoying the therapeutic process of crafting.
Whether you’re a seasoned crafter or a curious beginner, this project is accessible and rewarding. The process is simple, allowing you to personalize your votives with unique shapes, textures, and colors. From rustic farmhouse styles to modern minimalist designs, the possibilities are endless, limited only by your imagination.
Let’s embark on this DIY adventure and discover the joy of creating your own cozy ambiance.
Introduction to Clay Votive DIY
Clay votives are small, decorative containers made from clay, often used to hold tea lights or other small candles. They are a popular choice for home decor, adding a touch of warmth and ambiance to any space. They are also a great option for gifting, as they are personal, unique, and affordable.
Benefits of Creating Your Own Votives
Creating your own clay votives offers several advantages:
- Customization:You can choose the shape, size, color, and design of your votives to perfectly match your personal style and decor.
- Cost-effectiveness:Making your own votives can be significantly cheaper than buying them from stores, especially if you use readily available materials.
- Therapeutic Experience:The process of creating clay votives can be a relaxing and therapeutic experience, allowing you to unwind and express your creativity.
- Unique Gifts:Handmade clay votives make thoughtful and personalized gifts for friends, family, or special occasions.
Versatility of Clay Votives
Clay votives are incredibly versatile and can be incorporated into various aspects of home decor and gifting:
- Home Decor:Clay votives can be used to create a cozy and inviting atmosphere in any room, whether it’s on a coffee table, bookshelf, or mantelpiece. They can be arranged in groups for a dramatic effect or used individually as statement pieces.
- Gifting:Clay votives make thoughtful and unique gifts for various occasions, such as birthdays, holidays, housewarmings, or even just to show someone you care. They can be personalized with special messages, designs, or even embedded with dried flowers or other decorative elements.
- Event Decoration:Clay votives can be used to create a beautiful and elegant ambiance for weddings, parties, or other special events. They can be placed on tables, walkways, or even hung from the ceiling for a magical touch.
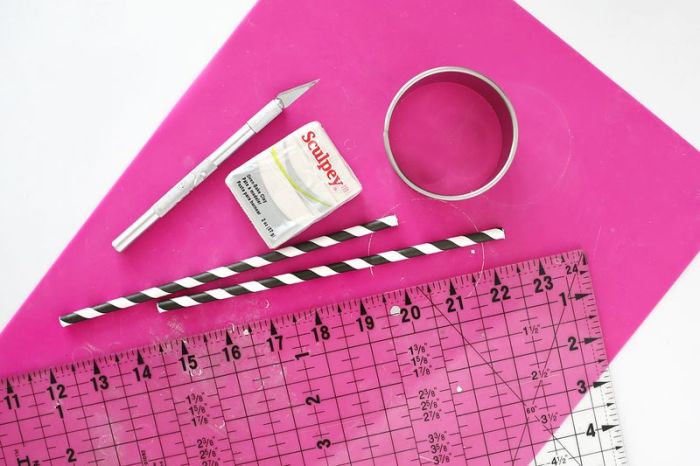
Materials and Tools
You’ll need a few essential materials and tools to create your own clay votives. This list includes everything you need to get started, from the clay itself to the finishing touches.
Materials, Easy clay votive diy
The materials you choose will influence the look and feel of your votives.
- Clay: Choose a clay that is suitable for sculpting and baking. Air-dry clay is a good option for beginners, as it does not require a kiln. Polymer clay is another popular choice, as it is durable and comes in a variety of colors.
Making easy clay votive holders is a fun and relaxing craft, perfect for adding a touch of personalized warmth to your home. As I was working on my latest batch, I was reminded of the importance of community engagement, especially when it comes to resource development.
The recent news about Canadian North Resources strengthening the community engagement and consultation for exploration and development of the Ferguson Lake Project really resonated with me. Just like crafting these little clay votives, involving everyone in the process is key to creating something truly meaningful and sustainable.
- Votive mold: This will determine the shape of your votives. You can find a variety of votive molds online or at craft stores.
- Rolling pin: This will help you flatten the clay evenly.
- Craft knife: This will help you cut the clay to size and create intricate designs.
- Scissors: These are useful for trimming excess clay.
- Acrylic paint: This will help you add color and detail to your votives.
- Paintbrushes: Use different sizes of brushes for different effects.
- Clear sealant: This will protect your votives from water damage and make them more durable.
Making easy clay votives is a fun and affordable way to add a personal touch to your holiday decor. You can create unique shapes and patterns to fit your style, and even personalize them with festive colors and embellishments.
If you’re looking for a DIY project to add a handmade touch to your holiday gifts, you can also check out this great tutorial on how to make your own holiday card. After you’ve made your votives, you can use them to create a cozy and inviting atmosphere in your home, or give them as gifts to friends and family.
- Tea lights: These are the candles you will use in your votives.
Tools
These tools are essential for creating your clay votives.
- Work surface: A flat, clean surface is essential for working with clay.
- Water: This will help you soften the clay and make it easier to work with.
- Spatula: This will help you smooth out the clay and create clean edges.
Crafting easy clay votives is a great way to add a touch of handmade charm to your home. I love how they can instantly elevate a space, and they’re so versatile – you can customize them with different colors, textures, and even add dried flowers or other embellishments.
Speaking of inspiration, I recently saw the stunning summer capsule collection from Tory Burch , and the vibrant colors and patterns reminded me of the possibilities with clay votives. The earthy tones and textures of the collection could easily translate into unique votive designs, adding a touch of summery sophistication to any room.
- Baking sheet: This is used for baking polymer clay votives.
- Oven: This is required for baking polymer clay votives.
Materials and Tools Table
Here is a table summarizing the materials and tools you’ll need:
| Material | Description | Quantity | Where to Buy |
|---|---|---|---|
| Clay | Suitable for sculpting and baking | 1 block | Craft stores, online retailers |
| Votive mold | Determines the shape of your votives | 1 | Craft stores, online retailers |
| Rolling pin | Flattens the clay evenly | 1 | Craft stores, online retailers |
| Craft knife | Cuts the clay to size and creates designs | 1 | Craft stores, online retailers |
| Scissors | Trims excess clay | 1 | Craft stores, online retailers |
| Acrylic paint | Adds color and detail to your votives | As needed | Craft stores, online retailers |
| Paintbrushes | Different sizes for different effects | As needed | Craft stores, online retailers |
| Clear sealant | Protects votives from water damage and makes them durable | 1 bottle | Craft stores, online retailers |
| Tea lights | Candles to use in your votives | As needed | Grocery stores, online retailers |
| Work surface | Flat, clean surface for working with clay | 1 | N/A |
| Water | Softens the clay and makes it easier to work with | As needed | N/A |
| Spatula | Smooths out the clay and creates clean edges | 1 | Craft stores, online retailers |
| Baking sheet | Used for baking polymer clay votives | 1 | Kitchen stores, online retailers |
| Oven | Required for baking polymer clay votives | 1 | N/A |
Tips and Tricks

Creating beautiful and durable clay votives requires some key tips and tricks to ensure professional-looking results. This section delves into some techniques that can enhance the overall quality and longevity of your clay votives.
Smooth Surfaces and Clean Edges
Smoothing out the clay surface and ensuring clean edges are crucial for a polished look.
- Use a damp sponge or cloth to gently smooth out any rough edges or fingerprints on the clay surface. This creates a uniform and visually appealing finish.
- Employ a sculpting tool or a sharp knife to achieve clean and defined edges. This ensures a professional look and prevents any uneven or jagged edges.
Preventing Cracks and Shrinkage
Clay shrinkage and cracking are common issues during the drying and firing process. To minimize these problems, consider these tips:
- Allow the clay to dry slowly and evenly. Avoid placing it in direct sunlight or near a heat source. This helps prevent sudden temperature changes that can cause cracks.
- Follow the manufacturer’s recommendations for drying and firing temperatures. This ensures that the clay is cured properly and minimizes the risk of cracking or warping.
Adding Durability and Longevity
To enhance the durability and longevity of your clay votives, consider the following:
- Use a glaze or sealant to protect the clay surface. This creates a protective barrier against moisture and scratches, extending the lifespan of the votive.
- Avoid using excessive amounts of water when working with the clay. This can weaken the clay and make it more prone to cracking.
Safety Precautions
Crafting clay votives is a fun and rewarding experience, but it’s crucial to prioritize safety throughout the process. Working with clay and candles involves potential hazards, so it’s essential to take precautions to prevent accidents and ensure a safe environment.
Working with Clay
Working with clay can be messy, and certain types of clay can be toxic if ingested. To mitigate these risks, follow these safety measures:
- Wash your hands thoroughlyafter handling clay, especially before eating or touching your face.
- Avoid using clay near food preparation areasto prevent contamination.
- Store clay in a sealed containerin a cool, dry place to prevent it from drying out and cracking.
- Use a well-ventilated areawhen working with clay, as some types can release fumes that may be harmful if inhaled.
- Wear a dust maskif you are sensitive to dust or if you are working with clay in a poorly ventilated area.
Working with Candles
Candles are a source of fire and heat, and it’s important to take precautions to prevent accidents and ensure fire safety. Here are some important guidelines to follow:
- Always burn candles on a heat-resistant surface, such as a ceramic tile or a metal tray, to prevent damage to surfaces and potential fire hazards.
- Never leave burning candles unattended, and keep them away from flammable materials, such as curtains, furniture, and paper.
- Keep candles out of reach of children and petsto prevent accidental burns or fires.
- Trim candle wicksto 1/4 inch before lighting to prevent excessive smoke and soot.
- Extinguish candles completelybefore leaving the room or going to sleep.
General Safety Tips
- Use proper tools and equipmentfor your clay projects. Make sure your tools are sharp and in good working order.
- Keep your work area clean and organizedto prevent accidents and make it easier to find what you need.
- Always wear appropriate clothing and footwearwhen working with clay and candles. Avoid loose clothing that could catch fire or get caught in tools.
- Use a first-aid kitin case of minor injuries, such as cuts or burns.
Conclusion: Easy Clay Votive Diy
Creating your own clay votive holders is a rewarding and creative experience. You can personalize them with different colors, textures, and designs, adding a unique touch to your home décor.
Key Takeaways
The process of making clay votives is relatively simple and can be enjoyed by individuals of all skill levels. By following the steps Artikeld in this guide, you can create beautiful and functional votives that will enhance your home environment.
Inspiration and Resources
For further inspiration and learning, consider exploring these resources:
- Online tutorials and videos:Many online platforms offer detailed tutorials and videos demonstrating various clay votive techniques.
- Clay art communities:Join online forums and social media groups dedicated to clay art. Connect with other enthusiasts, share your creations, and learn from their experiences.
- Local craft stores and workshops:Visit your local craft store or search for workshops in your area to explore a wider range of clay types, tools, and techniques.