
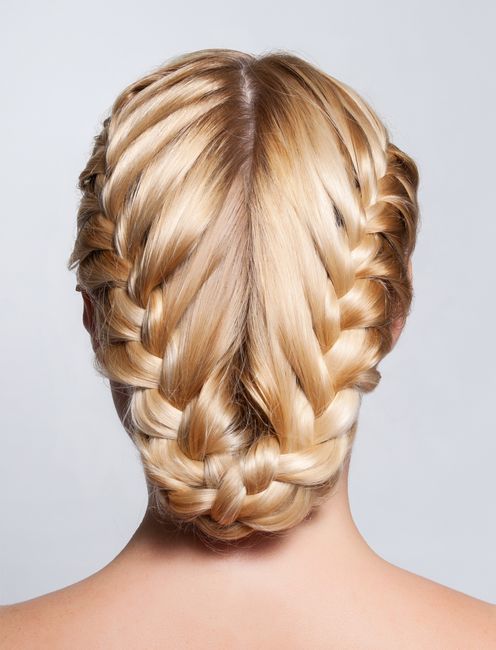
Mastering the Fishtail Braid: A Comprehensive Guide to Creating and Styling This Timeless Hairstyle
The fishtail braid, a seemingly intricate yet surprisingly achievable hairstyle, has endured as a fashion staple for its elegance, versatility, and effortless bohemian charm. Its unique weaving pattern, resembling the skeletal structure of a fish’s tail, creates a distinct texture and dimension that sets it apart from traditional three-strand braids. This comprehensive guide will delve deep into the mechanics of creating a perfect fishtail braid, offering step-by-step instructions suitable for various hair lengths and textures, and then explore a plethora of styling options to elevate this classic into a truly show-stopping look. Understanding the fundamental technique is paramount before venturing into more elaborate styling.
The core of the fishtail braid lies in a simplified two-strand weaving method. Unlike a conventional braid that utilizes three distinct sections of hair, the fishtail is constructed by continuously taking small, outer strands from one section and crossing them over to the opposite section. This creates the characteristic interlacing pattern. To begin, it’s essential to have manageable hair. Detangling is crucial to prevent snags and ensure a smooth braiding process. For those with fine or slippery hair, a texturizing spray or dry shampoo can provide the necessary grip. Begin by sectioning the hair into two equal halves. This is the fundamental division for the entire braiding process. Imagine these as your left and right sections.
Next, select a small, thin strand of hair from the outer edge of your right section. The key here is to keep these outer strands consistently thin; this is what gives the fishtail its intricate appearance. Take this small strand and cross it over to the left section, incorporating it into the main body of the left section. It’s important to pull this newly integrated strand snugly against the bulk of the left section to maintain tension. Now, repeat the process from the opposite side. Take a small, thin strand from the outer edge of your left section and cross it over to the right section, integrating it into the main body of the right section. Again, pull this strand firmly to maintain braid integrity.
Continue this alternating pattern: small outer strand from the right, cross to the left; small outer strand from the left, cross to the right. The size of the strands you pull directly impacts the final look of the braid. Thinner strands will result in a more detailed and intricate fishtail, while thicker strands will create a chunkier, more relaxed braid. Consistency is key; try to pull strands of roughly the same thickness throughout the entire process to achieve a uniform braid. As you braid, use your fingers to gently guide and gather the strands, ensuring they don’t become tangled or lost. This hand-eye coordination will improve with practice.
To achieve a truly polished fishtail, maintain consistent tension throughout the braiding. Avoid pulling too tightly, which can cause discomfort and make the braid look stiff, but also avoid being too loose, which will result in a sloppy, unraveling braid. A gentle, firm tug with each crossover is ideal. You’ll notice the fishtail pattern beginning to form as you progress down the length of your hair. The smaller, interwoven strands will create the distinctive herringbone-like texture.
Once you reach the desired length of your braid, secure the end with a hair tie. For a cleaner finish, opt for a hair tie that closely matches your hair color. If you’re aiming for a more bohemian or undone look, a contrasting elastic can be a stylish accent. Don’t be discouraged if your first few attempts aren’t perfect. The fishtail braid, like many intricate hairstyles, requires a bit of practice to master the feel of the strands and the rhythm of the crossover.
Now that you’ve mastered the fundamental fishtail braid, the world of styling opens up. The versatility of this braid allows it to be adapted for various occasions, from casual everyday wear to sophisticated evening events. One of the most popular and accessible ways to style a fishtail braid is the classic side braid.
To create a side fishtail braid, start by creating a deep side part. Gather all your hair to one side of your head, typically the side opposite your deep part. You can choose to braid directly from the nape of your neck or incorporate some of the hair from your crown for a more integrated look. Begin the fishtail braiding process as outlined previously, working your way down the length of your hair. The beauty of the side fishtail is its relaxed and effortless appearance. Once secured, gently tug on the edges of the braid to loosen it slightly. This "pancaking" technique adds volume and a more undone, bohemian feel, making the braid appear fuller and more lived-in. This is particularly effective for those with finer hair who want to create the illusion of thicker braids.
Another highly sought-after style is the half-up, half-down fishtail braid. This is a fantastic option for maintaining hair out of your face while still showcasing its length and texture. Start by sectioning off the top half of your hair, as you would for a half-up ponytail. Secure the bottom half temporarily to keep it out of the way. Now, take the top section of hair and divide it into two equal halves. Begin braiding a fishtail. You can braid this section all the way down or stop at a desired point, securing it with a small elastic. Once the braid is complete, gently loosen it. Then, release the bottom section of hair and allow it to cascade over the braid. For a more polished look, you can even incorporate the bottom section into the braid in a second, larger fishtail, creating a beautiful layered effect. Alternatively, you can pull the top braid back and secure it with bobby pins, allowing the bottom half to flow freely.
For a more structured and elegant look, consider the French fishtail braid. This variation incorporates elements of a French braid, allowing you to start the fishtail braid from the crown of your head. Begin by taking a small section of hair from the crown. Divide this section into two. Then, begin the standard fishtail braiding technique. As you incorporate new hair into the braid, you’ll be adding it from the sides of your head, similar to how you would with a French braid. Take a small section of loose hair from the side of your head and add it to the outer strand of one of your main sections before crossing it over. Then, repeat on the opposite side, adding hair from the other side of your head to the outer strand of the other main section before crossing it over. Continue this process, gradually incorporating all your hair into the fishtail braid as you work your way down. This method requires more dexterity and patience but results in a stunning, intricately woven braid that starts at the hairline.
The Dutch fishtail braid offers an inverted texture compared to the standard fishtail. Instead of crossing the outer strands over the center, you cross them under. This technique causes the braid to stand out from the head, creating a more dimensional and visible braid. To execute a Dutch fishtail, begin as usual by dividing your hair into two sections. Take a small outer strand from the right section and cross it under the left section. Then, take a small outer strand from the left section and cross it under the right section. Continue this underhand crossing motion, maintaining consistent tension. This technique creates a more pronounced, raised braid that can be a dramatic statement.
The fishtail braid can also be incorporated into updos for a sophisticated and romantic aesthetic. A braided bun is a classic example. Create a high or low ponytail, depending on your desired bun placement. Braid the ponytail into a fishtail braid, securing the end. Then, wrap the braided ponytail around the base of the ponytail to form a bun. Secure with bobby pins. For an even more intricate look, you can create two fishtail braids on either side of your head and then twist and pin them into a bun. This adds a beautiful textural element to the updo.
Another elegant updo option is the braided crown. This involves creating a fishtail braid that encircles your head like a halo. Start by taking a small section of hair from one temple. Begin a fishtail braid, gradually adding small sections of hair from your hairline as you work your way around your head, much like a French braid. Continue this around your entire head until all your hair is incorporated into the braid. Secure the end discreetly at the nape of your neck or pin it into the braid. This style is particularly stunning with loose, wispy strands framing the face.
For a more casual yet chic look, consider the braided headband. This is a simple and effective way to keep hair off your face while adding a touch of style. Take a section of hair from one temple and create a fishtail braid, braiding it towards your opposite ear. Secure the end with a small elastic. Then, bring the braid across the top of your head like a headband and pin it securely behind your ear. You can also create two braids on either side and pin them together at the back for a more substantial headband effect.
The beauty of the fishtail braid lies in its ability to be customized and adapted to individual hair types and preferences. For those with curly or textured hair, the fishtail braid can be a fantastic way to control and define their curls while adding a beautiful visual element. It’s important to ensure the hair is well-moisturized and detangled before attempting the braid. For very thick or coily hair, it may be beneficial to break down the braiding process into smaller, more manageable sections.
For those with fine hair, the "pancaking" technique is your best friend. After securing the braid, gently pull on the outer edges of each woven section. This not only adds volume and makes the braid appear thicker but also creates a softer, more relaxed aesthetic that can prevent fine hair from looking too sleek or sparse. Using a texturizing spray or dry shampoo before braiding can also provide the necessary grip and body.
To achieve a polished and professional look, ensure all the "tails" or ends of the strands are neatly tucked away. Bobby pins are invaluable for this purpose. When pinning, try to blend them into the braid by sliding them in the direction of the braid’s weave. For a softer, more romantic look, embrace the messy bun or halo braid. Leave a few wisps of hair to frame your face, creating an undone yet elegant appeal.
Accessorizing can further elevate your fishtail braid. Delicate hair vines, flowers, or jeweled pins can transform a simple braid into a statement piece for special occasions. A leather or fabric ribbon woven into the braid can add a bohemian or edgy touch. For a sleek and modern look, opt for minimalistic metallic accessories.
The longevity of your fishtail braid can be enhanced by proper preparation and finishing. Using a smoothing serum before braiding can combat frizz, especially in humid conditions. A strong-hold hairspray applied at the end will keep your braid intact throughout the day. For added texture and definition, especially in looser styles, consider a sea salt spray applied to damp hair before drying and braiding. This creates a beachy, lived-in texture that complements the bohemian nature of the fishtail.
Finally, remember that practice makes perfect. Don’t be discouraged by initial attempts. Experiment with different strand thicknesses, tension levels, and styling variations. The fishtail braid is a rewarding hairstyle to master, offering endless possibilities for creative expression and elegant adornment. From a simple side braid to an intricate updo, the fishtail braid remains a timeless and versatile hairstyle that continues to captivate.
