15 Ways to Display Photos in Your Home sets the stage for this enthralling narrative, offering readers a glimpse into a story that is rich in detail and brimming with originality from the outset. Think beyond the traditional photo album and explore the endless possibilities of showcasing your cherished memories in a way that truly reflects your personality and style.
From creating captivating wall displays to incorporating photos into furniture, this guide delves into a variety of creative techniques for displaying your photos in a way that enhances your home’s aesthetic appeal and adds a personal touch to every room.
We’ll cover everything from classic photo frames to unique DIY projects, ensuring you have all the inspiration you need to transform your photos into captivating works of art.
Wall Displays: 15 Ways To Display Photos In Your Home
Wall displays are a fantastic way to showcase your cherished photos and add personality to your home. They offer endless creative possibilities, from creating a focal point in a room to telling a story through your images. Let’s explore some popular wall display options and tips to make them truly shine.
From gallery walls to shadow boxes, there are tons of creative ways to display your favorite photos. But why stop there? Think about how you can display your other favorite things, like your collection of nail polish. You can create a beautiful and functional display by making your own nail polish shelves, using simple materials and following a DIY guide like this one make your own nail polish shelves.
Once you’ve got your nail polish organized, you can even incorporate those shelves into your photo display, creating a unique and personal touch to your home decor.
Photo Walls
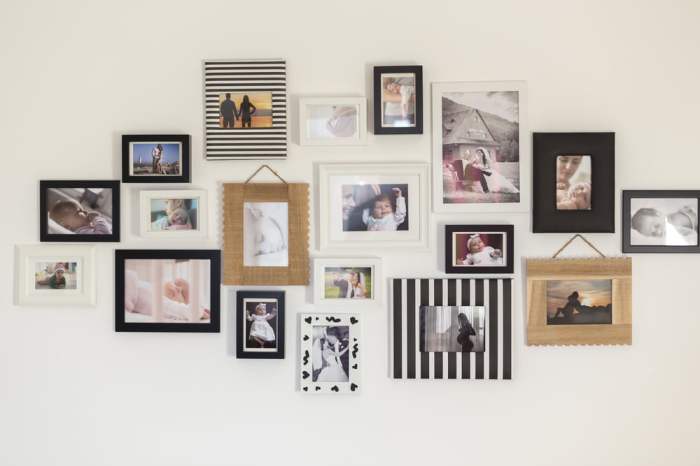
A photo wall is a collection of framed photos arranged together to create a dynamic and visually appealing display. Photo walls are a great way to showcase a variety of photos, from family portraits to travel shots.
- Choose a Theme: Start by selecting a theme that ties your photos together. It could be a specific time period, a location, or a particular style of photography.
- Consider the Size and Shape of the Frames: Mix and match different frame sizes and shapes to add visual interest. You can create a balanced look by using a combination of large and small frames, or you can go for a more eclectic style with a mix of different shapes.
- Arrange the Photos: There are many different ways to arrange photos on a wall. You can create a grid pattern, a free-flowing arrangement, or a more symmetrical design. Experiment with different layouts until you find one that you love.
- Add Accessories: You can add accessories to your photo wall, such as mirrors, artwork, or plants, to create a more cohesive and interesting look.
Gallery Walls
A gallery wall is a collection of framed artwork, photos, and other decorative items arranged together to create a cohesive display. It’s a great way to showcase your personal style and create a focal point in a room.
- Curate a Collection: Start by selecting a variety of pieces that you love and that complement each other. Consider the colors, textures, and styles of the items you choose.
- Use a Variety of Frames: A gallery wall looks best when it includes a variety of frames. You can use different materials, colors, and finishes to create a unique and eclectic look.
- Arrange the Pieces: There are many different ways to arrange pieces on a gallery wall. You can create a symmetrical layout, a free-flowing arrangement, or a grid pattern. Experiment with different layouts until you find one that you love.
- Add Lighting: Good lighting is essential for showcasing your gallery wall. Consider using track lighting, spotlights, or sconces to highlight the pieces.
Single-Photo Displays
A single-photo display is a simple yet elegant way to showcase a special photo. This approach allows a single image to truly stand out.
- Choose the Right Frame: The frame you choose for your single-photo display should complement the photo and the style of your home. Consider the size, shape, and material of the frame.
- Create a Focal Point: Place your single-photo display in a prominent location, such as above a fireplace, on a bookshelf, or on a side table. This will draw attention to the photo and make it a statement piece.
- Add Accessories: You can add accessories to your single-photo display, such as a small vase of flowers, a sculpture, or a decorative object. This will create a more cohesive and interesting look.
Shelving Solutions

Shelves are a versatile and practical way to display photos in your home. They offer flexibility in arrangement, allowing you to create unique and personal displays that reflect your style and the stories behind your photos.
From classic frames to innovative shadow boxes, there are endless ways to showcase your favorite memories. For a truly unique touch, consider incorporating diy wall mounted plants aka living art into your photo displays. These vibrant green accents can add a touch of nature and visual interest to your home while complementing your cherished photos.
Organizing Photos on Shelves
Shelves provide ample space to showcase your photos, and you can get creative with your organization. Here are some ideas:
- Use baskets and boxesto group photos by theme, event, or year. This adds visual interest and helps to create a cohesive look.
- Incorporate decorative elementslike vases, sculptures, or candles to complement your photo displays. This adds dimension and visual appeal to your shelves.
- Experiment with different sizes and shapes of framesto create a dynamic and eclectic display. This adds visual interest and breaks up the monotony of using the same frame size for all photos.
- Consider using a mix of horizontal and vertical photosto create a balanced and visually appealing display. This helps to break up the space and prevent the display from looking too uniform.
Creating a Layered Look
To create a layered look on your shelves, experiment with different heights and depths. Here are some ideas:
- Stack photos in different sizeson top of each other to create a layered effect. This adds depth and visual interest to your display.
- Place smaller photos in front of larger onesto create a sense of depth and dimension. This adds visual interest and helps to create a more dynamic display.
- Use a combination of framed and unframed photosto create a layered and eclectic look. This adds visual interest and helps to break up the monotony of using only framed photos.
- Incorporate decorative elementslike books, plants, or small sculptures to add depth and visual interest to your layered display.
Creative Photo Displays

Let’s get creative! Wall displays and shelves are great, but sometimes you want to think outside the box when it comes to displaying your photos. Creative photo displays add a unique touch to your home, reflecting your personality and making your photos stand out.
Using Picture Ledges, Shadow Boxes, and String Lights
Picture ledges, shadow boxes, and string lights offer versatile and stylish ways to showcase your photos.
- Picture Ledges: Picture ledges are great for creating a gallery-like display without the need for nails or hanging. They can be arranged horizontally or vertically, depending on your space and preference. You can create a curated look by mixing different sizes and shapes of photos.
- Shadow Boxes: Shadow boxes add depth and dimension to your photos. You can use them to display a collection of photos, mementos, or even create a mini-scene with your photos.
- String Lights: String lights add a warm and whimsical touch to any space. You can hang photos from the lights using clothespins or small clips, creating a unique and eye-catching display. This works especially well with black and white photos.
From gallery walls to shadow boxes, there are so many ways to showcase your cherished memories. While I’m brainstorming photo display ideas, I stumbled upon some exciting news: the Plastic Surgery Foundation appoints Alan Matarasso MD FACS as new president.
That’s a big deal for the field, and it got me thinking about how we preserve moments, both big and small, through photographs. Back to my photo display ideas – maybe I’ll create a timeline of family vacations using vintage frames.
Unconventional Materials for Photo Displays
Think outside the box! Unconventional materials can transform your photo displays into works of art.
- Cork Boards: Cork boards provide a unique and versatile backdrop for photos. You can use push pins to secure your photos, creating a dynamic and easily changeable display. You can also add embellishments like ribbons or fabric to the cork board for extra texture.
- Driftwood: Driftwood adds a rustic and natural element to your photo display. You can use wire or twine to attach your photos to the driftwood, creating a unique and eye-catching centerpiece. This style is perfect for beach-themed decor.
- Canvas: You can turn a plain canvas into a personalized photo display. Use fabric glue or tacks to attach your photos to the canvas. You can even create a collage effect by overlapping photos and adding embellishments like paint or glitter.
Digital Photo Displays

Digital photo frames offer a modern and dynamic way to showcase your cherished memories. Unlike traditional photo albums or framed prints, these frames allow you to display a slideshow of your photos, adding a touch of life and movement to your décor.
Choosing the Right Digital Photo Frame
Selecting the right digital photo frame involves considering several factors. Here are some key aspects to keep in mind:
- Screen Size:The screen size of the digital photo frame is a crucial factor. Larger screens offer a more immersive viewing experience, particularly if you’re displaying the frame from a distance. However, smaller frames are more compact and portable.
- Resolution:Resolution determines the sharpness and clarity of the images displayed. A higher resolution ensures that your photos look their best, even on larger screens.
- Storage Capacity:Consider the amount of storage available on the frame. Some frames offer built-in storage, while others allow for expandable storage via SD cards or USB drives. The storage capacity will determine how many photos you can store and display.
- Connectivity:Digital photo frames come with various connectivity options, including USB, SD card slots, and even Wi-Fi. Wi-Fi connectivity allows you to wirelessly transfer photos from your smartphone or computer, making it easier to update your displays.
- Features:Some digital photo frames offer additional features like slideshow transitions, music playback, and even clock and calendar displays. Consider which features are important to you and choose a frame that offers them.
Advantages of Digital Photo Frames
Digital photo frames offer several advantages over traditional photo displays:
- Dynamic Display:Digital photo frames allow you to create a dynamic slideshow of your photos, bringing your memories to life in a way that static prints cannot.
- Easy Updates:Updating your photo display is effortless with digital frames. Simply transfer new photos to the frame’s storage or connect it to your device wirelessly.
- Variety of Display Options:Digital photo frames offer a variety of display options, including slideshows, calendar displays, and even clock functions. You can customize the display to suit your preferences.
- Compact and Portable:Digital photo frames are often compact and portable, making them easy to move around your home or take with you on trips.
Disadvantages of Digital Photo Frames
While digital photo frames offer many advantages, they also have some drawbacks:
- Power Consumption:Digital photo frames require a constant power source, which can increase your energy consumption.
- Screen Brightness:The screen brightness of digital photo frames can be distracting in dimly lit rooms.
- Limited Display Size:The display size of digital photo frames is often limited compared to traditional framed prints.
- Technological Obsolescence:Digital photo frames can become outdated as technology advances, potentially requiring you to upgrade to a newer model.
Photo Albums and Scrapbooks
Photo albums and scrapbooks offer a tangible and sentimental way to preserve your cherished memories. They allow you to arrange photos in a meaningful way, adding personal touches and stories that bring your pictures to life.
Types of Photo Albums and Scrapbooks
Photo albums and scrapbooks come in a variety of styles and formats to suit different preferences and needs.
- Traditional Photo Albums: These albums feature adhesive pages where you can stick photos using photo corners or photo glue. They often have a classic design and are available in various sizes and binding styles.
- Magnetic Photo Albums: Magnetic albums are convenient for quick and easy photo arrangement. They use magnetic sheets to hold photos in place, allowing for flexibility and easy re-arrangement.
- Self-Adhesive Photo Albums: These albums feature pages with a self-adhesive surface that allows you to stick photos without needing glue or photo corners. They are simple to use and perfect for quick photo projects.
- Scrapbooks: Scrapbooks are more elaborate than photo albums, offering more space for creativity and personalization. They typically have blank pages or cardstock that you can decorate with photos, embellishments, journaling, and other creative elements.
Tips for Organizing and Storing Photos in Albums and Scrapbooks
Organizing and storing your photos in albums and scrapbooks ensures their longevity and accessibility.
- Chronological Order: Arrange photos in chronological order to create a timeline of your memories. This makes it easy to navigate through your albums and recall specific events.
- Thematic Organization: Group photos by theme, such as vacations, family gatherings, or hobbies. This allows you to easily find photos related to specific interests or events.
- Labeling and Indexing: Label your albums and pages with dates, locations, and brief descriptions to aid in finding specific photos. You can also create an index for easy reference.
- Acid-Free Materials: Use acid-free photo albums, scrapbook pages, and adhesives to prevent damage to your photos caused by acid. Acidic materials can cause discoloration and fading over time.
- Proper Storage: Store your photo albums and scrapbooks in a cool, dry place, away from direct sunlight and heat. Avoid storing them in damp or humid environments, as this can lead to mold and mildew.
Benefits of Creating Photo Albums and Scrapbooks, 15 ways to display photos in your home
Creating photo albums and scrapbooks offers numerous benefits, both for you and for future generations.
- Preserving Memories: Photo albums and scrapbooks provide a tangible way to preserve your precious memories and ensure they are passed down through generations.
- Sharing Stories: They offer a platform to share stories and anecdotes related to your photos, enriching the viewing experience and making your memories come alive.
- Emotional Connection: Creating albums and scrapbooks allows you to reconnect with your past and relive cherished moments, fostering emotional connection and a sense of nostalgia.
- Creative Expression: Scrapbooking in particular provides an outlet for creativity, allowing you to personalize your albums with embellishments, journaling, and unique designs.
- Family History: Photo albums and scrapbooks become valuable family heirlooms, documenting family history and providing future generations with a glimpse into their past.
Using Photos in Furniture
Turning your cherished photos into unique and functional pieces of furniture is a creative way to add personality and a touch of nostalgia to your home. You can transform ordinary furniture into personalized works of art, showcasing your memories and creating a truly unique ambiance.
Photo Transfer Techniques
Photo transfer techniques allow you to permanently embed your photos onto furniture surfaces, transforming them into one-of-a-kind pieces. This process involves transferring a photographic image onto a surface like wood, glass, or metal, using various methods, including:
- Decoupage:This method involves adhering a printed photograph to a surface using glue or varnish. The image is then sealed with multiple layers of varnish to create a durable and water-resistant finish.
- Gel Medium Transfer:This technique uses a gel medium to adhere the photo to the surface, and then the paper is carefully removed, leaving the image embedded on the furniture.
- Iron-On Transfer:This method utilizes special iron-on transfer paper, where the image is printed onto the paper and then transferred to the furniture surface using heat and pressure.
Custom Photo Furniture
Beyond transferring photos onto existing furniture, you can create custom photo furniture pieces that are tailored to your specific needs and preferences. These pieces are made to order, incorporating your photos directly into the design and construction of the furniture.
- Photo Coffee Tables:These tables feature a glass or acrylic top that displays your photos, creating a unique and personalized centerpiece for your living room.
- Photo Headboards:Transform your bedroom with a headboard featuring a collage of your favorite memories, adding a personal touch to your sleep sanctuary.
- Photo Storage Ottomans:These ottomans provide both storage space and a stylish display for your photos, seamlessly integrating them into your home decor.
Benefits of Using Photos in Furniture
Incorporating photos into your furniture offers numerous benefits, enhancing both the aesthetics and functionality of your home:
- Personalization:Furniture with photos adds a unique and personal touch to your space, reflecting your memories and style.
- Nostalgia:Surrounding yourself with cherished photos evokes fond memories and creates a warm and inviting atmosphere.
- Conversation Starters:Photo furniture pieces naturally spark conversations and provide a focal point for sharing stories and experiences.
- Unique Decor:Custom photo furniture adds a touch of originality and distinction to your home, setting it apart from conventional designs.