
DIY Butcher Block Countertops with Undermount Sink: A Comprehensive Guide
Installing DIY butcher block countertops with an undermount sink is a rewarding project that can dramatically transform your kitchen’s aesthetics and functionality. This guide provides a detailed, step-by-step approach to achieving a professional-looking result, focusing on material selection, preparation, installation, and sink integration. While the initial investment in materials and tools might seem substantial, the long-term savings compared to professional installation and the satisfaction of a DIY achievement are significant. This project requires patience, precision, and a willingness to learn, but with the right guidance, it’s entirely manageable for the dedicated DIYer.
I. Planning and Material Selection
The foundation of a successful DIY butcher block countertop project lies in meticulous planning and informed material selection. Before purchasing anything, thoroughly measure your existing countertops, accounting for any jogs, corners, or unusual shapes. Create detailed diagrams of your kitchen layout, marking the precise dimensions for each countertop section. Consider the desired thickness of your butcher block; 1.5 inches is standard and offers good durability, while 2-inch thick options provide a more substantial, high-end look.
For the butcher block itself, wood species selection is crucial. Maple and oak are the most popular choices due to their hardness, durability, and attractive grain patterns. Maple offers a lighter, more uniform appearance, while oak has a more pronounced grain and can be stained to various shades. Cherry, walnut, and beech are also viable options, each with its unique aesthetic and price point. Consider the environment of your kitchen – high-traffic areas might benefit from harder woods. Purchasing pre-finished butcher block can save time and effort, but unfinished options offer greater control over the final look and finish. Ensure your chosen butcher block is kiln-dried to minimize warping and cracking.
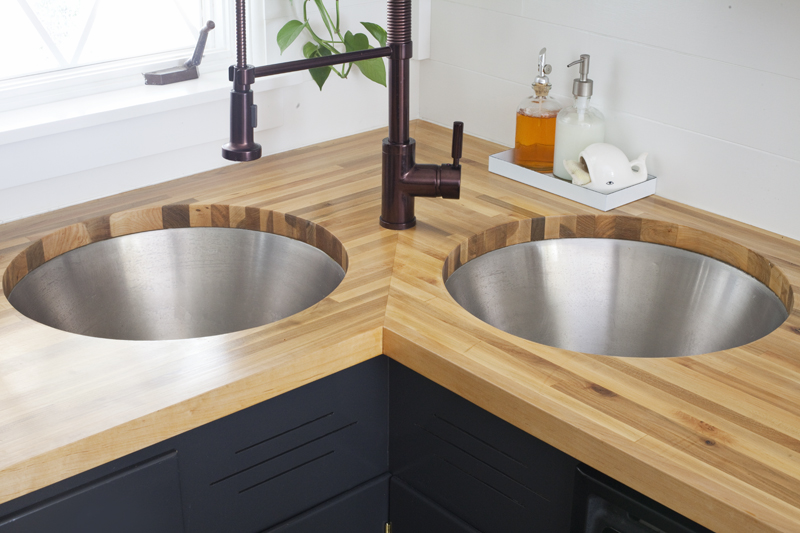
For the undermount sink, choose a model designed specifically for undermount installation. Stainless steel is a durable and classic choice, while composite granite or cast iron offer different aesthetic possibilities. Verify the sink’s dimensions, paying close attention to its width and depth, as these will dictate the cutout size in your countertop. Ensure the sink’s rim is sufficiently flat and wide to create a secure seal with the butcher block.
Other essential materials include:
- Wood Sealant/Finish: Food-grade mineral oil, tung oil, or a polyurethane finish designed for countertops. The choice depends on desired durability and maintenance.
- Wood Glue: High-quality, waterproof wood glue (e.g., Titebond III) if you need to join multiple butcher block pieces.
- Sandpaper: Various grits from 80 to 320.
- Caulk: Food-grade silicone caulk in a color that complements your sink and countertops.
- Screws: Appropriate length screws for securing the sink clips to the underside of the butcher block.
- Mounting Clips: Sink clips that come with your undermount sink.
- Optional: Wood filler, stain (if finishing unfinished wood).
II. Essential Tools
A successful DIY butcher block installation necessitates a well-equipped toolkit. While some tools are common household items, others are specific to woodworking and countertop installation.
- Measuring Tools: Tape measure, carpenter’s square, pencil.
- Cutting Tools: Circular saw with a fine-tooth blade (for clean cuts), jigsaw (for sink cutout), or a router with a straight-cutting bit for more precise sink cutouts.
- Drilling Tools: Power drill/driver with various drill bits and a screwdriver bit.
- Sanding Tools: Orbital sander or belt sander, sanding blocks.
- Clamping Tools: Bar clamps or pipe clamps (if joining multiple pieces).
- Safety Gear: Safety glasses, dust mask, work gloves.
- Adhesives & Sealants: Caulk gun, putty knife or scraper.
- Other: Level, hammer, stud finder (to locate cabinet support).
III. Preparing the Butcher Block
This phase is critical for a flawless finish and a well-fitting countertop. If you purchased unfinished butcher block, you’ll need to address any imperfections and prepare it for finishing.
A. Cutting and Shaping:
Carefully transfer your measurements from your diagrams to the butcher block. Use a carpenter’s square to ensure perfectly straight lines. When cutting, support the butcher block on both sides of the cut line to prevent tear-out. For long cuts, a circular saw with a guide or track is ideal for accuracy. If joining multiple pieces, ensure the edges are perfectly straight and square. Apply a generous amount of waterproof wood glue to both mating surfaces and clamp them tightly together. Wipe away any excess glue immediately with a damp cloth. Allow ample drying time according to the glue manufacturer’s instructions.
B. Sanding:
Thorough sanding is paramount for achieving a smooth, professional finish. Begin with a coarser grit sandpaper (e.g., 80 or 120) to remove any saw marks, imperfections, or dried glue residue. Progress through finer grits (e.g., 180, 220, 320), ensuring you sand with the grain of the wood. Between each grit, wipe down the surface thoroughly to remove all dust. A smooth surface is essential for an even finish and a comfortable feel. Pay close attention to edges and corners, ensuring they are also smooth and slightly rounded if desired.
C. Finishing:
The finish you choose will protect the butcher block from moisture, stains, and wear, and will also contribute significantly to its appearance.
- Oil Finish (Mineral Oil, Tung Oil): This is a popular choice for butcher block due to its food-safe nature and natural look. Apply multiple thin coats, allowing each to penetrate before wiping off the excess. Reapply periodically to maintain protection. This finish requires more frequent maintenance but is easily repairable.
- Polyurethane Finish: Offers superior durability and water resistance but is less food-safe and can be trickier to repair if damaged. Apply multiple thin coats, sanding lightly between coats with a fine-grit sandpaper. Follow the manufacturer’s instructions carefully for application and drying times.
If you are staining unfinished wood, apply the stain evenly after sanding to your desired grit. Allow it to dry completely according to the stain manufacturer’s instructions before applying your chosen topcoat (oil or polyurethane).
IV. Creating the Undermount Sink Cutout
Precisely cutting the opening for your undermount sink is arguably the most critical step for a seamless integration.
A. Templating the Sink:
Most undermount sinks come with a cardboard template. If yours doesn’t, you’ll need to carefully trace the outer dimensions of the sink onto a piece of sturdy cardboard or thin plywood. It’s crucial to be accurate here, as this template will guide your cuts.
B. Transferring the Template to the Butcher Block:
Position the sink template on the underside of the butcher block in its intended location. Ensure it is centered and positioned correctly relative to the edges of the countertop. Mark the cutout line on the butcher block.
C. Drilling Pilot Holes:
For a clean cut with a jigsaw or router, drill pilot holes inside the marked cutout line at each corner. These holes should be large enough for your saw blade to enter.
D. Cutting the Sink Opening:
- Using a Jigsaw: Carefully insert the jigsaw blade into a pilot hole and slowly follow the marked line, keeping the base of the jigsaw flat against the butcher block. Take your time to ensure a smooth, clean cut.
- Using a Router with a Straight Bit: This method offers a more precise and cleaner cut. Use a flush-trim bit or a straight-cutting bit with a guide. You can also create a template from MDF that matches the sink’s dimensions and use a template bit on your router for perfect accuracy. Secure the template to the butcher block and route around it.
E. Smoothing the Edges:
Once the cutout is made, lightly sand the edges of the opening to remove any rough spots or saw marks. This will ensure a smooth surface for the sink to rest against and for the caulk to adhere to.
V. Installing the Butcher Block Countertops
With the butcher block prepared and the sink cutout complete, it’s time for installation onto your cabinets.
A. Placing the Countertop:
Carefully lift and position the butcher block sections onto your cabinets. Ensure they sit flush and level. Use a level to confirm the countertop is even in all directions.
B. Securing the Countertop:
Butcher block countertops are typically secured from underneath by screwing into the cabinet frames. Locate the cabinet stiles and rails. Drill pilot holes through the butcher block (if necessary, and keep them from being visible from the top) or, more commonly, screw up through the cabinet frame into the underside of the butcher block. Use screws that are long enough to provide a secure grip but not so long that they penetrate the top surface of the countertop. Ensure the screws are countersunk so they don’t interfere with the sink installation.
VI. Installing the Undermount Sink
This is the moment of truth – integrating the sink into your newly installed butcher block.
A. Preparing the Sink and Countertop Edges:
Clean the underside rim of the sink and the edge of the butcher block cutout thoroughly. Ensure both surfaces are free of dust, debris, and any residual oils or finishes from the butcher block.
B. Applying Sealant:
Apply a continuous bead of food-grade silicone caulk around the entire perimeter of the sink cutout on the underside of the butcher block. Alternatively, apply the caulk to the underside rim of the sink. This creates a watertight seal and prevents water from seeping between the sink and the countertop.
C. Positioning and Securing the Sink:
Carefully lower the undermount sink into the cutout, aligning it correctly. Once positioned, engage the sink mounting clips. These clips typically screw into pre-drilled holes on the underside of the butcher block or into the cabinet frame, securing the sink tightly against the countertop. Follow the sink manufacturer’s instructions for the specific clip system. Tighten the clips evenly around the sink, ensuring a snug and secure fit without overtightening, which could damage the butcher block or sink.
D. Cleaning Excess Caulk:
Immediately after securing the sink, wipe away any excess caulk that has squeezed out around the edge of the sink with a damp cloth or a putty knife. This will create a clean, professional finish.
VII. Final Touches and Maintenance
With the sink installed and the countertops secured, you’re nearing the end of your DIY project.
A. Re-finishing (if necessary):
If you encountered any minor scratches or imperfections during installation, or if you used an oil finish that requires it, apply another coat of your chosen sealant.
B. Plumbing:
Connect your plumbing to the sink according to standard plumbing practices. Ensure all connections are tight and leak-free.
C. Ongoing Maintenance:
- Oiling (for oil finishes): Reapply mineral oil or tung oil periodically, especially in areas around the sink and cooking surfaces, to maintain the protective barrier.
- Cleaning: Use mild soap and water for daily cleaning. Avoid abrasive cleaners or harsh chemicals that can damage the finish.
- Wipe Spills Immediately: Promptly wipe up any spills, especially water or acidic liquids, to prevent staining or damage.
- Avoid Cutting Directly on the Surface: While butcher block is durable, it will show knife marks over time. Use cutting boards to preserve its pristine appearance.
DIYing butcher block countertops with an undermount sink is a project that requires careful planning, precise execution, and a commitment to quality. By following these steps, you can achieve a beautiful, functional, and durable kitchen centerpiece that you can be proud of for years to come. The investment of time and effort will be handsomely rewarded with a custom look and significant cost savings.
