DIY Standing Desk: A Comprehensive Guide to Building Your Own Ergonomic Workspace
The economic crisis in 2008 sparked a nationwide interest in DIY projects. From furniture to home repairs, people sought to cut costs and gain a sense of accomplishment by building things themselves. This trend has continued and expanded, encompassing even the creation of custom ergonomic workstations. Building a standing desk yourself offers significant advantages, including substantial cost savings compared to purchasing a pre-made unit, the ability to fully customize dimensions and aesthetics to perfectly suit your space and needs, and the satisfaction of a rewarding hands-on project. This comprehensive guide will walk you through the process of constructing a functional, durable, and attractive standing desk, suitable for any home office.
The most common and cost-effective method for building a standing desk involves utilizing readily available lumber and a few basic tools. The fundamental components of any standing desk are a stable base and a sturdy, level work surface. For a fixed-height standing desk, which is the simplest to construct, we’ll focus on a design that utilizes common lumber dimensions. The primary materials will likely include 2x4s for the frame and legs, and plywood or a similarly sturdy sheet material for the desktop. The exact dimensions of your desk will depend on your height and desired working posture. A general guideline for standing desk height is to position your arms so your elbows are bent at approximately a 90-degree angle when your forearms are parallel to the floor. Measure this distance from the floor to your elbows and add a few inches to account for your keyboard and mouse. This will be your target desk height. For a typical adult, this often falls between 40-45 inches.
When selecting lumber, opt for straight, knot-free pieces of construction-grade pine or fir. These are widely available at home improvement stores and offer a good balance of strength and affordability. For the desktop, 3/4-inch birch plywood is an excellent choice. It’s relatively inexpensive, offers a smooth, durable surface, and is available in large sheets, minimizing the need for seams. Alternatively, you could consider butcher block countertops for a more premium aesthetic and an even more robust surface, though this will increase the overall cost. When purchasing plywood, inspect the sheets for any warping or significant delamination. For the frame and legs, 2x4s are the standard. Ensure they are also straight and free from large cracks or knots that could compromise structural integrity.
The construction process for a fixed-height standing desk can be broken down into several key stages: building the leg frames, assembling the desktop, and finally, attaching the desktop to the leg frames. We’ll begin with the leg frames. For a sturdy and stable design, each leg should be constructed as a rectangular frame. Using 2x4s, cut four identical lengths for the upright legs and four identical lengths for the cross-braces. The height of the upright legs will be your predetermined desk height minus the thickness of your desktop and the height of your connecting frame. For instance, if your target height is 42 inches and your desktop is 3/4 inch thick, and your connecting frame will be 3 inches tall, your upright legs would need to be approximately 38 1/4 inches long. The cross-braces should be cut to fit the desired width and depth of your desk, providing stability to the leg structure.
To assemble the leg frames, use wood screws and wood glue. Apply wood glue to the joints before screwing them together for maximum strength. Pre-drilling pilot holes will prevent the wood from splitting, especially near the ends of the boards. Construct two identical leg frames. These frames will support the entire weight of your desk and its contents, so ensuring their rigidity is paramount. Once the glue has dried, you’ll have two robust rectangular leg assemblies. These will be the vertical supports of your standing desk.
Next, we’ll focus on creating the desktop. If you’re using a single sheet of plywood, the process is straightforward. Cut the plywood to your desired dimensions. Common desk widths range from 48 to 60 inches, and depths from 24 to 30 inches, but tailor these to your available space and needs. If you’re using multiple pieces of plywood or opting for a butcher block, you’ll need to join them securely. For plywood, this might involve using pocket hole joinery or simply screwing them together from the underside, ensuring a flush surface. If you choose a butcher block, follow the manufacturer’s instructions for assembly and finishing.
Once your desktop is cut to size, it’s crucial to finish it properly. This not only enhances its appearance but also protects the wood from spills and wear. Sand the entire surface thoroughly, starting with a coarser grit sandpaper (around 80-120 grit) to smooth out any rough spots and progress to finer grits (220-320 grit) for a smooth finish. For plywood, filling any visible voids or imperfections with wood filler is recommended before sanding. After sanding, apply several coats of a durable finish. Polyurethane is a popular and effective choice for desks, offering excellent protection. Apply thin, even coats, allowing adequate drying time between each layer. Lightly sand with a fine-grit sandpaper (400 grit or higher) between coats for a smoother final finish. For a more natural look, a Tung oil or Danish oil finish can be applied, though these may require more frequent reapplication.
With the leg frames and desktop prepared, it’s time for assembly. Lay the desktop upside down on a protected surface (a drop cloth or old blankets work well). Position the two leg frames on the underside of the desktop, ensuring they are square and evenly spaced. The distance between the leg frames will depend on the width of your desktop and the desired stability. A good starting point is to position them approximately 6-12 inches from the outer edges of the desktop. Mark the positions of the leg frames.
To attach the leg frames to the desktop, we’ll again utilize wood screws and wood glue. Apply wood glue to the top edges of the leg frames that will come into contact with the desktop. Place the leg frames in their marked positions on the underside of the desktop. Pre-drill pilot holes through the leg frames and into the desktop. The number and placement of screws will depend on the size of your desktop and leg frames, but generally, 4-6 screws per leg frame, evenly spaced, should provide ample support. Ensure the screws are long enough to penetrate the leg frame and securely fasten into the desktop material, but not so long that they protrude through the top surface of your desk. For added stability and to prevent any potential movement, consider adding diagonal braces between the leg frames on the underside of the desk. These can be fashioned from 2×4 scraps and screwed into place.
For an even more polished look and added functionality, consider adding a modesty panel or a cable management system. A modesty panel, made from a thinner piece of plywood or hardboard, can be attached to the back of the desk between the leg frames, improving the aesthetic and preventing items from falling off the back. Cable management can be achieved with simple solutions like cable clips, a wire basket mounted to the underside of the desk, or even a drilled hole with a grommet to pass cables through. These small additions can significantly improve the usability and tidiness of your standing desk.
The tools required for this project are relatively standard for any DIYer. You’ll need a measuring tape, a pencil, a saw (a circular saw or miter saw will make cutting lumber much easier and more precise), a drill with various drill bits, a screwdriver, wood glue, wood screws, sandpaper, and finishing supplies (polyurethane, brushes, etc.). Safety equipment such as safety glasses and gloves should also be considered essential. When using power tools, always follow the manufacturer’s safety guidelines.
The cost of building a DIY standing desk can vary significantly depending on the materials chosen and whether you already own some of the necessary tools. However, it’s generally possible to build a functional and attractive standing desk for under $200, especially if you utilize reclaimed lumber or opt for less expensive finishes. This stands in stark contrast to the hundreds or even thousands of dollars required for commercial standing desks. The satisfaction of building something yourself, tailored precisely to your needs and preferences, is an added bonus that cannot be quantified.
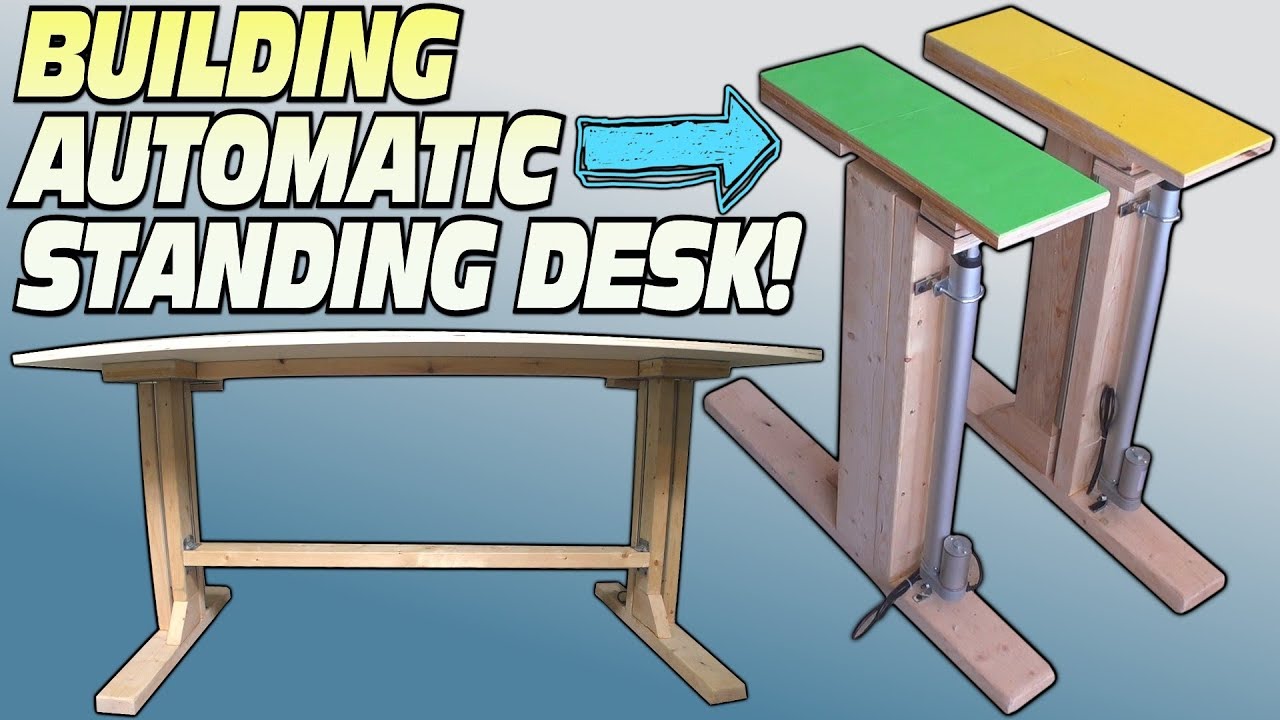
While this guide focuses on a fixed-height standing desk, the principles can be adapted for adjustable-height desks. However, adjustable-height desks typically involve more complex mechanisms, such as crank systems or electric motors, which significantly increase the cost and complexity of the build. For those seeking an introduction to DIY standing desks, the fixed-height design offers an achievable and highly rewarding starting point. The process of building your own standing desk provides valuable skills and a tangible improvement to your workspace, promoting better posture and overall well-being. The key to success lies in careful planning, precise measurements, and a commitment to building a sturdy and stable structure.
