DIY House Christmas Tree Topper: Crafting Festive Flair for the Top of Your Holiday Tree
The Christmas tree topper is the crowning glory of any festive fir, and for those seeking a truly unique and personalized touch, a DIY house Christmas tree topper offers an unparalleled opportunity for creative expression. Moving beyond the traditional star or angel, a miniature house, meticulously crafted and adorned, adds a whimsical, storybook charm to your holiday decor. This comprehensive guide will explore various DIY house Christmas tree topper ideas, detailing materials, techniques, and design considerations to help you create a show-stopping centerpiece that reflects your individual style and festive spirit. We will delve into materials ranging from simple craft supplies to repurposed household items, and discuss techniques suitable for beginners and more experienced crafters alike, ensuring that every Christmas tree can boast a custom-made, storybook abode. The goal is to inspire and equip you with the knowledge to transform ordinary materials into extraordinary holiday treasures that will be admired year after year.
Conceptualizing Your DIY House Christmas Tree Topper: Design and Scale
Before embarking on your DIY journey, envisioning the perfect house topper is crucial. Consider the overall aesthetic of your Christmas tree and your home’s holiday decor. Are you aiming for a rustic, farmhouse vibe, a whimsical gingerbread village feel, a modern minimalist interpretation, or a classic, nostalgic cottage look? The scale of your house topper is equally important. It should be proportionate to your tree, neither overwhelming nor lost in the branches. A general rule of thumb is that the topper should be roughly one-tenth the height of your tree. Think about the architectural style you want to emulate. Do you prefer a simple gable roof, a more complex multi-story design, or perhaps a charming bungalow? Sketching your ideas can be incredibly helpful in visualizing the final product. Consider the details that will bring your miniature house to life: windows (perhaps with tiny lights?), a door, a chimney (even a decorative one!), and any landscaping elements like a tiny wreath or mailbox. The color palette should complement your tree’s ornaments and your home’s color scheme. Will it be traditional red and green, icy blues and silvers, warm browns and creams, or a vibrant and eclectic mix? Thinking about these design elements upfront will streamline your material selection and crafting process, ensuring a cohesive and impactful final design.
Materials for Your DIY House Christmas Tree Topper: From Cardboard to Clay
The beauty of DIY is the vast array of materials you can utilize. For a lightweight and easily workable option, cardboard is an excellent choice. Cereal boxes, shipping boxes, or even thick cardstock can be cut, glued, and painted to create sturdy house structures. Foam board offers a slightly more rigid and durable alternative, ideal for larger or more intricate designs. For a more tactile and sculptural approach, air-dry clay or polymer clay allows for detailed molding of roofs, chimneys, and decorative elements. Wood scraps or thin balsa wood can be used for a more robust and naturalistic feel, requiring woodworking tools but offering excellent durability.
Beyond the structural components, a multitude of decorative materials can bring your house to life. Acrylic paints are versatile for achieving any color scheme, while spray paint can provide a smooth, even finish, especially for larger surfaces. Glitter in various colors and sizes can add sparkle and a festive glow. Small craft embellishments like miniature buttons, beads, tiny faux greenery, sequins, and even small pieces of fabric can simulate shingles, doors, windows, and other architectural details. For a gingerbread house look, consider using puff paint to create icing effects, small candies, or even cinnamon sticks for a faux wood beam. Hot glue is an indispensable tool for quickly and securely attaching various components, while craft glue or wood glue might be necessary for stronger bonds, depending on your materials. Don’t overlook repurposed items: bottle caps can become tiny decorative accents, small twigs can form fences, and even old jewelry pieces can be repurposed for unique embellishments. The key is to think creatively about how everyday objects can be transformed into festive, miniature architectural features.
Simple Cardboard House Topper: A Beginner-Friendly Approach
Creating a charming cardboard house topper is an accessible project for crafters of all skill levels. Begin by selecting a template or sketching your house design on a piece of sturdy cardboard. A simple gable-roofed house is a great starting point. Cut out the front, back, and two side panels, along with a separate piece for the roof. For the roof, you can either fold a single piece of cardboard in half or create two separate rectangular pieces that meet at the peak. Score the cardboard along the fold lines to ensure clean, crisp edges when folding.
Assemble the house walls by gluing or hot-gluing the side panels to the front and back pieces. Once the walls are secure, attach the roof. If using two roof pieces, ensure they meet neatly at the apex. Now comes the fun part: decorating! Paint the house your desired color. Once the base coat is dry, use a contrasting color to paint the roof. Tiny windows can be drawn on with a marker, or you can cut small squares from colored paper or acetate to create a stained-glass effect, attaching them from the inside. A simple door can be painted on, or you can cut a small flap in the front panel and hinge it with tape on the inside. For added charm, consider painting a miniature wreath on the door or using a small button as a doorknob. Use puff paint to create a snowy effect on the roof and eaves, or sprinkle glitter while the paint is still wet. A tiny chimney can be fashioned from a rolled piece of cardboard or a small cardboard tube, glued to the roof. Secure a sturdy wire or a wooden dowel to the bottom of your house for attaching it to the tree. This wire should be long enough to extend well into the tree’s branches for stability.
Advanced Techniques: Wood, Clay, and Intricate Details
For those seeking a more sophisticated and durable house topper, working with wood or clay opens up a world of possibilities.
Wood House Topper: Start with thin plywood or balsa wood. You can cut out the basic house shapes using a craft knife or a small saw. Sand all edges smooth to prevent splinters. Assemble the house using wood glue or small nails. For a more realistic look, consider adding dimensional details like window frames, door trims, or even tiny porch railings cut from thin wood strips. Painting can be done with acrylics, or you can opt for wood stains for a natural, rustic finish. Sealing the wood with a clear varnish will protect your creation and enhance its longevity. Attaching a wooden dowel securely to the base is crucial for tree stability.
Clay House Topper: Air-dry clay is easy to work with and doesn’t require baking. Knead the clay until it’s pliable. Roll out flat sheets for the walls and roof, or sculpt the house freehand. Use sculpting tools to add details like bricks, shingles, or window panes. Create a separate chimney and door. Once the clay has dried completely (this can take 24-72 hours depending on thickness), you can paint it with acrylics. For a charming gingerbread effect, mix a small amount of brown paint with white to create a warm, dough-like color. Use white paint or puff paint for icing details. Polymer clay requires baking according to package instructions but offers greater durability and detail retention. For both clay types, ensure a sturdy attachment point for your tree topper wire is incorporated into the base before drying or baking.
Adding Lights and Embellishments for Extra Sparkle
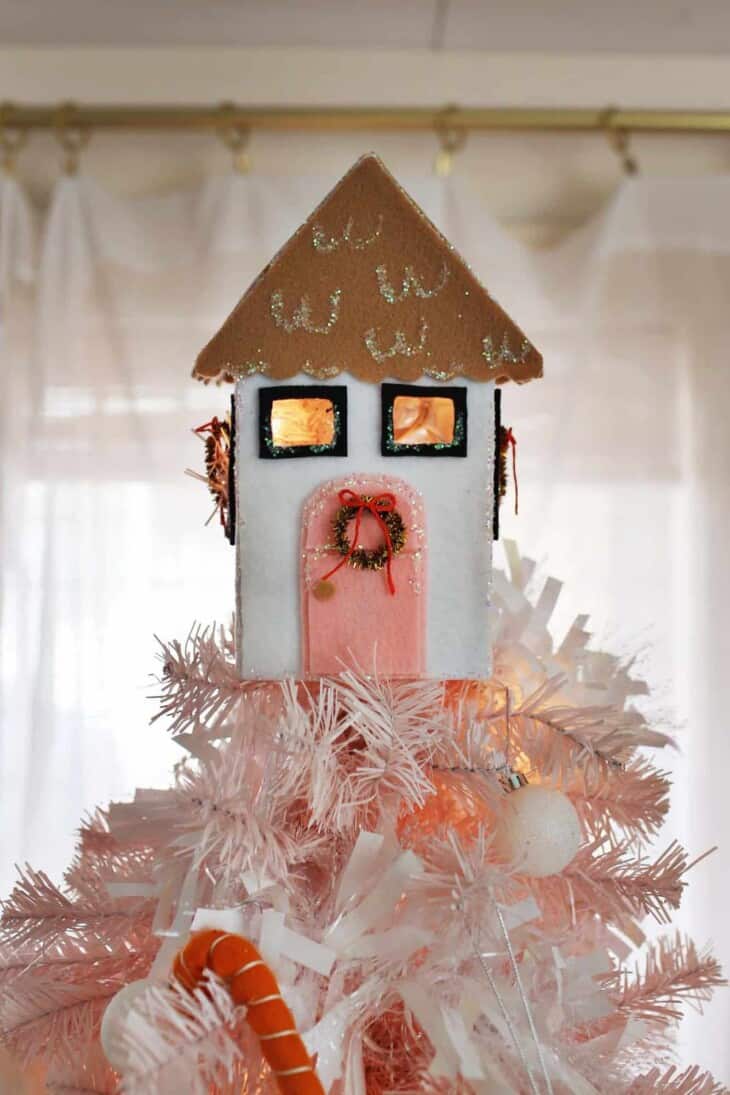
No Christmas house is complete without a touch of sparkle and warmth. Integrating lights can transform your DIY topper into a beacon of holiday cheer. Consider using tiny battery-operated LED fairy lights. You can thread these through small holes in the house walls or roof, or conceal the battery pack within the house structure. If your house design allows, a few strategically placed lights behind the windows can create a cozy, illuminated glow.
Beyond lights, embellishments are key to personalizing your house. For a gingerbread house, edible decorations like mini candy canes, gumdrops, or sprinkles can be glued on (ensure they are securely attached). For other styles, consider miniature wreaths made from small faux greenery, tiny fabric bows, or even small pieces of ribbon for festive accents. Buttons can serve as charming doorknobs or decorative elements. Sequins can be glued along the roofline for a frosty effect, and fine glitter can be applied to windows or doors to mimic glistening snow. Small twigs can be used to create a tiny fence around the base of your house, or miniature pinecones can add a rustic touch. Don’t be afraid to experiment with different textures and materials to add depth and visual interest.
Securing Your DIY House Christmas Tree Topper
The stability of your Christmas tree topper is paramount to prevent it from falling and causing damage. The method of attachment will depend on the weight and design of your topper. For lighter cardboard or foam board creations, a sturdy wire or a wooden dowel is typically sufficient.
Wire Method: Bend a long, heavy-gauge floral wire or craft wire into a loop at one end. This loop will be inserted into the top of your house, often through the roof or a designated hole in the base. Secure the wire firmly with hot glue or strong adhesive. The other end of the wire should be long enough to extend several inches into the tree’s branches. Gently bend and twist this wire around a strong branch, ensuring it’s firmly anchored.
Wooden Dowel Method: For heavier toppers, a wooden dowel is a more robust solution. Insert a portion of the dowel into a pre-drilled hole in the base of your house, securing it with wood glue or epoxy. The remaining length of the dowel will then be inserted into the top of the tree, ideally into a pre-drilled hole in the tree’s central support or a strong, upward-facing branch. You may want to reinforce the attachment point with additional wire or tape to ensure maximum stability.
Testing and Adjustment: Before placing your topper on the tree, gently test its stability by wiggling it. If it feels loose, reinforce the attachment point or add more support. Consider the balance of your topper as well; if one side is significantly heavier than the other, it can cause the tree to lean. Adjust the placement of embellishments or structural elements to ensure an even distribution of weight. For very large or heavy toppers, it might be beneficial to have a secondary support system, such as a strategically placed wire that anchors it to a higher branch.
Theme Ideas for Your House Christmas Tree Topper
Beyond generic house designs, infusing your topper with a specific theme can elevate its charm and storytelling potential.
- Gingerbread Village House: Embrace the classic sweet treat. Use brown paint for the base, white puff paint for icing details, and tiny candies or gingerbread-shaped cutouts for embellishments. Consider adding red and white striped candy cane accents.
- Rustic Farmhouse: Opt for natural materials like wood or wood-grained cardboard. Paint in muted tones like cream, grey, or barn red. Add miniature fences made from twigs, a tiny wheelbarrow, or faux greenery for a charming country feel.
- Winter Wonderland Chalet: Use icy blues, silvers, and whites. Add faux snow (cotton batting or baking soda mixed with glue) to the roof and eaves. Incorporate miniature pinecones, frosted branches, and perhaps even tiny icicle embellishments.
- Victorian Dollhouse: For intricate detail lovers. Use rich colors like deep red, forest green, or navy blue. Add tiny decorative trim pieces, miniature window panes, and perhaps a tiny porch swing. Consider adding faux lace for a delicate touch.
- Nordic-Inspired Cabin: Emphasize natural wood tones or simple white paint. Add minimal but impactful details like a single miniature wreath on the door, a tiny chimney with faux smoke (cotton balls), and natural twine accents.
- Magical Fairy House: Think whimsical and enchanting. Use iridescent paints, glitter, and tiny fairy lights. Incorporate miniature mushrooms, tiny flowers, and perhaps even a small fairy figurine peeking out of a window.
Troubleshooting Common DIY Topper Challenges
Even with careful planning, DIY projects can present challenges. Addressing these proactively will ensure a smoother crafting experience.
- Topper is Too Heavy: If your house topper is proving to be heavier than anticipated, reassess your material choices. Consider using lighter alternatives like foam board instead of thick wood, or hollow out dense areas. Ensure your tree can support the weight; a very heavy topper on a flimsy tree is a recipe for disaster. Reinforce the attachment point with extra glue or a stronger anchoring method.
- Topper is Unstable: This is the most common issue. Double-check your attachment method. Is the wire or dowel firmly secured to the topper? Is it adequately anchored into the tree? For wire attachments, ensure the wire is long enough and has enough "give" to be wrapped securely around a branch. For dowels, ensure it’s deeply inserted into the tree. Consider adding a secondary wire support that anchors the topper to a higher branch.
- Paint is Not Adhering Well: Ensure your surfaces are clean and dry before painting. For slick surfaces like plastic or some types of cardboard, a primer specifically designed for that material can significantly improve paint adhesion. Allow ample drying time between coats.
- Glue is Not Holding: Use the appropriate glue for your materials. Hot glue is fast but can be brittle. Wood glue is strong for wood but takes time to dry. Craft glue is good for paper and embellishments. For heavy items, consider epoxy for maximum strength. Ensure surfaces are clean and dry before applying glue.
- Design Looks Flat: Add dimension! Use layering techniques with different materials. Cut out window frames and attach them to the house. Create a small chimney that actually protrudes from the roof. Use puff paint or textured mediums to create depth for details like snow or brickwork.
Conclusion: A Personalized Statement of Holiday Cheer
Crafting your own DIY house Christmas tree topper is a rewarding endeavor that transforms a simple holiday decoration into a deeply personal statement of festive spirit. From humble beginnings with cardboard and glue to more intricate creations involving wood and clay, the possibilities for personalization are endless. By carefully considering design, material selection, and secure attachment, you can create a unique and memorable centerpiece that will undoubtedly become a cherished part of your family’s holiday traditions. The joy lies not just in the finished product, but in the creative process itself, the satisfaction of bringing your vision to life, and the enduring charm of a house that brings a little extra warmth and whimsy to the very top of your Christmas tree. Each handcrafted topper tells a story, a miniature architectural marvel imbued with the love and care of its creator, making it a truly special addition to any holiday display.
