How to make a drip cake sets the stage for this enthralling narrative, offering readers a glimpse into a story that is rich in detail with personal blog style and brimming with originality from the outset.
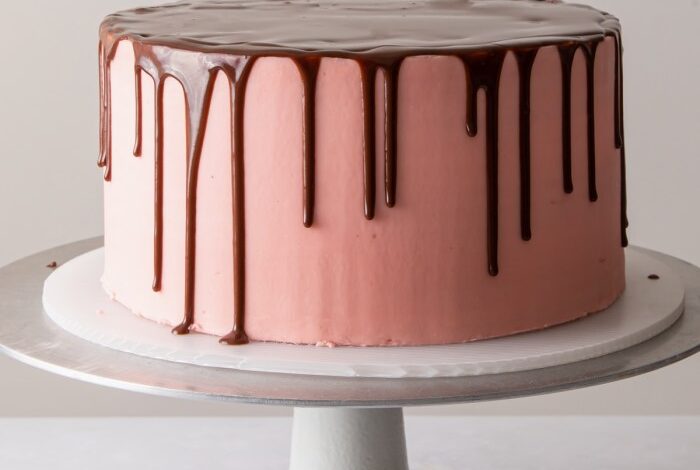
Drip cakes are a beautiful and delicious dessert that’s perfect for any occasion. They’re known for their dramatic, flowing glaze that creates a stunning visual effect. But don’t let the intricate look fool you – making a drip cake is easier than you think! In this post, we’ll guide you through every step, from baking the cake to creating the perfect drip glaze.
Understanding Drip Cake Basics: How To Make A Drip Cake

Drip cakes are a delightful and visually stunning dessert that has become increasingly popular in recent years. They feature a smooth, frosted cake base with a luscious, flowing “drip” of icing, ganache, or other decorative elements cascading down the sides.
Making a drip cake is all about the details, from the perfectly smooth frosting to the dramatic, cascading drips. For a truly luxurious touch, consider adding a homemade whipped rose shaving cream to the mix. It’s a surprisingly easy DIY project, with instructions you can find here , and the subtle floral scent adds a touch of elegance to the finished cake.
Just remember to keep the shaving cream chilled for the best results, and your drip cake will be the star of the show!
This creates a dramatic and eye-catching effect, making drip cakes a perfect choice for special occasions or everyday celebrations.
Making a drip cake is all about achieving that perfect, cascading chocolate, but sometimes the process can feel a bit messy. It’s like trying to keep up with the constant stream of misinformation on social media, which is why I think the article on probeat twitter should bantrump makes a valid point.
Maybe if we could clean up the internet, we could focus on the important things, like perfecting our drip cake techniques!
Types of Drip Cakes
The beauty of drip cakes lies in their versatility. You can customize them to fit any theme or occasion. Here are some popular types of drip cakes:
- Classic Drip Cake:This is the most basic type, featuring a simple cake base with a single layer of drip. The drip can be made with various icings, such as buttercream, ganache, or fondant. It’s a timeless choice for any celebration.
- Double Drip Cake:This variation features two layers of drip, creating a more dramatic and decadent look. The drips can be of different colors, textures, or flavors, allowing for endless customization.
- Ombre Drip Cake:This trendy style features a gradual transition of color in the drip, creating a soft and elegant effect. The ombre effect can be achieved using different shades of the same color or contrasting colors.
- Naked Drip Cake:This type showcases the natural beauty of the cake by using minimal frosting and a thin layer of drip. The cake’s layers are visible, adding a rustic and elegant touch.
- Tiered Drip Cake:For grand occasions, tiered drip cakes are a showstopper. They feature multiple layers of cake with cascading drips, creating a majestic and impressive centerpiece.
Choosing the Right Cake Base, How to make a drip cake
The foundation of any drip cake is the cake base. Choosing the right base is crucial for ensuring a delicious and visually appealing result.
- Flavor Profile:Consider the flavors of the cake and the drip. For example, a chocolate cake base pairs well with a chocolate ganache drip, while a vanilla cake base complements a fruity glaze.
- Texture:The texture of the cake should complement the drip. A moist and dense cake, like a pound cake, holds up well to a heavier drip, while a lighter cake, like a sponge cake, might benefit from a thinner drip.
- Shape and Size:The shape and size of the cake base will determine the overall look and feel of the drip cake. Round cakes are classic and versatile, while square or rectangular cakes offer a modern touch. The size should be appropriate for the occasion and the number of guests.
Making a drip cake is all about the details, just like creating a stunning centerpiece for your home. A touch of vintage charm can really elevate the look, and I love how a a vintage planter cacti garden can bring a touch of the desert to any room.
Just like the way you can use different colors and textures to make your drip cake stand out, a vintage planter garden offers endless possibilities for personalization, making it a unique and beautiful statement piece.
Preparing the Cake Base

The foundation of any spectacular drip cake is a perfectly baked and frosted cake. Choosing the right cake recipe and frosting technique will ensure your cake is both delicious and visually stunning. Let’s dive into the details.
Choosing the Right Cake Recipe
The ideal cake for a drip cake should be moist, dense, and hold its shape well after frosting. It should also be flavorful enough to complement the sweet and often tangy drip. Here are some popular cake recipes that work well:
- Vanilla Cake:A classic choice that provides a blank canvas for various flavors and decorations.
- Chocolate Cake:A rich and decadent base that pairs beautifully with chocolate or caramel drips.
- Red Velvet Cake:Offers a unique flavor and a beautiful red hue that contrasts beautifully with white or cream-colored drips.
- Carrot Cake:Provides a moist and slightly spicy base that pairs well with cream cheese frosting and a variety of drips.
Adding Flavor and Texture with Fillings
Adding a layer of filling to your cake base can add extra flavor and moisture. Here are some filling ideas:
- Classic Buttercream:A simple yet delicious option that complements most cake flavors.
- Chocolate Ganache:Rich and decadent, perfect for chocolate cakes or any cake with a chocolate drip.
- Cream Cheese Frosting:A tangy and creamy filling that works well with carrot cake or red velvet cake.
- Fruit Curd:Adds a burst of fresh flavor and acidity, particularly with vanilla or lemon cakes.
Frosting the Cake Base
Achieving a smooth and flawless frosting finish is crucial for a professional-looking drip cake. Here’s a step-by-step guide:
- Prepare the Frosting:Choose a frosting that will hold its shape well, such as buttercream, Swiss meringue buttercream, or cream cheese frosting. Ensure the frosting is at room temperature for easier spreading.
- Crumb Coat:Apply a thin layer of frosting to the entire cake, covering all the crumbs. This will create a smooth base for the final frosting layer. Refrigerate for 15-20 minutes to allow the crumb coat to set.
- Final Frosting:Apply a generous layer of frosting to the cake, smoothing it with a bench scraper or offset spatula. Use gentle, sweeping motions to achieve a smooth finish. For a perfectly level surface, use a cake turntable to rotate the cake as you frost.
- Chill the Cake:Refrigerate the frosted cake for at least 30 minutes to allow the frosting to firm up before applying the drip.
Creating the Drip Glaze
The drip glaze is the star of the show! It adds that captivating cascade of color and texture that makes a drip cake so irresistible. It’s all about achieving the perfect consistency
- not too thick, not too thin
- to create those mesmerizing drips.
Types of Drip Glaze Ingredients
The type of drip glaze you choose will depend on the flavor profile and aesthetic you’re aiming for.
- Chocolate:The classic choice, offering a rich, decadent flavor and a beautiful glossy finish. You can use dark, milk, or white chocolate, each lending its unique flavor and color.
- White Chocolate:Provides a smooth, creamy base that’s perfect for vibrant colors. It’s versatile and allows you to create a range of stunning shades.
- Candy Melts:These pre-made, temperature-stable melts are convenient for creating drip glazes. They come in a wide variety of colors and are easy to work with.
- Buttercream:This option is a bit more forgiving than chocolate and offers a softer, less glossy finish. It’s ideal for a rustic or casual look.
Preparing a Chocolate Drip Glaze
Chocolate drip glaze is a timeless classic. Here’s how to create a perfect one:
- Melt the Chocolate:Chop the chocolate into small pieces and melt it gently over a double boiler or in the microwave. The goal is to create a smooth, consistent melt.
- Add Butter:Stir in a tablespoon of unsalted butter. This will help to create a smoother, more flowing glaze.
- Incorporate Flavor:Add a teaspoon of vanilla extract or your preferred flavoring.
- Thin with Cream:Gradually add heavy cream, a tablespoon at a time, until you achieve the desired consistency. You want it to be thick enough to coat the back of a spoon but thin enough to drip smoothly.
- Strain:Strain the glaze through a fine-mesh sieve to remove any lumps.
White Chocolate Drip Glaze Recipe
This recipe creates a vibrant white chocolate glaze that’s perfect for a range of colors:
Ingredients:* 1 cup white chocolate chips
- 1/4 cup heavy cream
- 1 tablespoon unsalted butter
- 1 teaspoon vanilla extract
- Food coloring (optional)
Instructions:
- Melt the white chocolate chips in a double boiler or in the microwave, stirring until smooth.
- Stir in the heavy cream, butter, and vanilla extract until fully combined.
- If desired, add a few drops of food coloring to achieve your desired shade.
- Let the glaze cool slightly before using. It will thicken as it cools.
Applying the Drip Glaze
The moment of truth has arrived! You’ve prepped your cake, created your perfect glaze, and now it’s time to bring it all together. Applying the drip glaze is the final touch that transforms your cake into a masterpiece. This step might seem daunting, but with a little practice and these tips, you’ll be creating stunning drips in no time.
Applying the Drip Glaze
This step requires a steady hand and a bit of patience. Here’s a breakdown of the process:
- Chill the Glaze:Before you start, chill your glaze in the refrigerator for about 15-20 minutes. This will help it thicken slightly, making it easier to control and create a smooth drip.
- Prepare the Cake:Ensure your cake is completely cooled and leveled. If you’re using a turntable, now is the time to place your cake on it.
- Spoon the Glaze:Carefully spoon the glaze onto the center of the cake, allowing it to cascade down the sides. You can use a spoon, a piping bag, or even a squeeze bottle for more control.
- Spread the Glaze:Once the glaze is poured, use a spoon or an offset spatula to gently spread the glaze around the cake. This will help to create a smooth and even base for your drip effect.
- Tilt the Cake:This is where the magic happens! Gently tilt the cake to encourage the glaze to drip down the sides. You can do this by rotating the cake slowly on a turntable or by carefully tilting it by hand.
Troubleshooting Common Drip Glaze Issues
Even the most experienced bakers can encounter a few hiccups when applying drip glaze. Here are some common issues and how to address them:
- Glaze is Too Thin:If your glaze is too thin, it will drip too quickly and may not create a defined drip effect. To fix this, add a bit more powdered sugar or cocoa powder to your glaze and whisk it until it reaches the desired consistency.
- Glaze is Too Thick:If your glaze is too thick, it may not drip at all. To remedy this, add a little bit of milk or water to your glaze and whisk until it becomes more fluid.
- Glaze is Not Smooth:If your glaze has lumps or air bubbles, they can create an uneven drip effect. To prevent this, strain the glaze through a fine-mesh sieve before applying it to the cake.
- Glaze is Sticking to the Spatula:This can happen if the glaze is too thick or if it has been chilled for too long. To prevent this, lightly grease your spatula with a bit of vegetable shortening or butter.