
Transform Your IKEA PAX Wardrobe: A Comprehensive Guide to Customization with Trim
Elevate the aesthetic of your IKEA PAX wardrobe from standard to statement piece by integrating custom trim. This often-overlooked design element provides a sophisticated and personalized finish, seamlessly blending your furniture with your existing décor. While IKEA PAX wardrobes are renowned for their modularity and affordability, the addition of trim offers a bespoke touch that can significantly enhance their visual appeal and perceived value. This guide delves into the various trim options, their application, and essential considerations for achieving a professional, high-end look.
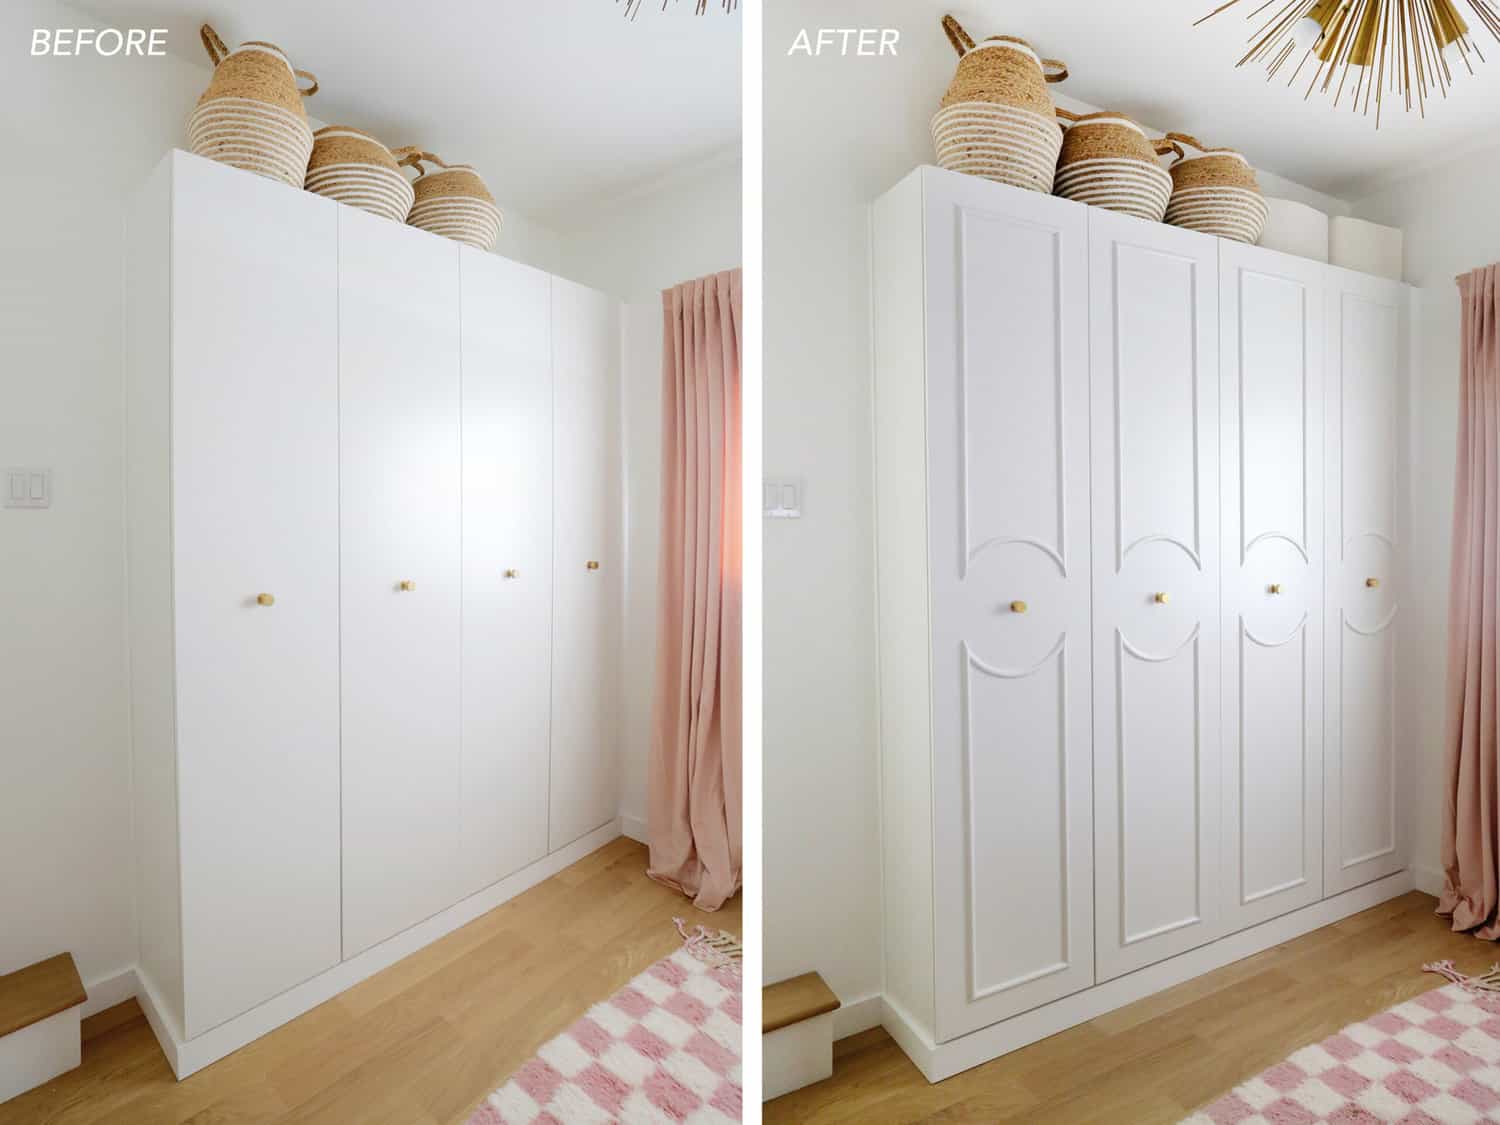
The primary goal of adding trim to your IKEA PAX wardrobe is to mask the utilitarian edges and seams inherent in flat-pack furniture, transforming a functional storage solution into a stylish focal point. Trim can mimic the look of custom millwork, adding architectural detail that makes your wardrobe appear built-in and significantly more expensive than its original cost. The type of trim you choose will heavily influence the overall style you achieve, from modern minimalism to classic elegance.
For a contemporary and sleek aesthetic, consider flat trim molding. This type of trim is characterized by its simple, unadorned profile and can be applied directly to the flat surfaces of the PAX wardrobe doors. It’s an excellent choice for minimalist interiors, as it adds a subtle layer of dimension without overwhelming the design. Options include simple rectangular profiles or slightly beveled edges. When selecting flat trim, opt for materials like MDF (medium-density fiberboard) or primed wood, which are easily painted to match your desired color scheme. The key here is precise measurement and application to create clean, sharp lines that accentuate the modern feel of the wardrobe.
If your style leans towards traditional or transitional, consider adding crown molding or decorative profile moldings. Crown molding, typically applied along the top edge of the wardrobe, can create the illusion of a custom built-in cabinet, especially when combined with matching base molding. Decorative profile moldings offer a vast array of intricate designs, from simple ogee curves to more elaborate egg-and-dart patterns. These can be applied to the doors in various configurations to create paneling effects, mimicking the look of shaker doors or more ornate styles. When using decorative moldings, consider the scale of your room and the wardrobe itself; oversized moldings can feel imposing in smaller spaces, while delicate profiles might get lost in a grander room.
Another popular and highly effective trim application is creating a paneled door effect. This involves strategically applying narrower strips of trim to the PAX doors to divide them into individual panels. This technique can dramatically alter the appearance of the standard PAX doors, transforming them into elegant shaker-style or even more traditional raised-panel doors. For shaker-style panels, use flat trim or simple rectangular molding to create a clean border around a central recessed or slightly raised area (which can be achieved by leaving the original door surface as is or by applying a thin piece of plywood or MDF within the trim border). For a more detailed look, consider using ogee or other decorative profiles for the inner edges of the panels. The spacing and width of your trim strips will dictate the final visual impact. Experiment with different layouts on paper or by temporarily holding trim pieces against the door before committing to adhesive or fasteners.
The material of your trim is a crucial decision. MDF is an affordable and versatile option, readily available and easy to work with. It paints beautifully, providing a smooth, uniform finish. However, MDF can be susceptible to moisture damage, so it’s best suited for dry environments. Solid wood, such as pine or poplar, offers greater durability and a more premium feel. It can also be stained for a natural wood look or painted. However, solid wood can be more expensive and may require more careful handling during installation to avoid warping. If you’re aiming for a painted finish, both MDF and primed wood are excellent choices. For stained finishes, select high-quality solid wood.
The application of trim can be achieved through several methods, each with its pros and cons. Adhesive is a popular choice for lighter trim profiles and for those who want to avoid drilling holes in their PAX wardrobe. High-strength construction adhesive, such as Liquid Nails or E-6000, can provide a secure bond. Ensure surfaces are clean and dry before applying the adhesive. For heavier trim or for added security, especially with crown molding or extensive paneling, mechanical fasteners are recommended. Small brad nails or finishing nails, driven by a nail gun, are ideal. Predrilling pilot holes, especially in MDF or particleboard, will prevent splitting. Once nailed, the nail holes can be filled with wood filler and then sanded smooth before painting.
Before you begin cutting and applying trim, meticulous planning and precise measurement are paramount. Measure your PAX wardrobe doors and side panels carefully. Account for any existing hardware or design elements on the doors. Sketch out your desired trim design on paper, noting the exact dimensions and placement of each trim piece. This visual representation will not only help you confirm your design but also serve as a blueprint during the installation process. Utilize a tape measure and a carpenter’s square to ensure all cuts are straight and all placements are level and plumb.
Cutting your trim accurately is critical for a professional finish. A miter saw is the ideal tool for achieving precise angled cuts, particularly for corner joints and decorative patterns. A standard handsaw with a miter box can also be used, but it requires more skill and patience to achieve clean, accurate angles. For straight cuts, a circular saw or even a miter box with a handsaw will suffice. Always use a sharp blade for clean cuts that require minimal sanding. Sanding cut edges smooth before application will ensure a seamless fit against the wardrobe surface.
When applying trim, start with the longest or most prominent pieces first, such as baseboards or crown molding. Work your way inwards, completing smaller details last. For paneled doors, consider laying out the trim pieces on a flat surface first to confirm your layout before adhering or nailing them to the door. Use painter’s tape to temporarily hold trim pieces in place while adhesive sets or while you’re marking for nail placement. This also helps protect the surface of your PAX wardrobe from accidental scratches or adhesive drips.
Painting is often the final and most impactful step in customizing your PAX wardrobe with trim. If you’ve used MDF or primed wood trim, you’ll want to apply a primer before your topcoat. A good quality primer will ensure even paint adhesion and a smooth, durable finish. For a flawless painted finish, multiple thin coats are better than one thick coat. Sand lightly between coats with fine-grit sandpaper (220 grit or higher) to remove any imperfections and ensure a silky-smooth surface. Choose a paint that complements your room’s color palette. Semi-gloss or satin finishes are generally recommended for wardrobes as they are more durable and easier to clean than matte finishes.
Don’t overlook the potential for adding trim to the sides of your PAX wardrobe, especially if it’s not installed flush against a wall. Applying trim to the exposed side panels can further enhance the built-in look, making the wardrobe appear as a seamless part of the room’s architecture. This is particularly effective if you’re aiming to create the illusion of a custom closet system.
Consider the scale and proportion of your chosen trim. Overly large or intricate trim can overwhelm a small room or a minimalist wardrobe. Conversely, very thin or plain trim might not make a significant enough visual impact on a large wardrobe in a grand space. It’s often helpful to find inspiration images online or in interior design magazines and analyze the trim styles used in similar settings.
For a truly seamless look, ensure the trim you choose is the same thickness as the edge of your PAX doors or panels. This will prevent the trim from creating an awkward lip or projection. If your trim is thinner, you might consider adding a layer of thin plywood or hardboard behind it to create a flush surface, though this adds complexity.
The type of PAX doors you have will also influence your trim application. For example, the Fornsiktig doors, with their subtle texture, might benefit from simpler, more modern trim. The highly popular Bergsbo doors, with their clean lines, are excellent candidates for shaker-style paneling. If you have the Hemnes doors, with their more traditional detailing, you might opt for more ornate crown molding or decorative profiles.
A common mistake is rushing the process. Take your time with measuring, cutting, and applying the trim. Patience will result in a much more professional and satisfying outcome. Once the trim is applied and painted, the transformation of your IKEA PAX wardrobe will be remarkable, offering a custom look that elevates your storage and enhances your home’s interior design. The investment in time and a few basic tools will yield a highly personalized and sophisticated piece of furniture that feels truly your own.
